JeepParts
My Garage
My Account
Cart
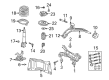
OEM 2006 Dodge Grand Caravan Control Arm Bushing
Suspension Arm Bushing- Select Vehicle by Model
- Select Vehicle by VIN
Select Vehicle by Model
orMake
Model
Year
Select Vehicle by VIN
For the most accurate results, select vehicle by your VIN (Vehicle Identification Number).
3 Control Arm Bushings found


2006 Dodge Grand Caravan Lower Control Arm Bushing Part Number: 4684120
$13.54 MSRP: $24.00You Save: $10.46 (44%)Ships in 1-2 Business DaysProduct Specifications- Other Name: Bushing - Pivot; Suspension Control Arm Bushing; Control Arm Bushing; Axle Pivot Bushing; Lower Control Arm Front Bushing; Spring Front Bushing; Bushings; Arm, Front Lower Control (LCA) , Right; Bushing Pivot
- Item Weight: 1.20 Pounds
- Item Dimensions: 2.9 x 1.9 x 1.6 inches
- Condition: New
- Fitment Type: Direct Replacement
- SKU: 4684120
- Warranty: This genuine part is guaranteed by Mopar's factory warranty.


2006 Dodge Grand Caravan Lower Control Arm Bushing Part Number: 4743556AA
$24.46 MSRP: $37.90You Save: $13.44 (36%)Ships in 1-2 Business DaysProduct Specifications- Other Name: Bushing - Pivot; Suspension Control Arm Bushing; Control Arm Bushing; Axle Pivot Bushing; Lower Control Arm Rear Bushing; Bushings; Bushing Pivot
- Item Weight: 0.80 Pounds
- Item Dimensions: 2.7 x 2.6 x 2.4 inches
- Condition: New
- Fitment Type: Direct Replacement
- SKU: 4743556AA
- Warranty: This genuine part is guaranteed by Mopar's factory warranty.
 Product Specifications
- Other Name: Bushing - Pivot; Control Arm Bushing; Axle Pivot Bushing; Bushings; Bushing Lower Control Arm; Bushing Pivot
- Item Weight: 0.90 Pounds
- Condition: New
- Fitment Type: Direct Replacement
- SKU: 4743095AA
- Warranty: This genuine part is guaranteed by Mopar's factory warranty.
2006 Dodge Grand Caravan Control Arm Bushing Parts and Q&A
- Q: How to Service and Repair a Control Arm Bushing on 2006 Dodge Grand Caravan?A: While working on the bushing, support the lower control arm in a vise and do not add grease or lubricant where the bushing will go, since this might lessen its grip. Hydro-bushings and control arm grooves in your vehicle are different for the right and left sides: on the left, the bushing master spline and control arm groove are on top, while they are on the bottom for the right. Guide the outer end of the master spline onto the lower control arm bushing groove and push the bushing upward by hand onto the motor mount stem. Following this, have Remover/Installer installed over the bushing and lower control arm, so that Bridge, Special Tool 8460-1, engages the flange on the lower control arm with its tips, while Installer Cup, Special Tool 8460-2, fits against the back of the bushing. Tighten the forcing screw slowly until the bushing is nearly level with the control arm flange and as you tighten, use Spacer Plate, Special Tool 8460-4 between the flange and the sleeve to hold the stem. Attach the bush in place against the Spacer Plate and tighten the bridge forcing screw using a torque wrench until about 50 Nm (37 ft. lbs.) of torque is on the screw. Afterward, unwind the forcing screw, pull out the tool and fit the lower control arm on the car.
Related 2006 Dodge Grand Caravan Parts
 2006 Dodge Grand Caravan Axle Beam Mount
 2006 Dodge Grand Caravan Axle Support Bushings
 2006 Dodge Grand Caravan Bump Stop
 2006 Dodge Grand Caravan Coil Springs
 2006 Dodge Grand Caravan Control Arm
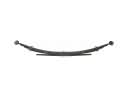 2006 Dodge Grand Caravan Leaf Spring
 2006 Dodge Grand Caravan Leaf Spring Bushing
 2006 Dodge Grand Caravan Shock Absorber
 2006 Dodge Grand Caravan Shock And Strut Mount
 2006 Dodge Grand Caravan Sway Bar Bushing
 2006 Dodge Grand Caravan Sway Bar Kit
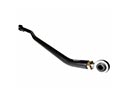 2006 Dodge Grand Caravan Track Bar