JeepParts
My Garage
My Account
Cart
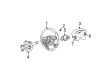
OEM 2006 Dodge Grand Caravan Steering Wheel
Navigation Steering Wheel- Select Vehicle by Model
- Select Vehicle by VIN
Select Vehicle by Model
orMake
Model
Year
Select Vehicle by VIN
For the most accurate results, select vehicle by your VIN (Vehicle Identification Number).
6 Steering Wheels found

2006 Dodge Grand Caravan Steering Wheel Part Number: WF80ZJ8AD
Product Specifications- Other Name: Wheel - Steering
- Replaces: WF80ZJ8AC
- Item Weight: 4.70 Pounds
- Condition: New
- Fitment Type: Direct Replacement
- SKU: WF80ZJ8AD
- Warranty: This genuine part is guaranteed by Mopar's factory warranty.
2006 Dodge Grand Caravan Steering Wheel, Gray Part Number: WF79XDVAD
Product Specifications- Other Name: Wheel - Steering
- Replaces: WF79XDVAC
- Item Weight: 3.20 Pounds
- Item Dimensions: 15.6 x 15.4 x 5.1 inches
- Condition: New
- Fitment Type: Direct Replacement
- SKU: WF79XDVAD
- Warranty: This genuine part is guaranteed by Mopar's factory warranty.
2006 Dodge Grand Caravan Steering Wheel Part Number: WF79ZJ8AD
Product Specifications- Other Name: Wheel - Steering
- Replaces: WF79ZJ8AC
- Item Weight: 4.40 Pounds
- Condition: New
- Fitment Type: Direct Replacement
- SKU: WF79ZJ8AD
- Warranty: This genuine part is guaranteed by Mopar's factory warranty.
2006 Dodge Grand Caravan Steering Wheel, Gray Part Number: WF801DVAD
Product Specifications- Other Name: Wheel - Steering
- Replaces: WF801DVAC
- Item Weight: 4.30 Pounds
- Item Dimensions: 15.8 x 15.8 x 6.2 inches
- Condition: New
- Fitment Type: Direct Replacement
- SKU: WF801DVAD
- Warranty: This genuine part is guaranteed by Mopar's factory warranty.
2006 Dodge Grand Caravan Steering Wheel, Gray Part Number: 1AP391DVAA
Product Specifications- Other Name: Wheel - Steering; Wheel Steering
- Item Weight: 4.10 Pounds
- Condition: New
- Fitment Type: Direct Replacement
- SKU: 1AP391DVAA
- Warranty: This genuine part is guaranteed by Mopar's factory warranty.
2006 Dodge Grand Caravan Steering Wheel Part Number: 1AP391J8AA
Product Specifications- Other Name: Wheel - Steering; Wheel Steering
- Item Weight: 4.10 Pounds
- Condition: New
- Fitment Type: Direct Replacement
- SKU: 1AP391J8AA
- Warranty: This genuine part is guaranteed by Mopar's factory warranty.
2006 Dodge Grand Caravan Steering Wheel Parts and Q&A
- Q: How to Safely Remove and Install a Steering Wheel on 2006 Dodge Grand Caravan?A: Before taking out the steering wheel, break the connection between the negative battery cable and the car and let two minutes pass so the air bag system reserve capacitor discharges. Loosen the mounting screws for the driver air bag, lift the air bag from its mount and unplug the two air bag squib, speed control and horn connectors and then keep it properly stored. After that, take out the steering wheel retaining bolt and damper and when the car is equipped, detach the remote audio control switch wiring from the Clock Spring. Don't bump or hammer the steering column as you try to remove it and be careful not to push threaded bolts into the Clock Spring more than half an inch from the back of the steering wheel while removing it. Holding the steering wheel straight ahead, fit the puller under the steering wheel and then use it to remove the steering wheel from the shaft. You may also want to remove the puller and any remote radio switches when you can. If remote radio switches are needed, make sure not to force the steering wheel onto the steering column shaft when you install them. Through the upper access hole on the steering wheel, send the wires from the Clock Spring and, before sliding the wheel on, make sure that the master notches line up with the missing spline on the shaft. Check the damper for damage before mounting it on the steering wheel and then tighten the retaining bolt with 61 Nm (45 ft. lbs.) value. When the vehicle includes remote audio controls, add wires from those to the Clock Spring and join the air bag squib wirings and the horn and speed control switch wiring. Insert the driver air bag into the steering wheel, then tighten each screw to 10 Nm (90 inch lbs.) of torque. After that, connect the negative battery cable again and operate the gear shifter, the headlight indicator switch and wiper and window buttons to confirm everything on the steering wheel is working as it should before taking the updated car on the road.
Related 2006 Dodge Grand Caravan Parts
 2006 Dodge Grand Caravan Power Steering Pump
 2006 Dodge Grand Caravan Power Steering Reservoir
 2006 Dodge Grand Caravan Rack And Pinion
 2006 Dodge Grand Caravan Power Steering Hose
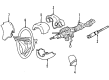
 2006 Dodge Grand Caravan Steering Column
 2006 Dodge Grand Caravan Steering Column Cover
 2006 Dodge Grand Caravan Steering Gear Box
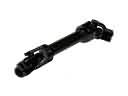 2006 Dodge Grand Caravan Steering Shaft
 2006 Dodge Grand Caravan Tie Rod End