JeepParts
My Garage
My Account
Cart
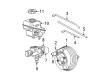
OEM 2006 Dodge Magnum Brake Master Cylinder
- Select Vehicle by Model
- Select Vehicle by VIN
Select Vehicle by Model
orMake
Model
Year
Select Vehicle by VIN
For the most accurate results, select vehicle by your VIN (Vehicle Identification Number).
2 Brake Master Cylinders found

2006 Dodge Magnum Master Cylinder Part Number: 5139153AA
$160.42 MSRP: $203.36You Save: $42.94 (22%)Ships in 1-2 Business DaysProduct Specifications- Other Name: Master Cylinder - Brake; Brake Master Cylinder; Master Cylinder Brake
- Item Weight: 1.80 Pounds
- Condition: New
- Fitment Type: Direct Replacement
- SKU: 5139153AA
- Warranty: This genuine part is guaranteed by Mopar's factory warranty.
2006 Dodge Magnum Master Cylinder Part Number: 5139148AA
$367.60 MSRP: $465.99You Save: $98.39 (22%)Ships in 1-2 Business DaysProduct Specifications- Other Name: Master Cylinder - Brake; Brake Master Cylinder; Master Cylinder Brake
- Item Weight: 1.80 Pounds
- Condition: New
- Fitment Type: Direct Replacement
- SKU: 5139148AA
- Warranty: This genuine part is guaranteed by Mopar's factory warranty.
2006 Dodge Magnum Brake Master Cylinder Parts and Q&A
- Q: How to Remove and Install a Brake Master Cylinder on 2006 Dodge Magnum?A: With the engine running, pump the brake pedal many times until you get a firm spot and after that, disconnect the negative battery cable. Pull off the access panel in the cowl area so that you can access the master cylinder, then clean every surface of the brake reservoir and master cylinder using Mopar. A product to clean brake parts. Take the wiring harness connector from the brake fluid level sensor and, if you have Electronic Stability Program, pull the connector from the pressure switch. Take the ends of the primary and secondary brake tubes off the master cylinder and use sealing plugs in the open ports where the brake tubes emerge. Clean both the master cylinder and the vacuum booster well, then unfasten and remove the two bolts between the master cylinder and the power brake booster assembly to free the master cylinder. Take care to remove the vacuum seal from the back of the master cylinder and then install a new one. For taking apart the brake system, clean the master cylinder and fluid container and if the vehicle has Electronic Stability Program, remove the pressure switch. Suck out the brake fluid from the reservoir with a syringe, then unscrew the bolt fixing the reservoir to the master cylinder housing and move the reservoir back and forth to remove it from its place. Get rid of the brake fluid reservoir seal grommets from the master cylinder housing. Be sure to place new grommets in the brass piston area, apply a small amount of fresh brake fluid at the reservoir mounting point and settle the reservoir into the grommets. Screw in the plastic reservoir mount and tighten it to 28 Nm. If aworld reliability The Electronic Stability Program is installed, insert the pressure switch and tighten it to 28 Nm. Bleeding the master cylinder several times after you replace it ensures the rear of it receives a new vacuum seal. Place the master cylinder on the power brake booster and push the booster push rod toward it to place the piston correctly, then secure the connection with the two nuts, torqued to 25 Nm. Slide the primary and secondary brake tubes into the openings of the master cylinder and fasten the tube nuts until they reach 20 Nm of tightness. When an Electronic Stability Program is installed, link the wiring harness to both the pressure switch and brake fluid level switch. Place the negative battery lead back and now fill the master cylinder reservoir with clean Mopar fluid. Use Brake Fluid and then attach the access panel again. Check the strength of the brake pedal before starting the car and get on the road to make sure the brakes are working nicely.
Related 2006 Dodge Magnum Parts
 2006 Dodge Magnum ABS Control Module
 2006 Dodge Magnum Brake Booster
 2006 Dodge Magnum Brake Caliper Bracket
 2006 Dodge Magnum Brake Caliper Piston
 2006 Dodge Magnum Brake Disc
 2006 Dodge Magnum Brake Dust Shield
 2006 Dodge Magnum Brake Line
 2006 Dodge Magnum Brake Pad
 2006 Dodge Magnum Hydraulic Hose
 2006 Dodge Magnum Parking Brake Cable
 2006 Dodge Magnum Wheel Bearing Dust Cap
 2006 Dodge Magnum Wheel Stud