JeepParts
My Garage
My Account
Cart
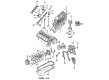
OEM 2006 Jeep Grand Cherokee Rod Bearing
Engine Connecting Rod Bearing- Select Vehicle by Model
- Select Vehicle by VIN
Select Vehicle by Model
orMake
Model
Year
Select Vehicle by VIN
For the most accurate results, select vehicle by your VIN (Vehicle Identification Number).
3 Rod Bearings found


2006 Jeep Grand Cherokee Connecting Rod Bearing Part Number: 68207790AA
$6.32 MSRP: $7.70You Save: $1.38 (18%)Product Specifications- Other Name: Bearing Package - Connecting Rod; Rod Bearing; Bearing; Bearings; Bearing Kit Connecting Rod Standard
- Replaces: 5086003AB
- Item Weight: 0.50 Pounds
- Item Dimensions: 3.8 x 2.6 x 1.8 inches
- Condition: New
- Fitment Type: Direct Replacement
- Require Quantity: 10
- SKU: 68207790AA
- Warranty: This genuine part is guaranteed by Mopar's factory warranty.


2006 Jeep Grand Cherokee Bearings Part Number: 68052222AB
$18.13 MSRP: $26.80You Save: $8.67 (33%)Ships in 1-2 Business DaysProduct Specifications- Other Name: Bearing - Connecting Rod; Engine Connecting Rod Bearing Set; Connecting Rod Bearing Set; Rod Bearing; Bearing Kit Connecting Rod Standard See Note
- Replaces: 5019447AA, 68052222AA
- Item Weight: 0.50 Pounds
- Item Dimensions: 3.9 x 2.6 x 2.0 inches
- Condition: New
- Fitment Type: Direct Replacement
- Require Quantity: 6
- SKU: 68052222AB
- Warranty: This genuine part is guaranteed by Mopar's factory warranty.


2006 Jeep Grand Cherokee Bearings Part Number: 5012363AE
$16.87 MSRP: $25.00You Save: $8.13 (33%)Ships in 1-2 Business DaysProduct Specifications- Other Name: Bearing - Connecting Rod; Rod Bearing; Bearing Kit Connecting Rod Standard See Note; Bearing Kit Connecting Rod Standard
- Replaces: 5012363AC, 5012363AD, 5018584AB, 5012363AB
- Item Weight: 0.50 Pounds
- Item Dimensions: 4.0 x 2.7 x 2.0 inches
- Condition: New
- Fitment Type: Direct Replacement
- SKU: 5012363AE
- Warranty: This genuine part is guaranteed by Mopar's factory warranty.
2006 Jeep Grand Cherokee Rod Bearing Parts and Q&A
- Q: How to Inspect and Install Rod Bearings to Ensure Proper Alignment and Clearance on 2006 Jeep Grand Cherokee?A: Look for signs of scoring, normal wear patterns, grooves, fatigue and pitting on the connecting rod bearings and change out any bearing that seems worn abnormally. Look for damage, like scoring, nicks and burrs, on connecting rod journals, as misshapen or bent connecting rods can cause the parts around them to wear excessively. Should the connecting rod's wear or damage suggest misalignment, inspect and replace any connecting rods that are bent, twisted or misaligned. First, remove the oil from the connecting rod journal and then oil the upper bearing insert and fit it into the rod, placing it right in the center. Measure the distance at points A and B, checking it stays below 0.50 mm (0.0196 inch). Perform the piston ring compressor cycling and use the Guide Pins Special Tool 8507 to major and minor the pistons, so that the oil slinger slot in the rod is at the front and the "F"s on the piston point forward. First, install the lower bearing insert in the bearing cap, making sure it is in the center, then set a strip of Plastigage across the full width of the insert at its center. Install the bearing cap and connecting rod onto the journal and tighten the bolts to 27 Nm (20 ft. lbs.) turning them without rotating the crankshaft so as not to smear the Plastigage. Just after removing the bearing cap, examine the compressed Plastigage to find the bearing-to-journal clearance, making sure it matches the clearance suggested in the engine manual. When the space changes a bit, the reason behind it could be a tapered journal, a bent connecting rod or foreign objects caught between the insert and the cap/rod. If the clearance is proper, do not replace the bearing inserts; simply take out the Plastigage and move on to installing everything. In case the clearance is more than allowed, choose the recommended bearing set and never use the bolts from the connecting rods again as they are Torque to Yield Bolts and must be replaced after being loosened. Do the Plastigage test a second time before the last assembly to confirm the chosen bearing and after choosing the right insert, install it and the cover, tightening the bolts on the connecting rod to 27 Nm (20 ft. lbs.) plus a 90° turn. After that, measure the clearance between the connecting rod and crankshaft journal flange with a feeler gauge, compare it to the Engine Specifications and change the connecting rod if the clearance isn't within requirements.
Related 2006 Jeep Grand Cherokee Parts
 2006 Jeep Grand Cherokee Oil Filter
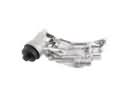 2006 Jeep Grand Cherokee Oil Filter Housing
 2006 Jeep Grand Cherokee Timing Chain
 2006 Jeep Grand Cherokee Rocker Arm
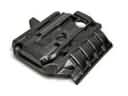 2006 Jeep Grand Cherokee Engine Cover
 2006 Jeep Grand Cherokee Cylinder Head
 2006 Jeep Grand Cherokee Dipstick
 2006 Jeep Grand Cherokee Crankshaft Pulley
 2006 Jeep Grand Cherokee Crankshaft Thrust Washer Set
 2006 Jeep Grand Cherokee Cylinder Head Gasket
 2006 Jeep Grand Cherokee Engine Mount Bracket
 2006 Jeep Grand Cherokee Timing Chain Tensioner