JeepParts
My Garage
My Account
Cart
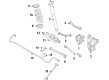
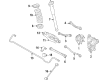
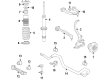
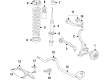
OEM 2007 Dodge Charger Sway Bar Kit
Stabilizer Sway Bar Set- Select Vehicle by Model
- Select Vehicle by VIN
Select Vehicle by Model
orMake
Model
Year
Select Vehicle by VIN
For the most accurate results, select vehicle by your VIN (Vehicle Identification Number).
6 Sway Bar Kits found


2007 Dodge Charger Stabilizer Bar, Rear Part Number: 4782873AB
$120.89 MSRP: $154.00You Save: $33.11 (22%)Ships in 1-2 Business DaysProduct Specifications- Other Name: Bar - Rear Suspension; Suspension Stabilizer Bar, Rear; Sway Bar; Stabilizer Bar Rear Suspension; Bar Rear Sway
- Position: Rear
- Item Weight: 6.20 Pounds
- Item Dimensions: 49.0 x 8.6 x 7.2 inches
- Condition: New
- Fitment Type: Direct Replacement
- SKU: 4782873AB
- Warranty: This genuine part is guaranteed by Mopar's factory warranty.

2007 Dodge Charger Stabilizer Bar, Rear Part Number: 4782871AB
$60.84 MSRP: $89.50You Save: $28.66 (33%)Ships in 1-3 Business DaysProduct Specifications- Other Name: Bar - Rear Sway; Suspension Stabilizer Bar, Rear; Sway Bar; Bar Rear Sway
- Position: Rear
- Item Weight: 7.40 Pounds
- Item Dimensions: 37.8 x 6.1 x 2.1 inches
- Condition: New
- Fitment Type: Direct Replacement
- SKU: 4782871AB
- Warranty: This genuine part is guaranteed by Mopar's factory warranty.


2007 Dodge Charger Stabilizer Bar, Front Part Number: 4782544AC
Product Specifications- Other Name: Bar - Front; Suspension Stabilizer Bar, Front; Sway Bar; Stabilizer Bar Front
- Position: Front
- Replaces: 4782544AB
- Item Weight: 15.60 Pounds
- Item Dimensions: 39.7 x 10.3 x 2.9 inches
- Condition: New
- Fitment Type: Direct Replacement
- SKU: 4782544AC
- Warranty: This genuine part is guaranteed by Mopar's factory warranty.

2007 Dodge Charger Stabilizer Bar, Front Part Number: 4782541AC
Product Specifications- Other Name: Bar - Front; Suspension Stabilizer Bar, Front; Sway Bar; Stabilizer Bar Front
- Position: Front
- Replaces: 4782541AB
- Item Weight: 11.30 Pounds
- Item Dimensions: 39.3 x 10.4 x 2.4 inches
- Condition: New
- Fitment Type: Direct Replacement
- SKU: 4782541AC
- Warranty: This genuine part is guaranteed by Mopar's factory warranty.

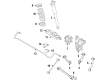
2007 Dodge Charger Stabilizer Bar, Rear Part Number: 4782872AB
Product Specifications- Other Name: Bar - Rear Suspension; Suspension Stabilizer Bar, Rear; Sway Bar; Stabilizer Bar Rear Suspension; Bar Rear Sway
- Position: Rear
- Item Weight: 5.80 Pounds
- Item Dimensions: 55.9 x 10.6 x 5.0 inches
- Condition: New
- Fitment Type: Direct Replacement
- SKU: 4782872AB
- Warranty: This genuine part is guaranteed by Mopar's factory warranty.

2007 Dodge Charger Stabilizer Bar, Front Part Number: 4782950AB
Product Specifications- Other Name: Bar - Front; Suspension Stabilizer Bar, Front; Sway Bar; Stabilizer Bar Front; Bar Front Sway
- Position: Front
- Item Weight: 19.30 Pounds
- Item Dimensions: 44.7 x 10.1 x 2.4 inches
- Condition: New
- Fitment Type: Direct Replacement
- SKU: 4782950AB
- Warranty: This genuine part is guaranteed by Mopar's factory warranty.
2007 Dodge Charger Sway Bar Kit Parts and Q&A
- Q: How to Service and Repair a Sway Bar Kit on 2007 Dodge Charger?A: To service and repair the sway bar kit, disconnect and isolate the battery negative cable on the battery post and then hoists and support the vehicle using jack stand. The wheel mounting nuts and tire and wheel assembly, on each side of the rear should be removed. The next step is taking out the rear exhaust system. When applying index marks put alignment marks on propeller shaft rubber coupler and axle flange and remove bolts and nuts of propeller shaft coupler to axle flange supporting propeller shaft by bungee cord attached to fuel tank straps. Unplugged the front parking brake cable at the point connected to the right rear parking brake cable, and remove the front parking brake cable at the equalizer and the screw that holds this routing bracket on the crossmember at the rear corner (front flange). Supposing that you have standard or premium disc brakes already fitted, loosen the disc brake caliper guide pin bolts and remove the brake caliper off the brake adapter and pads by guiding it over the suspension and prop it to ensure that you do not overstretch the brake hose. SRT8 disc brakes, a trim stick should be placed against the brake pad to get it to take a slight pressure which will ensure that the brake pad is bottomed out on the brake pad piston. In this instance, there should be a jack supporting the spring link so that this is out of the way and also have access to the brake caliper lower mounting bolt. Unbolt the lower and upper caliper mount, and carefully remove the brake caliper pack (with the pads on it) off the knuckle and away fro the brake rotor, hanging the assembly out of the way. Disconnect the wheel speed sensor connectors in the body wiring harness connector in the floor pan of the luggage compartment and un-clip the left wheel speed sensor cable in the routing clip. Unbolt, the lower shock absorber mounting bolt and nut on each side of the vehicle. On the body, mark the position of the rear crossmember where the four mounting points are, then jack stand the forward entry point of the engine cradle. Place a jack on the middle of the rear axle differential and lift it up to touch the differential and keep it still. Take out the fuel filler tube, then take out the front and the rear mounting bolts that hold the crossmember to it. Ease the crossmember out, just so it will release the propeller shaft from the rear axle differential, then lower it some more to the convenience of working on fasteners of the sway bar kit. Unbolt the sway bar kit braces to the sway bar link, then bolt the separating bolts fastened between each sway bar isolator retainer and the crossmember. Lastly, take out the sway bar kit with isolators and retainers and unplug the retainers to isolators and isolators to sway bar through the slits present in the bushings.
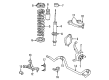
Related 2007 Dodge Charger Parts
 2007 Dodge Charger Control Arm
 2007 Dodge Charger Sway Bar Link
 2007 Dodge Charger Steering Knuckle
 2007 Dodge Charger Wheel Hub
 2007 Dodge Charger Axle Beam Mount
 2007 Dodge Charger Axle Pivot Bushing
 2007 Dodge Charger Control Arm Bolt
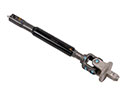 2007 Dodge Charger Intermediate Shaft
 2007 Dodge Charger Lateral Link
 2007 Dodge Charger Leaf Spring Bushing
 2007 Dodge Charger Sway Bar Bracket
 2007 Dodge Charger Sway Bar Bushing