JeepParts
My Garage
My Account
Cart
OEM 2008 Dodge Magnum Control Arm
Suspension Arm- Select Vehicle by Model
- Select Vehicle by VIN
Select Vehicle by Model
orMake
Model
Year
Select Vehicle by VIN
For the most accurate results, select vehicle by your VIN (Vehicle Identification Number).
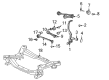
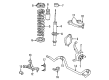
7 Control Arms found


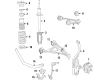
2008 Dodge Magnum Lower Control Arm, Front Upper Passenger Side Part Number: 4895668AB
$417.93 MSRP: $615.00You Save: $197.07 (33%)Ships in 1-2 Business DaysProduct Specifications- Other Name: Arm - Upper Control; Front Right Suspension Control Arm and Ball Joint Assembly.; Upper Control Arm; Arm Upper Control Front; Suspension Control Arm; Control Arm
- Position: Front Upper Passenger Side
- Replaces: 5180596AB, 4895668AA, 5180596AC
- Item Weight: 5.80 Pounds
- Item Dimensions: 12.4 x 12.9 x 4.0 inches
- Condition: New
- Fitment Type: Direct Replacement
- SKU: 4895668AB
- Warranty: This genuine part is guaranteed by Mopar's factory warranty.


2008 Dodge Magnum Lower Control Arm, Front Upper Driver Side Part Number: 4895669AB
$417.93 MSRP: $615.00You Save: $197.07 (33%)Ships in 1-2 Business DaysProduct Specifications- Other Name: Arm - Upper Control; Front Left Suspension Control Arm and Ball Joint Assembly.; Upper Control Arm; Arm Upper Control Front; Suspension Control Arm; Control Arm
- Position: Front Upper Driver Side
- Replaces: 5180597AA, 5180597AB, 5180597AC, 4895669AA
- Item Weight: 5.80 Pounds
- Item Dimensions: 12.4 x 9.7 x 3.9 inches
- Condition: New
- Fitment Type: Direct Replacement
- SKU: 4895669AB
- Warranty: This genuine part is guaranteed by Mopar's factory warranty.


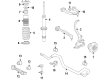
2008 Dodge Magnum Lower Control Arm, Front Part Number: 68002123AC
$220.94 MSRP: $329.00You Save: $108.06 (33%)Ships in 1-2 Business DaysProduct Specifications- Other Name: Arm - Lower Control; Suspension Control Arm, Front Lower Rearward; Suspension Control Arm Bushing; Upper Control Arm; Arm Lower Control Front Lower; Arm Lower Control Front; Suspension Control Arm; Control Arm
- Position: Front Lower
- Replaces: 68002123AA, 68002123AB
- Item Weight: 6.40 Pounds
- Item Dimensions: 3.1 x 4.1 x 16.8 inches
- Condition: New
- Fitment Type: Direct Replacement
- Require Quantity: 2
- SKU: 68002123AC
- Warranty: This genuine part is guaranteed by Mopar's factory warranty.


2008 Dodge Magnum Upper Control Arm, Front Driver Side, Steel Part Number: 4782665AB
$149.56 MSRP: $221.00You Save: $71.44 (33%)Product Specifications- Other Name: Arm - Control; Front Left Upper Suspension Control Arm and Ball Joint Assembly.; Arm Control; Suspension Control Arm; Control Arm
- Position: Front Upper Driver Side
- Item Weight: 5.80 Pounds
- Material: Steel
- Item Dimensions: 13.6 x 12.5 x 3.1 inches
- Condition: New
- Fitment Type: Direct Replacement
- SKU: 4782665AB
- Warranty: This genuine part is guaranteed by Mopar's factory warranty.

2008 Dodge Magnum Upper Control Arm, Front Passenger Side, Steel Part Number: 4782666AB
$149.56 MSRP: $221.00You Save: $71.44 (33%)Product Specifications- Other Name: Arm - Control; Front Right Upper Suspension Control Arm and Ball Joint Assembly.; Arm Control; Suspension Control Arm; Control Arm
- Position: Front Upper Passenger Side
- Item Weight: 2.40 Pounds
- Material: Steel
- Item Dimensions: 20.2 x 15.8 x 15.3 inches
- Condition: New
- Fitment Type: Direct Replacement
- SKU: 4782666AB
- Warranty: This genuine part is guaranteed by Mopar's factory warranty.
 Product Specifications
- Other Name: Arm - Lower Control; Front Left Suspension Control Arm and Ball Joint Assembly.
- Position: Front Lower Driver Side
- Replaces: 4895041AC
- Item Weight: 16.50 Pounds
- Item Dimensions: 18.2 x 15.6 x 6.8 inches
- Condition: New
- Fitment Type: Direct Replacement
- SKU: 4895041AF
- Warranty: This genuine part is guaranteed by Mopar's factory warranty.
- Product Specifications
- Other Name: Arm - Lower Control; Front Right Suspension Control Arm and Ball Joint Assembly.
- Position: Front Lower Passenger Side
- Replaces: 4895040AC
- Item Weight: 17.90 Pounds
- Item Dimensions: 6.7 x 16.0 x 18.7 inches
- Condition: New
- Fitment Type: Direct Replacement
- SKU: 4895040AF
- Warranty: This genuine part is guaranteed by Mopar's factory warranty.
2008 Dodge Magnum Control Arm Parts and Q&A
- Q: How to Properly Install and Align a Control Arm on an AWD on 2008 Dodge Magnum?A: When installing the lower control arm, remember that the cradle bolt needs to go into the same hole it was initially in when the vehicle has a wheel alignment adjustment bolt. Into the engine cradle, insert the lower control arm. After that, set the ball joint stem into the hole where the knuckle mounts. Between the two bolts, the forward bolt goes from front to rear and the rearward bolt from rear to front. Do not tighten the bolts for the lower control arm mounting at this time; just install them. Place the steering gear in position and secure it up top with the lower bolts, next install the upper bolts and nuts, making sure to tighten them to 122 Nm (90 ft. lbs). After that, put heat shields over the rod bellows and tighten the attachment screws to 7 Nm (62 in. lbs.). Push the control arm down to guide the ball joint stud into the knuckle, then tighten a new nut onto the stud by holding it with a hex wrench and turning the nut with a wrench, while using a crow foot wrench on the torque wrench set to 68 Nm plus a 90-degree turn (50 ft. lbs. plus 90-degree turn). Make sure the shock clevis bracket lines up with the bushing on the control arm and then put the bolt in and tighten it later. On the end of the half shaft where the hub is, install the hub nut and, together with someone operating and releasing the brakes, tighten the hub nut to 213 Nm (157 ft. lbs.). Put in the tire and wheel assembly, fasten the mounting nuts on 150 Nm (110 ft. lbs,) or 190 Nm (140 ft. lbs) for police vehicles. Lift your vehicle slightly to avoid damage and then park it on the alignment rack or drive-on lift. Only turn the adjustable nut when you are tightening the lower shock clevis mounting bolt, as the bolt shaft is designed that way. Fasten the nut for the lower shock clevis bracket to about 174 Nm (128 ft. lbs.) and then adjust the wheels. If you have a wheel alignment bolt on the lower control arm engine cradle, just tighten the nut to ensure you don't damage the cradle. As soon as the camber is correct, tighten the lower control arm cradle bolt nuts to 176 Nm (130 ft. lbs.) while you keep the bolts from moving. Afterward, add the belly pan to the car.
Related 2008 Dodge Magnum Parts
 2008 Dodge Magnum Control Arm Bushing
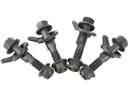 2008 Dodge Magnum Alignment Bolt
 2008 Dodge Magnum Axle Beam Mount
 2008 Dodge Magnum Axle Support Bushings
 2008 Dodge Magnum Bump Stop
 2008 Dodge Magnum Coil Spring Insulator
 2008 Dodge Magnum Control Arm Bolt
 2008 Dodge Magnum Shock And Strut Mount
 2008 Dodge Magnum Steering Knuckle
 2008 Dodge Magnum Sway Bar Bracket
 2008 Dodge Magnum Sway Bar Link
 2008 Dodge Magnum Wheel Hub