JeepParts
My Garage
My Account
Cart
OEM 2009 Chrysler PT Cruiser Axle Beam
Rigid Axle- Select Vehicle by Model
- Select Vehicle by VIN
Select Vehicle by Model
orMake
Model
Year
Select Vehicle by VIN
For the most accurate results, select vehicle by your VIN (Vehicle Identification Number).
5 Axle Beams found


2009 Chrysler PT Cruiser Engine Cradle, Front Part Number: 5272962AE
Product Specifications- Other Name: Crossmember - Front Suspension; Engine Cradle, Front; Crossmember Front Suspension
- Position: Front
- Replaces: 5272962AD, 5272962AB, 5272962AC
- Item Weight: 34.20 Pounds
- Item Dimensions: 39.1 x 23.9 x 10.8 inches
- Condition: New
- Fitment Type: Direct Replacement
- SKU: 5272962AE
- Warranty: This genuine part is guaranteed by Mopar's factory warranty.
2009 Chrysler PT Cruiser Engine Cradle, Front Part Number: 5272970AH
Product Specifications- Other Name: Crossmember - Front Suspension; Engine Cradle, Front; Crossmember Front Suspension
- Position: Front
- Replaces: 5272970AE, 5272970AD
- Item Weight: 39.40 Pounds
- Item Dimensions: 39.9 x 23.2 x 11.8 inches
- Condition: New
- Fitment Type: Direct Replacement
- SKU: 5272970AH
- Warranty: This genuine part is guaranteed by Mopar's factory warranty.


2009 Chrysler PT Cruiser Crossmember, Rear Part Number: 4724856AA
Product Specifications- Other Name: Crossmember - Rear Floor; Floor Pan Reinforcement, Rear; Crossmember Rear Floor
- Position: Rear
- Item Weight: 16.60 Pounds
- Item Dimensions: 42.4 x 17.3 x 3.6 inches
- Condition: New
- Fitment Type: Direct Replacement
- SKU: 4724856AA
- Warranty: This genuine part is guaranteed by Mopar's factory warranty.
 Product Specifications
- Other Name: Crossmember - Rear Floor; Front Reinforcement; Crossmember Rear Floor
- Position: Rear
- Replaces: 5027377AC
- Item Weight: 9.10 Pounds
- Condition: New
- Fitment Type: Direct Replacement
- SKU: 5027377AD
- Warranty: This genuine part is guaranteed by Mopar's factory warranty.

2009 Chrysler PT Cruiser Crossmember, Rear Part Number: 4724591AD
Product Specifications- Other Name: Crossmember - Rear Floor; Floor Pan Reinforcement, Rear; Crossmember Rear Floor
- Position: Rear
- Item Weight: 2.00 Pounds
- Item Dimensions: 23.5 x 20.1 x 2.5 inches
- Condition: New
- Fitment Type: Direct Replacement
- SKU: 4724591AD
- Warranty: This genuine part is guaranteed by Mopar's factory warranty.
2009 Chrysler PT Cruiser Axle Beam Parts and Q&A
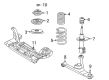
- Q: How to Service and Repair an Axle Beam with Rear Disc Brakes on 2009 Chrysler PT Cruiser?A: On rear disc brake cars, put the left and right trailing arm forward brackets down over the axle and align the bracket hole with the hole in the axle bushing. From the outboard end, attach the threaded end of the thru-bolt (1) to the bracket and bushing, so the other (non-threaded) ends of the bolt face inward to prevent contact with the vehicle during installation. Put the nut (3) onto the bolt at the vehicle's inboard end, tightening it until you feel resistance, but do not finish tightening until the vehicle sits on the ground. First, place the axle beam over the transmission jack at its removal level. After that, lift the axle trailing arms and align their brackets (3) with the marks you drew earlier during removal. Thread all of the eight bolts from the axle brackets to the body without tightening them completely. Loosen and move the brackets if required and tighten all bolts with 54 Nm (40 ft. lbs.) of torque. On each end of the springs, add a rubber isolator and align the rubber abutment (1) so it is up against the flat end of the coil. Next, put the coil springs (2) properly on the axle spring perches (5). Align the flat ends on both of the upper coil springs with a straight line (1) parallel to the axle beam, so the coils are placed at the sides of the vehicle. Use the transmission jack to move the coil springs into place on the spring mounting brackets (4), then keep lifting until the shock absorber lower mounting bolts can be put in from the axle brackets into the shock absorber lower eyes. Mount the shock absorber by putting in the lower mounting bolts through the slots (5) and place the easy-to-use washer (6) and tighten the nut (7) to 88 Nm (65 ft. lbs.). After you remove the jack, attach the lower part of the stabilizer bar cushion retainers on both sides into the slots on the axle's rear and rotate the other end to mount the bolts. Tighten each mounting bolt to 61 Nm (45 ft. lbs.). Make sure the bell crank has its handle pointing down when you attach the watts links and bell crank to the axle so that "BACK UP" (1) can be seen from behind. Put the watts link bell crank (9) on the center of the axle (11) and fasten it with bolt (7), washer (2) and nut (1), applying 149 Nm (110 ft. lbs.) of torque. Attach the spindle (6), seal (5) and disc brake adapter (3) on the end of the axle, clean the mounting bolt threads and coat the stud and bearing pad threads with Mopar(R) Stud AND Bearing Mount Adhesive or a similar product before tightly installing the bolts (7) at 95 Nm (70 ft. lbs.). For cars with antilock brakes, insert the wheel speed sensor head into the disc brake adapter and attach it with the mounting screw (3) tightened to 12 Nm (105 in. lbs.). Last, snap routing clips (2) onto the axle (1) and trailing arm (3) to hold the wheel speed sensor. Send each parking brake cable through the hole in the trailing arm towards the wheel brake, align its cable routing bracket with the mount and install the two bolts, tightening them to 11 Nm (100 in. lbs.). Pull the end of the parking brake cable into the disc brake adapter, spreading the locking fingers (3), then push on the parking brake shoe actuator lever (1) and push the shoe assembly into the adapter (5), next put in both shoe hold-down clips (2) and push the upper return spring (1) into place last. First, join the hub and bearing (2) to spindle (6), attach a NEW hub nut (11) and tighten it to 217 Nm (160 ft. lbs.), then set on the hub and bearing dust cap (10). After that, add the rotor and caliper, then attach the brake flex hose to the axle with the bolt and bolster the caliper guide pin bolts to 22 Nm (192 in. lbs.). Put in the wheel and tire assembly (1), tighten its nuts (3) to 135 Nm (100 ft. lbs.) and then drop the vehicle so its rear wheels lift just above the floor. Join the rear parking brake cables (3) to the equalizer (2) on the parking brake lever output cable (1) while taking care not to injure yourself during the feature adjustment. Adj urb, be sure the parking brake cables are secure and remove the pin punch (3) connected to the parking brake lever (1) so the system can adjust itself. Make sure the parking brake lever shifts into the set position and that both rear wheels move freely. You should also lower the car, set in the center console, push down on the parking brake, remove tire blocks, connect the negative cable to the battery (1), install the air cleaner cover, use firm pressure on the brake pedal, place the vehicle on an alignment rack and secure the pivot thru-bolts (1) for the trailing arms to their mounting bracket at 122 Nm (90 ft. lbs.) at curb height. After that, do a rear wheel alignment and if the thrust angle needs adjustment, loosen the axle trailing arm bracket bolts (4), shift the axle (1) and retighten them to 54 Nm (40 ft. lbs.).
Related 2009 Chrysler PT Cruiser Parts
 2009 Chrysler PT Cruiser Car Speakers
 2009 Chrysler PT Cruiser Door Check
 2009 Chrysler PT Cruiser Exhaust Nut
 2009 Chrysler PT Cruiser Floor Pan
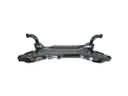 2009 Chrysler PT Cruiser Front Cross-Member
 2009 Chrysler PT Cruiser Grille
 2009 Chrysler PT Cruiser Hood Latch
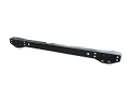 2009 Chrysler PT Cruiser Rear Crossmember
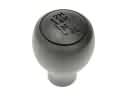 2009 Chrysler PT Cruiser Shift Knob
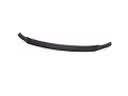 2009 Chrysler PT Cruiser Spoiler
 2009 Chrysler PT Cruiser Sunroof
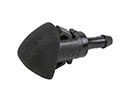 2009 Chrysler PT Cruiser Windshield Washer Nozzle