JeepParts
My Garage
My Account
Cart
OEM Chrysler PT Cruiser Axle Beam
Rigid Axle- Select Vehicle by Model
- Select Vehicle by VIN
Select Vehicle by Model
orMake
Model
Year
Select Vehicle by VIN
For the most accurate results, select vehicle by your VIN (Vehicle Identification Number).
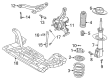
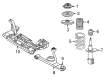
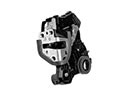
8 Axle Beams found


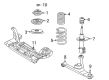
Chrysler PT Cruiser Engine Cradle, Front Part Number: 5272962AE


Chrysler PT Cruiser Crossmember, Rear Part Number: 4724591AD

Chrysler PT Cruiser Front Crossmember, Rear Part Number: 5027377AD

Chrysler PT Cruiser Crossmember, Rear Part Number: 4724856AA

Chrysler PT Cruiser Engine Cradle, Front Part Number: 5272341AG

Chrysler PT Cruiser Engine Cradle, Front Part Number: 5272888AC
Chrysler PT Cruiser Engine Cradle, Front Part Number: 5272888AG
Chrysler PT Cruiser Engine Cradle, Front Part Number: 5272970AH
Chrysler PT Cruiser Axle Beam
Choose OEM Axle Beam that meet Chrysler factory standards. Chrysler designs and tests every component for precision and durability. Each Axle Beam follows strict manufacturing steps to lock in quality and fit. If your Chrysler PT Cruiser matters to you, OEM parts make the smart choice. You'll get the exact look, feel, and performance you expect. Shop genuine PT Cruiser parts at the highly competitive prices online. Enjoy a manufacturer's warranty, a hassle-free return policy, and rapid delivery. No more guesswork with off brands. Get genuine parts with exact fit and true factory performance. Shop with confidence today at JeepPartsDeal.com.
Chrysler PT Cruiser Axle Beam Parts and Q&A
- Q: How to maintain an axle beam on Chrysler PT Cruiser?A:Service the rear axle beam by first removing the air cleaner cover and moving it aside, followed by taking out the battery's negative terminal. Lay blocks under the tires to stop the car and unscrew the console screws after using the parking brake release, to access the lever's cable. Raise the cable up until you can insert a pin punch through the lever mounting bracket, fixing the parking brake mechanism and leaving the cable loose. Take the rear Parking Brake Cables off the equalizer, lift the vehicle and remove each of the rear tires and wheels. When you have rear drum brakes, remove the flex hose bolts and the clips that secure the drum, before taking out the drums. If you have disc brakes at the rear, start by unbolting the flex hose, caliper guide pin bolts and finally the calipers. Hang these parts off the side and remove the brake rotor. Get rid of the dust cover and the hub and bearing nut to separate the hub and bearing. With a rear disc brake car, pop off the return spring on top, detach the hold-down clips from the shoes and push the shoes apart to take them out. Remove the parking brake cable from the actuating lever and support plate on drum brake vehicles by using a box wrench. Carefully remove the two bolts securing the cable and routing brackets to the trailing arm and pull the cable from this hole. For antilock brake equipped vehicles, disconnect the bolts and sensors from the wheel speed sensor. Remove the bolts from the support plate or adapter held to the axle and slid off the plates and Spindles from both sides. Taking off the bolt on the watts link bell crank, also remove both retainer cushions for the stabilizer bar. Lower your vehicle with a transmission jack, get rid of the shock absorber bolts from the lower bracket and remove the rubber mount and spring from the suspension. Put a mark where the axle trailing arm bracket lies on the vehicle, take out the fasteners securing the forward trailing arm brackets to the body and then remove the axle. Set the brackets over the axle trailing arm bushing, insert the thru-bolt, place and tighten the nut so there is resistance but can still move. Make sure the axle beam is centered on the jack, put the trailing arms against the lines you drew and do not tighten the mounting bolts all the way. Match the brackets and tighten them with a torque wrench to 54 Nm or 40 ft. lbs. Set rubber isolators on the Coil Springs and attach the springs to the axle spring perches so the springs connect in the proper direction. Guide the springs into the mounting bracket with the raised jack and then install and tighten the lower shock bolts to 68 Nm (50 ft. lbs.). Put the stabilizer bar cushion retainers into the axle, secure them with bolts and tighten the bolts to 54 Nm (40 ft. lbs.). Fix the watts link bell crank to the axle with a bolt, washer and nut; tighten everything to 122 Nm (90 ft. lbs.). Get the support plate or disc brake adapter and spindle into place on each left and right side of the axle, wipe away dirt from the bolt threads, add Mopers Lock And Seal and tighten until they reach 95 Nm (70 ft. lbs.). Tighten all wheel speed sensor bolts to 12 Nm (105 inch lbs.) on vehicles that have antilock brakes. Feed the parking brake cables into the trailing arm, line up the brackets and bolt them in at 11 Nm (100 inch lbs.). Slide the parking brake cables over the rear brake support plate or rear brake adapter so that the locking fingers have expanded onto the cable ends. When installing a parking brake for drum braked vehicles, attach the cable to the actuating lever and the actuating spring. On vehicles with disc brakes, fit the parking brake shoe actuator lever and shoe assemblies. Put a hub, bearing and retaining nut (tightened to 217 Nm or 160 ft. lbs.) on every rear spindle and install the dust caps. On cars with drum brakes, fit the Brake Drums and on those with disc brakes, attach the rotors and calipers, tightening the caliper guide pin bolts to 22 Nm (192 inch lbs.). Attach the flex hoses to the axle trailing arms, fit and tighten the rear tires to the wheel assemblies and set the wheel nuts at 135 Nm (100 ft. lbs.). Adjust the car so it's lower to the ground, join the rear brakes to the equalizer and check that everything lines up properly. Release the pin punch from the brake lever to activate auto adjustment, pull and release the lever and make sure the rear wheels are not blocked. Check that the center console and Shift Knob are installed before you use the parking brake, remove the blocks from beneath the wheels, reconnect the battery and then reinstall the air cleaner cover. On the alignment rack, tighten the mounting bolts of the trailing arm to 108 Nm (80 ft. lbs.), check the rear wheels and adjust as needed by adjusting the bolts on the axle trailing arm to 54 Nm (40 ft. lbs.).
- Q: How to Service and Repair an Axle Beam on Rear Drum Brake on Chrysler PT Cruiser?A:For rear drum brake cars, begin axle beam repairs by mounting the trailing arm forward brackets so their holes line up with the axle trailing arm bushings. Feed the thru-bolt through both the bracket and bushing, keeping the threaded ends on the inside of the axle so they don't touch when you install it. Place the nut at the inboard end of the bolt and keep tightening until you experience some resistance, but leave the tightening until the vehicle is at curb height. Put the axle beam under the transmission jack and at its removing height, then swing up the rear arms to align the brackets with the marks you made initially. Use the eight bolts to join the bracket to the body frame, but leave them loose for now. Move the brackets to fit over the scribed marks and secure each bolt to 54 Nm. Place rubber isolators under each end of the Coil Springs, attaching them the right way and put the coil springs onto their spring perches on top of the axle. Twist the coil springs so that the bottom sides of each upper coil are just beyond the outboard sides of the vehicle. Lift the jack with the transmission, move it so the coil springs line up with the spring mounting brackets and raise the vehicle until the bolts on the axle bracket can go through the shock absorber's lower mounting eyes. Attach the washer and nut to each shock absorber lower mounting bolt, tighten them down to 88 Nm. Lift up the jack, place the lower end of both stabilizer bar cushion retainers in the rear axle's slots and rotate their top ends upward to add the mounting bolts, tightening all to 61 Nm. Check that the bell crank is pointing in the correct way after fitting the watts links and bell crank onto the axle, grasping it together with the bolt and tightening to a torque of 149 Nm. Set the Spindle and seal in place at the axle end, clean the bolts used to attach the disc brake adapter and spindle and apply stud and bearing mount adhesive to the threads. After that, put in the four bolts, tighten them to 95 Nm and clean up any residue. Secure the sensor for antilock braked vehicles into the disc brake adapter, tighten it with a 12 Nm wrench and put routing clips on to secure it to the axle and trailing arm. Feed the Parking Brake Cable into the trailing arm, position the routing brackets accordingly, attach the bolts and tighten these to 11 Nm. Direct the parking brake cable up through the brake support plate, spread out the locking fingers, press the adjusting screw and secure the cable onto the parking brake lever. Slide the bearing and hub on the spindle, secure a fresh hub nut and make it snug to 217 Nm, then install the dust cap on the hub and bearing, adjust the brake caliper and gather the drum in place. Attach the disc brake flex hose to the axle, fit the tire and wheel onto the vehicle and secure them all by tightening the wheel nuts to 135 Nm. Set the vehicle so the rear wheels are just above the floor and then insert both rear parking brake cables into the equalizer on the parking brake lever output cable, without setting the automatic adjuster lockout device free yet. Securely fix the parking brake cable system and correctly align it, then pull out the pin punch in the parking brake lever to allow it to adjust itself. Position the parking brake lever, check free movement of the rear wheels, lower the vehicle, set the center console into the car, apply the parking brake, remove the tire blocks, attach the battery's negative cable, fit the air cleaner cover, place the car on an alignment rack and with the car at curb height, tighten the trailing arm to mounting bracket pivot thru-bolts to 122 Nm before performing a rear wheel alignment.


Related Chrysler PT Cruiser Parts
 Chrysler PT Cruiser Door Lock
 Chrysler PT Cruiser Floor Pan
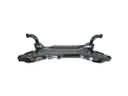 Chrysler PT Cruiser Front Cross-Member
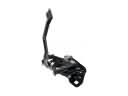 Chrysler PT Cruiser Hood Latch
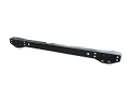 Chrysler PT Cruiser Rear Crossmember
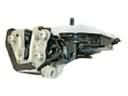 Chrysler PT Cruiser Rear Passenger Door Handle Latch
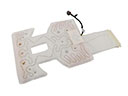 Chrysler PT Cruiser Seat Heater
 Chrysler PT Cruiser Sunroof
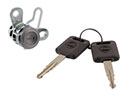 Chrysler PT Cruiser Tailgate Lock
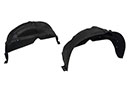 Chrysler PT Cruiser Wheelhouse
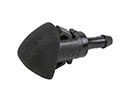 Chrysler PT Cruiser Windshield Washer Nozzle
 Chrysler PT Cruiser Windshield Wiper