JeepParts
My Garage
My Account
Cart
OEM 2009 Dodge Grand Caravan Steering Knuckle
Front Steering Knuckle- Select Vehicle by Model
- Select Vehicle by VIN
Select Vehicle by Model
orMake
Model
Year
Select Vehicle by VIN
For the most accurate results, select vehicle by your VIN (Vehicle Identification Number).
2 Steering Knuckles found


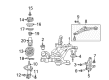
2009 Dodge Grand Caravan Knuckle, Front Passenger Side Part Number: 4743568AE
$290.58 MSRP: $649.00You Save: $358.42 (56%)Ships in 1-2 Business DaysProduct Specifications- Other Name: Knuckle - Suspension; Steering Knuckle, Front Right; Knuckle Suspension
- Position: Front Passenger Side
- Replaces: 4743568AB, 4743568AC, 4743568AD
- Item Weight: 6.30 Pounds
- Item Dimensions: 12.7 x 9.5 x 4.1 inches
- Condition: New
- Fitment Type: Direct Replacement
- SKU: 4743568AE
- Warranty: This genuine part is guaranteed by Mopar's factory warranty.


2009 Dodge Grand Caravan Knuckle, Front Driver Side Part Number: 4743569AE
$38.45 MSRP: $55.75You Save: $17.30 (32%)Product Specifications- Other Name: Knuckle - Suspension; Steering Knuckle, Front Left; Knuckle Suspension
- Position: Front Driver Side
- Replaces: 4743569AC, 4743569AD, 4743569AB
- Item Weight: 6.30 Pounds
- Item Dimensions: 4.3 x 9.3 x 12.6 inches
- Condition: New
- Fitment Type: Direct Replacement
- SKU: 4743569AE
- Warranty: This genuine part is guaranteed by Mopar's factory warranty.
2009 Dodge Grand Caravan Steering Knuckle Parts and Q&A
- Q: How is the Steering Knuckle Installed on the Front on 2009 Dodge Grand Caravan?A: When the hub and bearing must be installed, make sure they are installed straight through the knuckle's hole, with the wheel speed sensor pointing to the end farther from the engine. Place the threaded mounting holes together and add four bolts. Secure the bolts one by one with torque, tightening them in a pattern that crosses diagonally to reach 50 Nm (37 ft. lbs.). After blasting the knuckle and ball joint stud, wipe them with a shop cloth and spray Brake Parts Cleaner over the contact area before joining them together. Line up the knuckle with the ball joint stud and install a new steering knuckle to ball joint stud nut, turning till it's tight at 27 Nm (20 ft.lbs.) and 180° more. Snug the halfshaft stub shaft into the bearing assembly and hub, as you make certain the clevis-to-knuckle bolts don't budge. For the left knuckle, fit the lower end of the strut assembly to the upper end of the knuckle, add both strut clevis-to-knuckle bolts, lock them with the nuts and tighten them to 88 Nm (65 ft. lbs.) followed by an extra 90° turn. Do the same process for the right knuckle. Wipe clean the tie rod stud and knuckle connection, install the outer tie rod stud into the knuckle steering arm and attach the nut to the tie rod stud. Turn the nut by 75 Nm (55 ft. lbs.) plus 1/4 extra turn. Place the wheel speed sensor routing bracket onto the knuckle and strut assembly, grasp the screws and tighten them to 8 Nm (71 in. lbs.) and 10 Nm (89 in. lbs.). Slide the wheel speed sensor connector and the routing clip to the clip on the frame rail and then join the wire from the vehicle harness to the wheel speed sensor connector. Attach the brake shield to the knuckle and tighten all three screws to 8 Nm (71 in. lbs.). Next, install the brake rotor and brake caliper and adapter assembly on the assembly. Replace the hub nut every time, attaching it to the end of the halfshaft stub shaft and install it firmly at 160 Nm (118 ft. lbs.), ensuring you have help from someone with the brake on. Mount the tire and wheel on the vehicle and tighten the wheel nuts to 135 Nm (100 ft. lbs.), gently lower it to the ground, press the brake pedal several times, verify the correct fluid level and do a wheel alignment.
Related 2009 Dodge Grand Caravan Parts
 2009 Dodge Grand Caravan Wheel Bearing
 2009 Dodge Grand Caravan Sway Bar Link
 2009 Dodge Grand Caravan Wheel Hub
 2009 Dodge Grand Caravan Bump Stop
 2009 Dodge Grand Caravan Coil Spring Insulator
 2009 Dodge Grand Caravan Coil Springs
 2009 Dodge Grand Caravan Control Arm
 2009 Dodge Grand Caravan Shock Absorber
 2009 Dodge Grand Caravan Shock And Strut Mount
 2009 Dodge Grand Caravan Strut Bearing
 2009 Dodge Grand Caravan Sway Bar Bushing
 2009 Dodge Grand Caravan Sway Bar Kit