JeepParts
My Garage
My Account
Cart
OEM 2009 Dodge Ram 1500 Engine Mount
Engine Motor Mount- Select Vehicle by Model
- Select Vehicle by VIN
Select Vehicle by Model
orMake
Model
Year
Select Vehicle by VIN
For the most accurate results, select vehicle by your VIN (Vehicle Identification Number).
11 Engine Mounts found


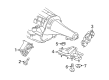
2009 Dodge Ram 1500 Motor Mount, Driver Side Part Number: 55398569AC
$63.50 MSRP: $115.00You Save: $51.50 (45%)Ships in 1-2 Business DaysProduct Specifications- Other Name: Insulator - Engine Mount; Engine Mount, Left; Engine Mount Bracket; Front Mount; Mount; Insulator Engine Mount
- Position: Driver Side
- Replaces: 55398569AB, 55398569AA
- Item Weight: 9.10 Pounds
- Item Dimensions: 7.1 x 4.7 x 4.2 inches
- Condition: New
- Fitment Type: Direct Replacement
- SKU: 55398569AC
- Warranty: This genuine part is guaranteed by Mopar's factory warranty.

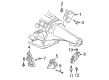
2009 Dodge Ram 1500 Motor Mount, Driver Side Part Number: 68043231AB
$141.50 MSRP: $210.00You Save: $68.50 (33%)Product Specifications- Other Name: Insulator - Engine Mount; Engine Mount, Left; Engine Mount Bracket; Front Mount; Mount
- Position: Driver Side
- Replaces: 68043231AA
- Condition: New
- Fitment Type: Direct Replacement
- SKU: 68043231AB
- Warranty: This genuine part is guaranteed by Mopar's factory warranty.
2009 Dodge Ram 1500 Motor Mount, Passenger Side Part Number: 68043230AC
$199.89 MSRP: $301.00You Save: $101.11 (34%)Ships in 1-2 Business DaysProduct Specifications- Other Name: Insulator - Engine Mount; Engine Mount, Right; Engine Mount Bracket; Front Mount; Mount
- Position: Passenger Side
- Replaces: 68043230AB, 68043230AA
- Condition: New
- Fitment Type: Direct Replacement
- SKU: 68043230AC
- Warranty: This genuine part is guaranteed by Mopar's factory warranty.


2009 Dodge Ram 1500 Motor Mount, Passenger Side Part Number: 68043474AA
$117.83 MSRP: $175.00You Save: $57.17 (33%)Ships in 1-2 Business DaysProduct Specifications- Other Name: Insulator - Engine Mount; Engine Mount, Right; Engine Mount Bracket; Mount; Insulator Engine Mount
- Position: Passenger Side
- Item Weight: 7.80 Pounds
- Item Dimensions: 6.8 x 6.0 x 5.2 inches
- Condition: New
- Fitment Type: Direct Replacement
- SKU: 68043474AA
- Warranty: This genuine part is guaranteed by Mopar's factory warranty.
2009 Dodge Ram 1500 Motor Mount, Driver Side Part Number: 68043475AA
$144.83 MSRP: $160.00You Save: $15.17 (10%)Ships in 1-2 Business DaysProduct Specifications- Other Name: Insulator - Engine Mount; Engine Mount, Left; Engine Mount Bracket; Mount; Insulator Engine Mount
- Position: Driver Side
- Item Weight: 7.40 Pounds
- Item Dimensions: 6.8 x 5.9 x 5.2 inches
- Condition: New
- Fitment Type: Direct Replacement
- SKU: 68043475AA
- Warranty: This genuine part is guaranteed by Mopar's factory warranty.


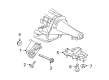
2009 Dodge Ram 1500 Mount Bracket, Driver Side Part Number: 52110084AC
Product Specifications- Other Name: Bracket - Engine Mount; Automatic & Manual Transmission Mount Bracket, Left; Engine Mount Torque Strut; Motor Mount; Mount Brace; Bracket Engine Mount; Engine Mount Bracket
- Position: Driver Side
- Item Weight: 9.00 Pounds
- Item Dimensions: 20.7 x 11.6 x 5.3 inches
- Condition: New
- Fitment Type: Direct Replacement
- SKU: 52110084AC
- Warranty: This genuine part is guaranteed by Mopar's factory warranty.

2009 Dodge Ram 1500 Motor Mount, Driver Side Part Number: 68044127AD
$129.16 MSRP: $190.00You Save: $60.84 (33%)Product Specifications- Other Name: Insulator - Engine Mount; Engine Mount, Left; Engine Mount Bracket; Front Mount; Mount
- Position: Driver Side
- Replaces: 68044127AA, 68044127AC
- Condition: New
- Fitment Type: Direct Replacement
- SKU: 68044127AD
- Warranty: This genuine part is guaranteed by Mopar's factory warranty.

2009 Dodge Ram 1500 Motor Mount, Passenger Side Part Number: 68044126AD
$217.54 MSRP: $324.00You Save: $106.46 (33%)Product Specifications- Other Name: Insulator - Engine Mount; Engine Mount, Right; Engine Mount Bracket; Front Mount; Mount
- Position: Passenger Side
- Replaces: 68044126AC, 68044126AA
- Condition: New
- Fitment Type: Direct Replacement
- SKU: 68044126AD
- Warranty: This genuine part is guaranteed by Mopar's factory warranty.

2009 Dodge Ram 1500 Front Mount Part Number: 68417512AB
$206.21 MSRP: $304.00You Save: $97.79 (33%)Product Specifications- Other Name: Gasket Kit - Engine; Valve Grind Gasket Kit; Overhaul Gasket Set
- Replaces: 68196239AC, 68196239AA, 68196239AB, 68417512AA, 68046260AA
- Item Weight: 3.00 Pounds
- Item Dimensions: 21.0 x 12.7 x 3.5 inches
- Condition: New
- Fitment Type: Direct Replacement
- SKU: 68417512AB
- Warranty: This genuine part is guaranteed by Mopar's factory warranty.

 Product Specifications
- Other Name: Insulator - Engine Mount; Engine Mount, Right; Engine Mount Bracket; Mount; Insulator Engine Mount
- Position: Passenger Side
- Item Weight: 7.60 Pounds
- Item Dimensions: 6.8 x 6.1 x 5.2 inches
- Condition: New
- Fitment Type: Direct Replacement
- SKU: 55398588AB
- Warranty: This genuine part is guaranteed by Mopar's factory warranty.

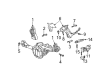
2009 Dodge Ram 1500 Mount Bracket, Driver Side Part Number: 52110053AD
Product Specifications- Other Name: Bracket - Engine Mount; Automatic Transmission Mount Bracket, Left; Motor Mount; Bracket Engine Mount
- Position: Driver Side
- Item Weight: 5.20 Pounds
- Item Dimensions: 14.1 x 8.2 x 5.1 inches
- Condition: New
- Fitment Type: Direct Replacement
- SKU: 52110053AD
- Warranty: This genuine part is guaranteed by Mopar's factory warranty.
2009 Dodge Ram 1500 Engine Mount Parts and Q&A
- Q: How to Service and Repair an Engine Mount for 2WD and 4WD on 2009 Dodge Ram 1500?A: Connecting the negative cable to the battery is important before replacing or repairing an engine mount on any vehicle. You should take out the viscous fan before lifting the engine to keep the fan blade, fan clutch and fan shroud from being damaged. After that, take out the cooling fan and raise the vehicle. For a 2WD, start by removing the engine oil filter and the oil drain trough. Then, raise the engine with a lot placed beneath a suitable block of wood across the full length of the engine oil pan. Raise the front with a suitable jack and then unbolt the engine mounts from the front axle by removing the 4 bolts and the 3 bolts attaching it to the left bracket. After lowering the front axle, take out the through bolts, raise the engine enough to remove the left and right engine mounts and then come out the 8 mount to engine bolts that connect the mounts to the engine. With a 4WD, remove the skid plate and front crossmember before you get to the engine oil filter and drain trough. After the engine and front axle are stable, unbolt the attachments: four at the motor mounts to the axle and three at the axle to the left engine bracket. To remove the engine mounted brackets, lift the front axle, remove the 6 bolts from the front mount, lower the engine, remove the engine mounts, then the engine mount brackets.
Related 2009 Dodge Ram 1500 Parts
 2009 Dodge Ram 1500 Oil Pump
 2009 Dodge Ram 1500 Timing Chain
 2009 Dodge Ram 1500 Camshaft Thrust Plate
 2009 Dodge Ram 1500 Crankshaft Pulley
 2009 Dodge Ram 1500 Crankshaft Seal
 2009 Dodge Ram 1500 Crankshaft Thrust Washer Set
 2009 Dodge Ram 1500 Cylinder Head Gasket
 2009 Dodge Ram 1500 Dipstick
 2009 Dodge Ram 1500 Dipstick Tube
 2009 Dodge Ram 1500 Harmonic Balancer
 2009 Dodge Ram 1500 Valve Cover Gasket
 2009 Dodge Ram 1500 Valve Stem Seal