JeepParts
My Garage
My Account
Cart
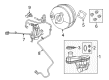
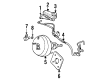
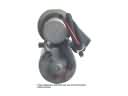
OEM Chrysler Voyager Brake Booster
Brake Power Booster- Select Vehicle by Model
- Select Vehicle by VIN
Select Vehicle by Model
orMake
Model
Year
Select Vehicle by VIN
For the most accurate results, select vehicle by your VIN (Vehicle Identification Number).
6 Brake Boosters found

Chrysler Voyager Brake Booster Part Number: 68488303AC
$202.93 MSRP: $308.00You Save: $105.07 (35%)Ships in 1-2 Business Days
Chrysler Voyager Brake Booster Part Number: 68308762AC
$154.99 MSRP: $232.00You Save: $77.01 (34%)
Chrysler Voyager Brake Booster Part Number: 4797614


Chrysler Voyager Brake Booster Part Number: 4721721AA
Chrysler Voyager Brake Booster Part Number: 4721613AA

Chrysler Voyager Brake Booster Part Number: 4721338AA
Chrysler Voyager Brake Booster
Choose OEM Brake Booster that meet Chrysler factory standards. Chrysler designs and tests every component for precision and durability. Each Brake Booster follows strict manufacturing steps to lock in quality and fit. If your Chrysler Voyager matters to you, OEM parts make the smart choice. You'll get the exact look, feel, and performance you expect. Shop genuine Voyager parts at the highly competitive prices online. Enjoy a manufacturer's warranty, a hassle-free return policy, and rapid delivery. No more guesswork with off brands. Get genuine parts with exact fit and true factory performance. Shop with confidence today at JeepPartsDeal.com.
Chrysler Voyager Brake Booster is one of the key parts that play an important role in boosting up the braking system of Chrysler Voyager automobiles and thus providing secure drive. Sitting right between the brake pedal and the master cylinder this Brake Booster uses vacuum or hydraulic pressures to mechanically increase the force applied by the driver on the brake pedal. Chrysler has ensured that the voyager brake booster suits a number of models of the voyager to make sure that drivers get reliability and performance of the voyager of different generations. These vacuum-operated boosters are famous for its reliability and hydraulic system always provides consistent support and that's why Chrysler Voyager Brake Booster is one of the specialties in auto market. They include single diaphragm and dual diaphragm and different diameter; thus, the Brake Booster provides optimization of performance, stability, and safety. Thus, due to the promising sales performance and a favorable reputation, the Chrysler Voyager has established itself in the segment of minivans, and the Brake Booster is an essential component of the vehicle. Other features for instance the capability of delivering extra power boost when using large diameters add on the unique capabilities of Chrysler Voyager Brake Booster as compared to other market products. In conclusion, Chrysler Voyager Brake Booster is one of the many examples of how the Chrysler brand strives for the production of well-developed and creative automobile parts for providing safety and smoothness when driving.
Chrysler Voyager Brake Booster Parts and Q&A
- Q: How to Service and Repair a Vacuum Brake Booster on a Left-Hand Drive on Chrysler Voyager?A:First, pump the brake pedal on a left-hand drive vehicle with the engine off until it feels solid; next, unhook the negative and positive cables from the battery, remove the battery's thermal guard shield, clamp and battery to service the vacuum brake booster. At this point, take off the screw that holds the engine coolant filler tube to the battery tray, remove the vacuum hose for speed control and take out the two nuts and one bolt that fasten the battery tray. If your servo is for speed control, put it nearby. Open the master cylinder fluid reservoir and remove the wiper module, then take out its connecting wiring. Using a solvent, rub it around the master cylinder junction with the power brake booster and next, separate the primary and secondary brake tubes from the ABS integrated control unit, fitting caps on the brake tube openings. After removing both nuts holding the master cylinder to the power brake booster, slide the master cylinder out straight and remember to place a new vacuum seal on it each time you remove it for service. You should detach the vacuum hose from the vacuum booster check valve, take the silencer panel out from beneath the instrument panel and loosen the booster input rod from the brake pedal. Use the retaining clip to detach it and then discard this part, remembering to attach a new clip to the booster rod when putting everything back together. Open the panel, remove the four nuts and pull the booster forward till it clears the engine compartment, making sure you do not open it up. While installing, fit the power brake booster under the dash panel, tighten all four mounting nuts to 29 Nm (250 in. lbs.) and before inserting the booster rod, lubricate its pin with a lubriplate. Change the brake lamp switch, put the silencer panel back and join the vacuum hose to the check valve. Carefully get rid of the old seal on the master cylinder, fit a new seal, place the master cylinder on the booster and fasten the two nuts to 25 Nm (225 in. lbs.). Bind the brake fluid level switch wire back to the wiring harness, connect both sets of brake tubes and tighten the nuts to a torque of 17 Nm (145 in. lbs.). The wiper module, speed control servo if present and battery tray should be fixed in their places and tightened with pliers to 14 Nm (124 in. lbs.). If you have a servo vacuum hose, attach it, as well as the air inlet resonator and hoses. After that, secure the engine coolant filler neck and place the battery and its pieces back in position. Always bleed the base brakes as needed and drive the vehicle to make sure the brakes are working properly.
- Q: How to Remove and Install a Brake Booster in a Left-Hand Drive on Chrysler Voyager?A:Service your left-hand drive vehicle by pumping the brake with the engine off and making sure the pedal is firm, then disconnect both battery cables, remove the battery guard shield and clamp and then remove the battery itself before continuing. Remove the screw that keeps the engine coolant filler tube attached to the Battery Tray, unplug the vacuum hose from the vacuum tank (only if it has speed control) and remove the two nuts along with the one bolt that secure the battery tray, then take it out. For a servo that has speed control, take off the wiring harness from the speed control servo, remove both of its nuts and set the servo aside. Take out the wiper module and remove the wire harness from the brake level switch located in the master reservoir. After cleaning the connecting area with Mopar Brake Parts Cleaner, dissassemble the tubes on the unit and plug the open holes so the unit is not exposed. Take out the two nuts that are holding the master cylinder to the booster and pull it straight out, always remembering to seal the master cylinder with a new vacuum hose if removed. Unplug the vacuum hose from the valve on the booster, then in your vehicle, open the silencer panel and find the rod coming from the booster going to the pedal. Slide a screwdriver inserted in the retaining clip on the brake pedal pin to release it, take out the rod in the booster input and remove the four bolts underneath the booster. When those are gone, you can slide the booster up and out of the vehicle toward the engine. As you install the booster, fit it on the dashboard, secure the mounting nuts to the recommended torque, lubricate the brake pedal and set a new clip on the rod's end. Install a new brake lamp switch, apply the silencer panel and link the vacuum hose to the check valve. Cover the master cylinder once again, connect the push rod from the booster to the piston and tighten both mounting nuts to 25 Nm (225 in. lbs.). Attach the wiring harness to the brake fluid level switch, rejoin the brake tubes, fix them tightly at 17 Nm (145 in. lbs.), put in the wiper module; if you have speed control, attach the servo and tighten its mounting nuts to 14 Nm (124 in. lbs.). Replace the battery tray, fasten its nuts and bolts to 14 Nm (124 in. lbs.), attach the servo vacuum hose when necessary and secure the clamps of the air inlet resonator and hoses. After that, seal the engine coolant filler neck, fit the battery and its accessories and check and bleed the vehicle's brake system as appropriate, before driving it to see if the brakes operate correctly.

Related Chrysler Voyager Parts
 Chrysler Voyager ABS Pump And Motor Assembly
 Chrysler Voyager Backing Plate
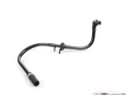 Chrysler Voyager Brake Booster Vacuum Hose
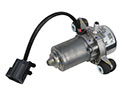 Chrysler Voyager Brake Booster Vacuum Pump
 Chrysler Voyager Brake Caliper Bracket
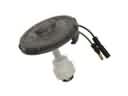 Chrysler Voyager Brake Fluid Level Sensor
 Chrysler Voyager Brake Line
 Chrysler Voyager Brake Master Cylinder
 Chrysler Voyager Brake Proportioning Valve
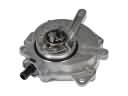 Chrysler Voyager Vacuum Pump
 Chrysler Voyager Wheel Cylinder
 Chrysler Voyager Wheel Hub Bolt