JeepParts
My Garage
My Account
Cart
OEM Chrysler Voyager Radiator Support
Center Radiator Support- Select Vehicle by Model
- Select Vehicle by VIN
Select Vehicle by Model
orMake
Model
Year
Select Vehicle by VIN
For the most accurate results, select vehicle by your VIN (Vehicle Identification Number).
4 Radiator Supports found

Chrysler Voyager Lower Tie Bar, Front Part Number: 68292237AB
$62.99 MSRP: $92.75You Save: $29.76 (33%)Ships in 1-3 Business Days
Chrysler Voyager Radiator Support, Front Part Number: 68292241AB
$517.54 MSRP: $754.00You Save: $236.46 (32%)Ships in 1-3 Business Days
Chrysler Voyager Support, Passenger Side Part Number: 4809274AC
$106.74 MSRP: $135.31You Save: $28.57 (22%)Ships in 1-2 Business DaysChrysler Voyager Support, Driver Side Part Number: 4809273AC
$108.57 MSRP: $137.63You Save: $29.06 (22%)Ships in 1-2 Business Days
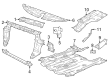
Chrysler Voyager Radiator Support
Choose OEM Radiator Support that meet Chrysler factory standards. Chrysler designs and tests every component for precision and durability. Each Radiator Support follows strict manufacturing steps to lock in quality and fit. If your Chrysler Voyager matters to you, OEM parts make the smart choice. You'll get the exact look, feel, and performance you expect. Shop genuine Voyager parts at the highly competitive prices online. Enjoy a manufacturer's warranty, a hassle-free return policy, and rapid delivery. No more guesswork with off brands. Get genuine parts with exact fit and true factory performance. Shop with confidence today at JeepPartsDeal.com.
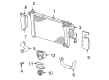
The Chrysler Voyager Radiator Support functions as a critical component which demonstrates superb reliability and performance characteristics within Chrysler vehicles. The Chrysler Voyager Radiator Support operates to stabilize and align the radiator and condenser and headlights when placed inside the engine chamber so the cooling operation together with vehicle functionality can perform effectively. The multi-purpose part enhances both hood and fender integrity by dealing with collision forces to increase the safety measures of the Chrysler Voyager. A wide range of Voyager models can employ this support component since it receives production from durable materials including steel or aluminum and plastic substances for long-lasting resistance. It is fundamental to maintain the radiator support through proper upkeep since any damage caused by deformation will negatively affect the cooling system operation. The Chrysler Voyager Radiator Support represents a superior market solution because of its strong construction and critical functionality for safety and efficiency improvement. The sheer number of 12 million units sold demonstrates the car's market success while proving the radiator support system's reliability which reflects the manufacturer's quality standards. A properly operating Chrysler Voyager Radiator Support delivers critical engine cooling while maintaining performance which qualifies the support as an essential component for any the automaker model vehicle owner.
Chrysler Voyager Radiator Support Parts and Q&A
- Q: How to Service and Repair a Radiator Support on Chrysler Voyager?A:To start working on the radiator crossmember, first release the Hood Latch and then lift the hood. Unhook the radiator sight shield and remove the engine air inlet resonator. Slide the hood cable out from the upper radiator crossmember and unfasten the screws that hold the hood latch to the same crossmember and keep the latch off to the side. Bring out the hood prop rod and remove the screw linking the coolant bottle to the crossmember. Remove the bolts from the radiator isolators where they are fastened to the crossmember and remove the bolts on the crossmember side that hold the closure panel. Suspend the crossmember upward above the radiator cover panel before pulling it away from the vehicle. When putting in the panel, slide the crossmember of the radiator closure into place between the layers of the panel at both sides, aligned with the paint around the bolt heads. Put on the bolts holding the ends of the crossmember to the radiator closure panel and tighten them up to 14 ft.lbs. After that, fit the bolts on the radiator isolators to the crossmember and the screw on the coolant recovery bottle. Add the engine air inlet resonator and the hood prop rod after removal. Put the hood latch over the net pierce tabs and if it doesn't line up, flatten the tabs until they are. Set the bolts on the hood latch and clip the cable, while tightening them to a torque of 13.5 N.m (10 ft.lbs.) Install the radiator sight shield again, check how the hood latch works and make sure the hood is aligned.

Related Chrysler Voyager Parts
 Chrysler Voyager Thermostat
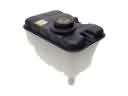 Chrysler Voyager Coolant Reservoir
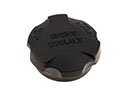 Chrysler Voyager Coolant Reservoir Cap
 Chrysler Voyager Coolant Reservoir Hose
 Chrysler Voyager Cooling Fan Assembly
 Chrysler Voyager Drive Belt
 Chrysler Voyager Fan Blade
 Chrysler Voyager Radiator Cap
 Chrysler Voyager Radiator fan
 Chrysler Voyager Serpentine Belt
 Chrysler Voyager Thermostat Gasket
 Chrysler Voyager Water Pump Gasket