JeepParts
My Garage
My Account
Cart
OEM Dodge Caravan Drive Shaft
Axle Shaft- Select Vehicle by Model
- Select Vehicle by VIN
Select Vehicle by Model
orMake
Model
Year
Select Vehicle by VIN
For the most accurate results, select vehicle by your VIN (Vehicle Identification Number).
1 Drive Shaft found

Dodge Caravan Drive Shaft Part Number: 4641899AC
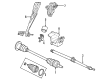
Dodge Caravan Drive Shaft
Choose OEM Drive Shaft that meet Dodge factory standards. Dodge designs and tests every component for precision and durability. Each Drive Shaft follows strict manufacturing steps to lock in quality and fit. If your Dodge Caravan matters to you, OEM parts make the smart choice. You'll get the exact look, feel, and performance you expect. Shop genuine Caravan parts at the highly competitive prices online. Enjoy a manufacturer's warranty, a hassle-free return policy, and rapid delivery. No more guesswork with off brands. Get genuine parts with exact fit and true factory performance. Shop with confidence today at JeepPartsDeal.com.
Dodge Caravan Drive Shaft Parts and Q&A
- Q: How to Remove and Install a Drive Shaft on Dodge Caravan?A:Two people are necessary to remove the propeller shaft; be sure not to let the shaft hang while still connect to these modules. First, set the transaxle to "neutral" and mark both propeller shaft flanges in the power transfer unit and rear driveline module to serve as reference for installation. The first step is to remove the six bolts from the propeller shaft transfer unit, followed by a helper taking out the three bolts from the rear rubber coupler while you're supporting the shaft. Following that, take out the bolts on the center bearing support-to-crossmember and - with support for the front shaft - gently lower the propeller shaft assembly to the ground without harming the flanges. During installation, have the transaxle in neutral and lift the propeller shaft assembly into its place, supported by a helper. As the helper holds the front end of the shaft up to the underneath part on the driveline flange, ensure the painted marks are aligned and tighten the three rubber coupler bolts by hand. Place the marks on the flanges of the power transfer unit and the shaft where they are designed to join and put in the six bolts there, torque them to 30 Nm (22 ft. lbs.) and alternate each bolt. Place the center bearing, attach the center bearing-to-crossmember bolts, torque them to 54 Nm (40 ft. lbs.) and then torque the propeller shaft rubber coupler-to-rear driveline module assembly to 54 Nm (40 ft. lbs.).