JeepParts
My Garage
My Account
Cart
OEM Dodge Grand Caravan Clock Spring
Spiral Cable Clock Spring- Select Vehicle by Model
- Select Vehicle by VIN
Select Vehicle by Model
orMake
Model
Year
Select Vehicle by VIN
For the most accurate results, select vehicle by your VIN (Vehicle Identification Number).
14 Clock Springs found


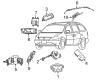
Dodge Grand Caravan Clockspring Part Number: 5082050AC
$292.31 MSRP: $430.00You Save: $137.69 (33%)Ships in 1-3 Business Days

Dodge Grand Caravan Clockspring Part Number: 68459489AA
$471.74 MSRP: $688.00You Save: $216.26 (32%)Ships in 1-3 Business Days
Dodge Grand Caravan Clockspring Part Number: 4688550
$36.77 MSRP: $46.61You Save: $9.84 (22%)Ships in 1-2 Business Days
Dodge Grand Caravan Clockspring Part Number: 5093254AB
$233.33 MSRP: $408.00You Save: $174.67 (43%)Ships in 1-2 Business DaysDodge Grand Caravan Clockspring Part Number: 5093329AB
$46.81 MSRP: $80.45You Save: $33.64 (42%)Ships in 1-3 Business DaysDodge Grand Caravan Clockspring Part Number: 5093330AB
$278.72 MSRP: $410.00You Save: $131.28 (33%)Ships in 1-3 Business Days


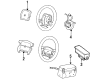
Dodge Grand Caravan Clockspring Part Number: 68459485AA
$472.89 MSRP: $689.00You Save: $216.11 (32%)
Dodge Grand Caravan Clockspring Part Number: 68025044AA
Dodge Grand Caravan Clockspring Part Number: 56007536
Dodge Grand Caravan Slip Ring Part Number: 4688554
Dodge Grand Caravan Trim Bar Part Number: 4688553
Dodge Grand Caravan Clockspring Part Number: 4688551
Dodge Grand Caravan Slip Ring Part Number: 4688655
Dodge Grand Caravan Clockspring Part Number: 56046241AC
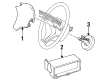
Dodge Grand Caravan Clock Spring
Choose OEM Clock Spring that meet Dodge factory standards. Dodge designs and tests every component for precision and durability. Each Clock Spring follows strict manufacturing steps to lock in quality and fit. If your Dodge Grand Caravan matters to you, OEM parts make the smart choice. You'll get the exact look, feel, and performance you expect. Shop genuine Grand Caravan parts at the highly competitive prices online. Enjoy a manufacturer's warranty, a hassle-free return policy, and rapid delivery. No more guesswork with off brands. Get genuine parts with exact fit and true factory performance. Shop with confidence today at JeepPartsDeal.com.
A Dodge Grand Caravan Clock Spring functions as a vital element that bridges the Supplemental Restraint System (SRS) by linking the airbag module to the electrical parts of the vehicle. The link functions as an essential requirement for airbag deployment in collisions to elevate passenger safety levels. The Dodge Grand Caravan Clock Spring allows the steering wheel rotation while retaining stored energy through its spiral design. Throughout the years the Grand Caravan received multiple Clock Spring designs which demonstrated enhanced material selections that increased dependability and performance. Several Grand Caravan model generations can utilize this essential part because of its extensive compatibility range. Safety improvement through the Dodge Grand Caravan Clock Spring comes with an added benefit of vehicle efficiency that sets this component apart in automotive markets. This component stands out by sustaining airbag performance for safety and features a unique design enhancing both quick installation and replacement. The Dodge car Clock Spring stands as a remarkable reliability standard that demonstrates brand dedication to quality performance in every Dodge model model.
Dodge Grand Caravan Clock Spring Parts and Q&A
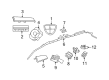
- Q: How to Install a Clock Spring Assembly on Dodge Grand Caravan?A:The first step is to put the Clock Spring assembly on the column, then link the 4-way and 6-way connectors between the Clock Spring and the wiring harness from the instrument panel. Then, put in the steering column shrouds and secure the traction control wire connector if your car has it. After that, position and connect the 4-way harness connector from the Steering Wheel with the lower harness next to the Clock Spring. When the radio is able to use a 2-way connector, fix it to the radio's remote control harness. Finally, put on the driver air bag and tighten the two screws so they both have 10 Nm (90 in.lbs.) of torque. You should not attach the negative battery cable before carrying out the system test, to avoid injury or serious harm.
- Q: How to Remove and Replace a Clock Spring Assembly on Dodge Grand Caravan?A:Disable your vehicle's Supplemental Restraint System (SRS) first by disconnecting and isolating the battery negative cable and let the system capacitor discharge for two minutes before moving forward. Since promising to repair all other damages, make sure the Clock Spring is centered in between the steering gear, wheel and shaft. Your replacement service Clock Spring is delivered pre-centered with a locking pin that you should not remove until the Steering Wheel is fitted. Make sure the front wheels point forward before you begin. Attach the multifunction switch and adjustable pedal switch to the mounting bracket and then gently slide the central Clock Spring down over the upper shaft of the steering column. Plug the instrument panel wiring into the multi-function switch, the adjustable pedal switch, Steering Angle Sensor (SAS) and Clock Spring. Make sure the two upper captive screws at the back are tight and then tighten the lower screw on the Clock Spring's front side. Replace the shrouds over the steering column. When attaching the steering wheel, put the upper dowel from the rotor into the wheel's lower bucket. Install the steering wheel firmly onto the steering column. Whenever you put in a new Clock Spring, be sure to remove the plastic locking pin for centering; if you reinstall the old one, another centering device should be removed. Reconnect the ending point of the steering wheel wire harness connector to the top connector on the Clock Spring. Connect the air bag back up to the steering wheel and put the battery's negative cable back in place.


Related Dodge Grand Caravan Parts
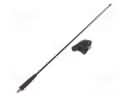 Dodge Grand Caravan Antenna
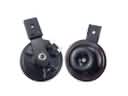 Dodge Grand Caravan Horn
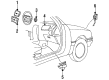
 Dodge Grand Caravan Air Bag Control Module
 Dodge Grand Caravan Air Bag Sensor
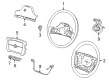
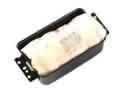 Dodge Grand Caravan Airbag
 Dodge Grand Caravan Brake Light Switch
 Dodge Grand Caravan Distributor
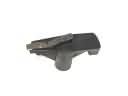 Dodge Grand Caravan Distributor Rotor
 Dodge Grand Caravan Fuse
 Dodge Grand Caravan Occupant Detection Sensor
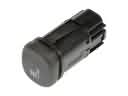 Dodge Grand Caravan Seat Heater Switch
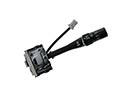 Dodge Grand Caravan Windshield Wiper Switch