JeepParts
My Garage
My Account
Cart
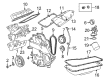
OEM Dodge Grand Caravan Intake Manifold
Engine Intake Manifold- Select Vehicle by Model
- Select Vehicle by VIN
Select Vehicle by Model
orMake
Model
Year
Select Vehicle by VIN
For the most accurate results, select vehicle by your VIN (Vehicle Identification Number).
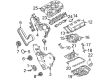
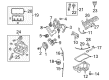
17 Intake Manifolds found


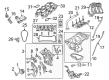
Dodge Grand Caravan Intake Manifold, Upper Part Number: 5184693AE
$367.97 MSRP: $560.00You Save: $192.03 (35%)


Dodge Grand Caravan Intake Manifold, Lower Part Number: 5184199AF
$381.29 MSRP: $560.00You Save: $178.71 (32%)
Dodge Grand Caravan Intake Plenum Part Number: 5096100AB
$128.53 MSRP: $148.00You Save: $19.47 (14%)Ships in 1-2 Business Days


Dodge Grand Caravan Intake Manifold, Lower Part Number: 4892233AA


Dodge Grand Caravan Intake Manifold, Lower Part Number: 4892233AB

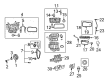
Dodge Grand Caravan Intake Manifold, Upper Part Number: 4781578AP

Dodge Grand Caravan Intake Plenum Part Number: 4781578AG
Dodge Grand Caravan Intake Manifold Part Number: 4781035AF


Dodge Grand Caravan Intake Plenum Part Number: 4781577AF

Dodge Grand Caravan Intake Manifold Part Number: 4781577AM

Dodge Grand Caravan Intake Plenum Part Number: 5083032AA

Dodge Grand Caravan Intake Plenum Part Number: 4781578AF
Dodge Grand Caravan Intake Plenum Part Number: 4621376

Dodge Grand Caravan Intake Manifold Part Number: 4648958AA
Dodge Grand Caravan Intake Manifold Part Number: 4667173

Dodge Grand Caravan Intake Manifold, Upper Part Number: 4593578AD

Dodge Grand Caravan Intake Manifold Part Number: 4781035AQ
Dodge Grand Caravan Intake Manifold
Choose OEM Intake Manifold that meet Dodge factory standards. Dodge designs and tests every component for precision and durability. Each Intake Manifold follows strict manufacturing steps to lock in quality and fit. If your Dodge Grand Caravan matters to you, OEM parts make the smart choice. You'll get the exact look, feel, and performance you expect. Shop genuine Grand Caravan parts at the highly competitive prices online. Enjoy a manufacturer's warranty, a hassle-free return policy, and rapid delivery. No more guesswork with off brands. Get genuine parts with exact fit and true factory performance. Shop with confidence today at JeepPartsDeal.com.
The Intake Manifold of the Dodge Grand Caravan is instrumental in delivering air, or the air and fuel mixture to the respective cylinders making a very important aspect of the power output and performance of the engine. It works by drawing air from the throttle body or the carburetor with differences between the designs determined by the kind of engine. For instance, earlier manufactured carbureted vehicles injection of air and fuel is done inside the manifold while the latest, highly developed multiport fuel injected engines use individual injectors. The Dodge Grand Caravan has gone over the years through the various kind of Intake Manifold styles featuring the material such as cast iron, aluminum right down to LV plastic. This change improves the efficiency of fuel and also retains cooler air for combusting the fuel. Some models have intake manifolds that are extendible and adapt to changing load conditions thus improving the engines' performance. In summing up, the Intake Manifold plays an important role in achieving the top level of the Dodge Grand Caravan's engine performance.
Dodge Grand Caravan Intake Manifold Parts and Q&A
- Q: How to Install an Intake Manifold on Dodge Grand Caravan?A:Take a little Mopar(R) Engine RTV GEN II and apply it as a bead to each of the four corners where the manifold meets the cylinder head gasket. After that, properly install the new intake manifold gasket and screw in the end seal retainers to 12 Nm (105 in. lbs.). Place the lower intake manifold and fasten each bolt using an initial torque of 1 Nm (10 in. lbs.), then follow with a sequential torque of 22 Nm (200 in. lbs.) and one last torque of 22 Nm (200 in. lbs.). Before installing anything else, ensure the intake manifold is in the right place and all the seals are there. Slide the Fuel Injectors and rail assembly into their holes, attach the electrical harness and attach the temperature sensor, heater supply and top hoses for the radiator to the manifold. Attach the fuel line, put in the upper intake manifold, attach the negative battery cable again and fill the cooling system.
- Q: How to Remove and Replace an Intake Manifold for Lower on Dodge Grand Caravan?A:The first step in replacing the intake manifold is to put a small bead of Mopar(R) Engine RTV GEN II onto all four corners where the manifold meets the cylinder head gasket. Place the intake manifold gasket onto the manifold with care. Make sure you tighten the end seal retainer bolts to 12 Nm (105 in. lbs.). Lay the lower intake manifold on the gasket. After installation, tighten the support bolt and the harness connector support bracket, as covered by the next step. Insert the last of the intake manifold bolts and tighten them all to 1 Nm (10 in. lbs.) in the beginning. Then, tighten all in two steps to 22 Nm (200 in. lbs.) in the correct order, always making sure there are seals in place after you fit the bolts. Connected the front cover support bracket using two bolts and a nut, after tightening the nut to 22 Nm (200 in. lbs.) and the bolts to 25 Nm (18 ft. lbs.). Install the upper radiator hose and apply a light layer of engine oil to the O-ring at the nozzle end of all your injectors. Position the fuel injector nozzles into the lower intake manifold openings, lock them and fit the bolts to the fuel rail, torque them to 12 Nm (106 in. lbs.). Correctly mount and link the connectors on the fuel injector electrical harness. Put the heater supply hose together with the ECT sensor's electrical connection. Attach the Ignition Coil and the bracket and afterward, join the fuel supply hose to the fuel rail. Attach the upper intake manifold as well as the EGR Tube. Add coolant to the cooling system, clip the negative battery cable in place and tighten the nut on the cable to 45 in. lbs. You should also use the ASD Fuel System Test to pressurize the fuel system wand check for possible leaks.


Related Dodge Grand Caravan Parts
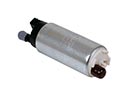 Dodge Grand Caravan Fuel Pump
 Dodge Grand Caravan Fuel Filter
 Dodge Grand Caravan Air Filter Box
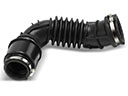 Dodge Grand Caravan Air Intake Hose
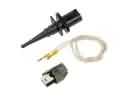 Dodge Grand Caravan Air Temperature Sensor
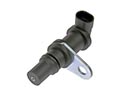 Dodge Grand Caravan Crankshaft Position Sensor
 Dodge Grand Caravan Fuel Filler Hose
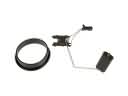 Dodge Grand Caravan Fuel Level Sensor
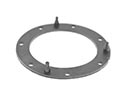 Dodge Grand Caravan Fuel Pump Gasket
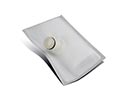 Dodge Grand Caravan Fuel Pump Strainer
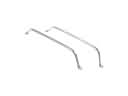 Dodge Grand Caravan Fuel Tank Strap
 Dodge Grand Caravan Intake Manifold Gasket