JeepParts
My Garage
My Account
Cart
OEM Dodge Intrepid Hood Cable
Hood Release Cable- Select Vehicle by Model
- Select Vehicle by VIN
Select Vehicle by Model
orMake
Model
Year
Select Vehicle by VIN
For the most accurate results, select vehicle by your VIN (Vehicle Identification Number).
2 Hood Cables found


Dodge Intrepid Release Cable, Front Part Number: 4580280AC


Dodge Intrepid Release Cable Part Number: 4580531
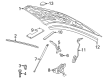
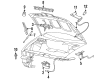
Dodge Intrepid Hood Cable
Choose OEM Hood Cable that meet Dodge factory standards. Dodge designs and tests every component for precision and durability. Each Hood Cable follows strict manufacturing steps to lock in quality and fit. If your Dodge Intrepid matters to you, OEM parts make the smart choice. You'll get the exact look, feel, and performance you expect. Shop genuine Intrepid parts at the highly competitive prices online. Enjoy a manufacturer's warranty, a hassle-free return policy, and rapid delivery. No more guesswork with off brands. Get genuine parts with exact fit and true factory performance. Shop with confidence today at JeepPartsDeal.com.
Dodge Intrepid Hood Cable Parts and Q&A
- Q: How to Maintain and Fix the Hood Cable on Dodge Intrepid?A:Begin the hood cable service by releasing the Hood Latch from inside if you are able; if the outside release is not responding, reach up through the bottom of the fascia and release the latch pawl. Take out the hood cable ferrule and end from the hood latch assembly. Untangle the hood cable, securely remove the screws from the cowl side of the vehicle and remove the left wheel splash shield. Take the cable out of the routing clips and roll the carpet back so you can see the cable. Remove the cable from inside the vehicle by taking out the taped cable clip, rubber grommet from inside the dash panel and pulling the cable through the hole on the dash liner. Installation involves setting the cable in place and then pushing it through the access hole on the dashboard. Once the cable grommet is in place, put in the screws that hold the hood cable handle to the cowl and tighten them between 2.3 and 3.4 N.m (20 to 30 in.lbs.). Locate the cable clips, fit the carpet back against the floor and then slide the left wheel splash shield into place. Next, attach the hood cable ferrule and cable end to the hood latch and test that the hood latch works properly before you close the hood.

Related Dodge Intrepid Parts
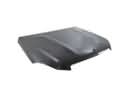 Dodge Intrepid Hood
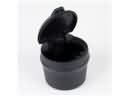 Dodge Intrepid Ashtray
 Dodge Intrepid Car Speakers
 Dodge Intrepid Dash Panels
 Dodge Intrepid Door Lock
 Dodge Intrepid Door Lock Switch
 Dodge Intrepid Hood Hinge
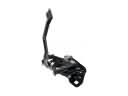 Dodge Intrepid Hood Latch
 Dodge Intrepid Lift Support
 Dodge Intrepid Shift Indicator
 Dodge Intrepid Sunroof
 Dodge Intrepid Trunk Lid Lift Support