JeepParts
My Garage
My Account
Cart
OEM Dodge Ram 2500 Van Timing Chain
Engine Timing Chain- Select Vehicle by Model
- Select Vehicle by VIN
Select Vehicle by Model
orMake
Model
Year
Select Vehicle by VIN
For the most accurate results, select vehicle by your VIN (Vehicle Identification Number).
1 Timing Chain found


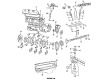
Dodge Ram 2500 Van Timing Chain Part Number: 83507095
Dodge Ram 2500 Van Timing Chain
Choose OEM Timing Chain that meet Dodge factory standards. Dodge designs and tests every component for precision and durability. Each Timing Chain follows strict manufacturing steps to lock in quality and fit. If your Dodge Ram 2500 Van matters to you, OEM parts make the smart choice. You'll get the exact look, feel, and performance you expect. Shop genuine Ram 2500 Van parts at the highly competitive prices online. Enjoy a manufacturer's warranty, a hassle-free return policy, and rapid delivery. No more guesswork with off brands. Get genuine parts with exact fit and true factory performance. Shop with confidence today at JeepPartsDeal.com.
Dodge Ram 2500 Van Timing Chain Parts and Q&A
- Q: How to service and repair the timing chain and sprockets on Dodge Ram 2500 Van?A:Remove the cover that sits over the timing chain and sprockets and then disconnect the negative battery cable before any work. Join the timing marks by turning the crankshaft with the special bolt loosened, then use a suitable socket and breaker bar to tighten the bolt fully as you rotate the crankshaft. After that, unscrew the bolt securing the camshaft sprocket and take out the timing chain, crankshaft sprocket and camshaft sprocket. To inspect the timing chain, place a scale beside it and measure any movement it has. Fasten the bolt on the camshaft sprocket with the torque wrench and socket, increasing torque to 41 Nm with the cylinder head inside. If removed, use 20 Nm, making sure the crankshaft does not move and is held if needed. Using the chain, measure how much it moves when you give it 14 Nm (30 ft. lbs.) with the heads attached and 20 Nm (15 ft. lbs.) with the heads taken out. If the movement goes past 3.175 mm (1/8 in.), it's time to replace the timing chain. Before mounting, match the timing marks on the sprockets to an imaginary line through their bores and then grasp the timing chain and connect it to both sprockets on the bench. Rotate the crankshaft and camshaft, aligning both to the points on their shafts that match the gears, then raise the sprockets and chain while still keeping them firmly against each other as you slide them both over the proper shafts. Put and tighten the camshaft bolt to a torque of 68 Nm (50 ft. lbs.). Ensure camshaft end play, between .002" and .006" when new and up to .010" with a used thrust plate, if the limits are out of range, you should install a different thrust plate. Replace the timing chain cover as the last step.

Related Dodge Ram 2500 Van Parts
 Dodge Ram 2500 Van Crankshaft Pulley
 Dodge Ram 2500 Van Dipstick
 Dodge Ram 2500 Van Dipstick Tube
 Dodge Ram 2500 Van Engine Mount Bracket
 Dodge Ram 2500 Van Harmonic Balancer
 Dodge Ram 2500 Van Oil Filler Cap
 Dodge Ram 2500 Van Oil Filter
 Dodge Ram 2500 Van Oil Pan
 Dodge Ram 2500 Van Oil Pan Gasket
 Dodge Ram 2500 Van Rocker Arm
 Dodge Ram 2500 Van Timing Cover Gasket
 Dodge Ram 2500 Van Valve Cover Gasket