JeepParts
My Garage
My Account
Cart
OEM Dodge Sprinter 3500 Voltage Regulator
Adjustable Voltage Regulator- Select Vehicle by Model
- Select Vehicle by VIN
Select Vehicle by Model
orMake
Model
Year
Select Vehicle by VIN
For the most accurate results, select vehicle by your VIN (Vehicle Identification Number).
2 Voltage Regulators found

Dodge Sprinter 3500 Regulator Part Number: 68078956AA
$96.25 MSRP: $143.00You Save: $46.75 (33%)Ships in 1-2 Business DaysDodge Sprinter 3500 Regulator Part Number: 5133774AA
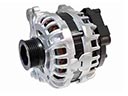
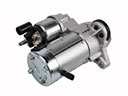
Dodge Sprinter 3500 Voltage Regulator
Choose OEM Voltage Regulator that meet Dodge factory standards. Dodge designs and tests every component for precision and durability. Each Voltage Regulator follows strict manufacturing steps to lock in quality and fit. If your Dodge Sprinter 3500 matters to you, OEM parts make the smart choice. You'll get the exact look, feel, and performance you expect. Shop genuine Sprinter 3500 parts at the highly competitive prices online. Enjoy a manufacturer's warranty, a hassle-free return policy, and rapid delivery. No more guesswork with off brands. Get genuine parts with exact fit and true factory performance. Shop with confidence today at JeepPartsDeal.com.
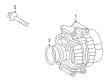
The voltage regulator is an important part that speaks of the efficiency of the Dodge Sprinter 3500 series by providing utmost electrical operations of the vehicle. This Voltage Regulator is Moreover very vital in regulating a voltage that the alternator puts out to ensure the battery's long life and efficiency of the system. smart computer regulates field current to the alternator rotor that will maintain voltage between 13.5 to 14.5 volts for the Dodge sprinter 3500 voltage regulator. Interestingly, the change from mechanical to electronic solid-state regulators in the Dodge Sprinter 3500 models has produced better performance when it comes to response to power controls, and functionalities of the vehicles. This Voltage Regulator is perfectly suitable for almost all models of the Dodge Sprinter 3500 manufactured between 2003 and 2009; It contributes to the automobile's upgraded efficiency as well as safety that is why it is obligatory for every car's equipment. The Dodge Sprinter 3500 model stands out due to its great fuel economy and powerful pulling capability, and these characteristics are enhanced by the function of the Voltage Regulator, which stabilizes the work of the electrical system depending on the current situation. The latest design and installation of the Dodge Sprinter 3500 Voltage Regulator into the alternator or PCM makes the automotive market to stand out from the rest, giving the drivers the premier feeling that they desire.
Dodge Sprinter 3500 Voltage Regulator Parts and Q&A
- Q: How to Maintain a Voltage Regulator on Dodge Sprinter 3500?A:First, take off the negative Battery Cable to stay safe while working on the regulator. Secure and raise your vehicle, then taking out bolt 2 at the turbocharger brace 1. Unbolt bolt 1 from brace 2 and turn the swivel so it is on the side. Go ahead and take out screws 3 and 4, then remove wires 5 and 6. Lift off the cover over source 1 by undoing screw 2 and nuts 3 and 4. Unscrew parts 1, 3 and 4, then take out the voltage regulator 2 by pulling it out directly from the generator. If the condition of the commutator rings 1 is worn, you should replace the whole generator assembly. If the carbon brushes 1 seem worn, you may likely need to replace the generator assembly too. Before installation, ensure the carbon brushes 1 and commutator rings 1 are not badly worn. Attach voltage regulator 2 at the back of the generator and line it up before installing it slowly into the generator. Once screws 1, 3 and 4 are in, notch fit cover 1 back in place with screw 2 and nuts 3 and 4. Put eyelets 5 and 6 next to the generator studs and tighten on the + terminal screws, BUT, ONLY use the included nut 4, attached to the + terminal and tighten it to 18 N.m (159 in. lbs.) and nut 3 instead. First, place and tighten brace bolt 1 into brace 2 to 20 N.m (15 ft. lbs.), then install bolt 2 into turbocharger brace 1 and tighten it to 30 N.m (22 ft. lbs.). Drop the car, fasten the negative battery cable and make sure the charging system runs as expected.