JeepParts
My Garage
My Account
Cart
OEM Dodge Stratus Automatic Transmission Shifter
AT Shifter- Select Vehicle by Model
- Select Vehicle by VIN
Select Vehicle by Model
orMake
Model
Year
Select Vehicle by VIN
For the most accurate results, select vehicle by your VIN (Vehicle Identification Number).
9 Automatic Transmission Shifters found


Dodge Stratus Shift Lever Part Number: CBMTC454
$17.38 MSRP: $29.85You Save: $12.47 (42%)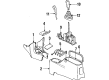
Dodge Stratus Shift Lever Part Number: CBFSC459
$19.72 MSRP: $28.35You Save: $8.63 (31%)Dodge Stratus Shift Lever Part Number: CBNTC455
$31.09 MSRP: $44.70You Save: $13.61 (31%)
Dodge Stratus Shift Lever Part Number: 4668275AH
$70.54 MSRP: $102.00You Save: $31.46 (31%)Ships in 1-2 Business DaysDodge Stratus Gear Shift Assembly Part Number: 4593297AC
Dodge Stratus Shift Lever Part Number: 4593297AB
Dodge Stratus Gear Shift Assembly Part Number: 4578146AD

Dodge Stratus Gear Shift Assembly Part Number: 4593334AH
Dodge Stratus Gear Shift Assembly Part Number: 4578167AE
Dodge Stratus Automatic Transmission Shifter
Choose OEM Automatic Transmission Shifter that meet Dodge factory standards. Dodge designs and tests every component for precision and durability. Each Automatic Transmission Shifter follows strict manufacturing steps to lock in quality and fit. If your Dodge Stratus matters to you, OEM parts make the smart choice. You'll get the exact look, feel, and performance you expect. Shop genuine Stratus parts at the highly competitive prices online. Enjoy a manufacturer's warranty, a hassle-free return policy, and rapid delivery. No more guesswork with off brands. Get genuine parts with exact fit and true factory performance. Shop with confidence today at JeepPartsDeal.com.
Dodge Stratus Automatic Transmission Shifter Parts and Q&A
- Q: How to Service and Repair an Automatic Transmission Shifter on Dodge Stratus?A:First, clear the battery by removing the negative cable and placing it away from the car to fix and repair the gearshift mechanism. Extract the set screw that holds the gearshift knob in place, pull out the bezel after that and unplug the range indicator lamp connector. The following step is to remove the center console assembly. Twist the nut on the shift cable adjust lever, then separate the shift lever pin from the core end of the shifter cable with a flat blade before lifting the cable conduit clip above it to pull the conduit free. Put a pointed object into the shift bracket to disengage the interlock lock, pull out the shifter/ignition interlock cable adjuster from the shift bracket and unhook the cable core from the shifter assembly. If your car has Autostick, unplug the connector from the control unit. Get rid of the five bolts holding the shifter together and take it out of the vehicle. To fit the shifter mechanism, put it in its original position and attach it to the floor pan with tightened nuts set to 17 Nm (150 inch lbs.). Attach the gearshift cable to the conduit bracket and hook it over the shift pin and then hold it in place with a retainer clip. Turn the cable adjuster nut to 23 Nm (200 inch lbs.), guide the interlock's core wire into the lever and ensure the slug is in place while you snap the adjuster end into the bracket. Tighten or loosen the gearshift and interlock cables as required for a good fit. When you have Autostick, plug the Autostick connector in. Replace the center console assembly, reattach the instrument panel range indicator lamp and set in the gearshift bezel. Then, attach the gearshift knob, torque the set screw to 2 Nm (20 inch lbs.) and link the negative Battery Cable back again.
- Q: How to Maintain and Fix an Automatic Transmission Shifter in the 40TE Transaxle on Dodge Stratus?A:Before working on the 40TE Automatic Transaxle gearshift mechanism, take off the negative Battery Cable first. Unscrew the knob and the set screw holding the gearshift knob, remove the knob and then the gearshift bezel and lastly unplug the range indicator lamp connector. After that, remove the center console assembly. Release the locking nut on the adjust leverage, then free the cable core end at the shifter knob's pin and remove the cable conduit from the bracket. Insert a suitable pointed object into the shift bracket to open up the interlock, then pull the adjuster end out of the gearshift mechanism bracket and unplug the cable core from the shifter. If you have an autostick, disconnect its connector and undo the five nuts beneath the shifter assembly to remove it from the car. To install, put the shifter mechanism in its original position and fasten it with nuts to 17 Nm (150 inch lbs.). Instead of the gearshift cable into the conduit bracket and onto the shift pin, holding it in place with a retainer clip and fix the cable adjuster nut tight enough so it can handle a torque of 23 Nm (200 inch lbs.). Feed the interlock cable core wire into the groove on the interlock lever, making sure the slug is placed, before pushing the adjuster end into the bracket. Tune the gearshift and interlock cables when required. Use the Autostick connector if your vehicle is equipped with Autostick. Install the center console assembly, fix the range indicator lamp and construct the gearshift bezel to your console. After that, add the gearshift knob and screw it down to 2 Nm (about 20 inch lbs.), before connecting the negative battery cable.

Related Dodge Stratus Parts
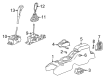
 Dodge Stratus Automatic Transmission Shift Levers
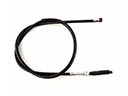 Dodge Stratus Clutch Cable
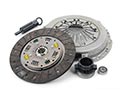 Dodge Stratus Clutch Disc
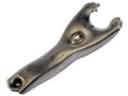 Dodge Stratus Clutch Fork
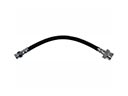 Dodge Stratus Clutch Hose
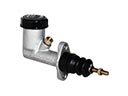 Dodge Stratus Clutch Master Cylinder
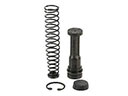 Dodge Stratus Clutch Master Repair Kit
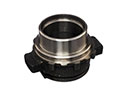 Dodge Stratus Clutch Release Bearing
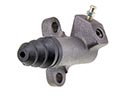 Dodge Stratus Clutch Slave Cylinder
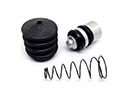 Dodge Stratus Clutch Slave Repair Kit
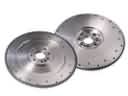 Dodge Stratus Flywheel
 Dodge Stratus Pressure Plate