JeepParts
My Garage
My Account
Cart
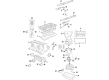
OEM Jeep Patriot Piston
Engine Pistons- Select Vehicle by Model
- Select Vehicle by VIN
Select Vehicle by Model
orMake
Model
Year
Select Vehicle by VIN
For the most accurate results, select vehicle by your VIN (Vehicle Identification Number).
5 Pistons found


Jeep Patriot Piston Part Number: 5191341AA
$162.84 MSRP: $247.00You Save: $84.16 (35%)Ships in 1-2 Business Days
Jeep Patriot Oil Pump Part Number: 5191337AA
$102.41 MSRP: $212.00You Save: $109.59 (52%)Ships in 1-2 Business Days
Jeep Patriot Piston Part Number: 5191342AA
$128.02 MSRP: $193.00You Save: $64.98 (34%)Ships in 1-2 Business Days
Jeep Patriot Piston Part Number: 5191338AA
$130.19 MSRP: $184.00You Save: $53.81 (30%)Ships in 1-2 Business Days
Jeep Patriot Piston Part Number: 5191339AA
$102.24 MSRP: $136.00You Save: $33.76 (25%)Ships in 1-2 Business Days
Jeep Patriot Piston
Choose OEM Piston that meet Jeep factory standards. Jeep designs and tests every component for precision and durability. Each Piston follows strict manufacturing steps to lock in quality and fit. If your Jeep Patriot matters to you, OEM parts make the smart choice. You'll get the exact look, feel, and performance you expect. Shop genuine Patriot parts at the highly competitive prices online. Enjoy a manufacturer's warranty, a hassle-free return policy, and rapid delivery. No more guesswork with off brands. Get genuine parts with exact fit and true factory performance. Shop with confidence today at JeepPartsDeal.com.
The Piston in Jeep Patriot vehicles is an integral system used in the internal combustion engine, which manipulates combustion power to the energy used by a vehicle. This Jeep Patriot Piston moved force from expanding gases to crankshaft, which enable it to enhance efficiency of the car. Usually made of aluminum alloys due to their high strength and low density, these pistons may contain some designs such as cooling ducts for control of pressure and heat. A range of piston types with the Jeep Patriot models has been used over the years such as the trunk pistons that work to support side forces and are fitted with oil rings and the slipper pistons that provide high speed efficiency. All of them has their uses and design changes from one to another are for improved efficiency and ruggedness. In fact, the Jeep Patriot Piston design provides a good wireframe based on light weight but muscular muscle needed to power the vehicle in different terrains.
Jeep Patriot Piston Parts and Q&A
- Q: How to Service and Repair a Piston on Jeep Patriot?A:To work on the connecting rod, start by taking away the engine and the cylinder head, draining the engine oil and then remove the Oil Pan and Oil Filter. Then, remove the balance shaft assembly and the ladder frame. Before you take out the piston, remove any carbon or lingering debris in the cylinder so you don't scratch the sides of the piston. Use a good-quality ridge reamer to eliminate the ridge found in the cylinder bores as you keep the pistons covered at all times. Turn the Crankshaft to bring the connecting rods to the middle of the cylinder bores and put a permanent mark indicating the cylinder number on each connecting rod cap, instead of using a stamp or punch. Do not damage the cracked rod and cap joint areas during screw removal. Unscrew the connecting rod bolts and the cap, as you can use them only one time. For all pistons and rods, hold the cap, carefully pull the piston and rod out of the cylinder and put the cap back on the other side of the rod as you reinstall the assembly.
- Q: How to Replace a Piston and Connecting Rod Assembly on Jeep Patriot?A:To change the piston and connecting rod assembly, first take out the engine. After that, take out the cylinder head and remove the engine oil. You should then remove the Oil Pan and the Oil Filter and after that, remove the balance shaft assembly and the ladder frame. Before getting rid of the piston, wipe away any carbon and dirt from the cylinder to prevent any scratching on the piston's lower part. Instead of removing the ridge with a regular tool, do it with a ridge reamer that keeps the top of each piston shielded. Position every connecting rod in the middle of its cylinder bore and, using a marker or paint, write the number (cylinder number) of that cylinder on the connecting rod cap to avoid damaging the cap with a punch. Disconnect the connecting rod cap and bolts, since you shouldn't install the reused bolts during motor assembly. Push out each piston and rod from the cylinder bore, replace the bearing cap on the matching rod and then repeat this step for each assembly.


Related Jeep Patriot Parts
 Jeep Patriot Oil Pan
 Jeep Patriot Oil Pump
 Jeep Patriot Camshaft
 Jeep Patriot Crankshaft
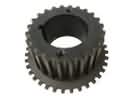 Jeep Patriot Crankshaft Gear
 Jeep Patriot Crankshaft Pulley
 Jeep Patriot Crankshaft Timing Gear
 Jeep Patriot Piston Ring Set
 Jeep Patriot Timing Chain Guide
 Jeep Patriot Timing Chain Tensioner
 Jeep Patriot Valve Stem Seal
 Jeep Patriot Variable Timing Sprocket