JeepParts
My Garage
My Account
Cart
OEM 2000 Dodge Dakota Air Duct
Air Hose- Select Vehicle by Model
- Select Vehicle by VIN
Select Vehicle by Model
orMake
Model
Year
Select Vehicle by VIN
For the most accurate results, select vehicle by your VIN (Vehicle Identification Number).
3 Air Ducts found


2000 Dodge Dakota Air Hose Part Number: 53030761
Product Specifications- Other Name: Hose; Engine Air Intake Hose; Intake Coupling; Hose Air Cleaner; Air Intake Hose
- Item Weight: 2.60 Pounds
- Item Dimensions: 22.9 x 22.9 x 6.1 inches
- Condition: New
- Fitment Type: Direct Replacement
- SKU: 53030761
- Warranty: This genuine part is guaranteed by Mopar's factory warranty.

2000 Dodge Dakota Air Duct, Front Part Number: 53031692AA
Product Specifications- Other Name: Duct - Air Cleaner; Engine Air Intake Hose, Front; Intake Coupling; Air Inlet Tube; Duct Air Cleaner; Air Intake Hose
- Position: Front
- Item Weight: 0.80 Pounds
- Condition: New
- Fitment Type: Direct Replacement
- SKU: 53031692AA
- Warranty: This genuine part is guaranteed by Mopar's factory warranty.

2000 Dodge Dakota Air Hose Part Number: 4883599AA
Product Specifications- Other Name: Hose - Air Cleaner To Throttle Body; Engine Air Intake Hose; Intake Coupling; Hose Air Cleaner To Throttle Body; Air Intake Hose
- Item Weight: 1.10 Pounds
- Item Dimensions: 12.2 x 4.6 x 4.4 inches
- Condition: New
- Fitment Type: Direct Replacement
- SKU: 4883599AA
- Warranty: This genuine part is guaranteed by Mopar's factory warranty.
2000 Dodge Dakota Air Duct Parts and Q&A
- Q: How to Maintain and Repair an Air Duct System on 2000 Dodge Dakota?A: Before you service or repair air ducts, check that the vehicle's safety features for air-bags are fully operational and that the risk of deploying them is eliminated. Both the panel and defroster ducts are built into the instrument panel assembly and the defroster outlets are located in the top cover of the instrument panel. For the panel-outlet barrels, place a trim stick or a suitable flat tool on the edge of each barrel and gently pull the outside of the barrel away from the pivot hole, before fitting the barrel into the panel housing and pressing down until it hooks onto the pivot. To change the floor duct, unscrew the four screws that keep it attached to the heater-A/C housing, remove the duct, place it back in and tighten the screws to 2.2 Nm (20 in. lbs.). First, roll down the instrument panel, disconnect the flexible duct from the hose, remove the two securing screws and pull out the adapter. Simply go backward through the initial setup, making sure to tighten the screws to 2.2 Nm (20 in. lbs.). To remove the demister hose, lift out the A/C and heater control panel, access the screw securing the hose to the tee in the demister, take it off the adapter, take the hose from the tee below the instrument panel and tighten the securing screw to 2.2 Nm (20 in. lbs.). After taking the top off the instrument panel, unscrew the ducts, gently pry them loose from the outlet and push on the flange of the outlet to take it out through the top. Uninstall the system the same way you unscrewed it and while reinstalling, set the screws to 2.2 Nm (20 in. lbs.). Open up the vehicle, take out the heater-A/C housing, fit the adapter across one part of the plenum hole, pull down on the other side to pull it away from the panel and pull it out from the plenum panel. Be sure the snap features are engaged while you reinstall, to make the connection watertight, then undo the rest of the removal steps in the other order to finish the job.
Related 2000 Dodge Dakota Parts
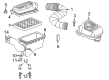
 2000 Dodge Dakota Air Filter
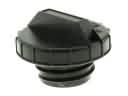 2000 Dodge Dakota Gas Cap
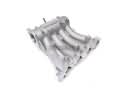 2000 Dodge Dakota Intake Manifold
 2000 Dodge Dakota Cruise Control Switch
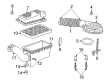
 2000 Dodge Dakota Air Filter Box
 2000 Dodge Dakota Air Intake Coupling
 2000 Dodge Dakota Cruise Control Servo
 2000 Dodge Dakota Fuel Filler Neck
 2000 Dodge Dakota Fuel Pump Gasket
 2000 Dodge Dakota Fuel Tank Skid Plate
 2000 Dodge Dakota Intake Manifold Gasket
 2000 Dodge Dakota Throttle Cable