JeepParts
My Garage
My Account
Cart
OEM 2000 Dodge Durango Engine Mount
Engine Motor Mount- Select Vehicle by Model
- Select Vehicle by VIN
Select Vehicle by Model
orMake
Model
Year
Select Vehicle by VIN
For the most accurate results, select vehicle by your VIN (Vehicle Identification Number).
14 Engine Mounts found


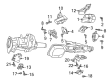
2000 Dodge Durango Front Mount, Passenger Side Part Number: 52020244AA
Product Specifications- Other Name: Insulator - Engine Mount; Engine Mount, Rear Right, Right; Engine Mount Torque Strut; Engine Mount Bracket; Motor Mount; Rear Insulator; Front Insulator; Insulator Engine Mount
- Position: Passenger Side
- Item Weight: 1.00 Pounds
- Condition: New
- Fitment Type: Direct Replacement
- SKU: 52020244AA
- Warranty: This genuine part is guaranteed by Mopar's factory warranty.

2000 Dodge Durango Front Mount, Passenger Side Part Number: 52019962AC
Product Specifications- Other Name: Insulator - Engine Mount; Engine Mount, Front Right, Right; Engine Mount Bracket; Motor Mount; Front Insulator; Insulator Engine Mount
- Position: Front Passenger Side
- Item Weight: 4.80 Pounds
- Item Dimensions: 9.4 x 5.1 x 4.8 inches
- Condition: New
- Fitment Type: Direct Replacement
- SKU: 52019962AC
- Warranty: This genuine part is guaranteed by Mopar's factory warranty.

2000 Dodge Durango Mount Bracket, Driver Side Part Number: 52020247AC
Product Specifications- Other Name: Bracket - Engine Mount; Engine Mount Bracket, Left; Motor Mount; Front Mount; Bracket Engine Mount; Engine Mount Bracket
- Position: Driver Side
- Condition: New
- Fitment Type: Direct Replacement
- SKU: 52020247AC
- Warranty: This genuine part is guaranteed by Mopar's factory warranty.

2000 Dodge Durango Front Mount, Driver Side Part Number: 52019961AC
Product Specifications- Other Name: Insulator - Engine Mount; Engine Mount, Front Left, Left; Engine Mount Bracket; Motor Mount; Front Insulator; Insulator Engine Mount
- Position: Front Driver Side
- Condition: New
- Fitment Type: Direct Replacement
- SKU: 52019961AC
- Warranty: This genuine part is guaranteed by Mopar's factory warranty.

2000 Dodge Durango Rear Mount Part Number: 52019394AD
Product Specifications- Other Name: Insulator - Transmission Support; Automatic Transmission Mount; Engine Mount Torque Strut; Bracket; Motor Mount; Rear Insulator; Lower Insulator; Bracket And Insulator Transmission Support; Insulator Engine Mount
- Condition: New
- Fitment Type: Direct Replacement
- SKU: 52019394AD
- Warranty: This genuine part is guaranteed by Mopar's factory warranty.

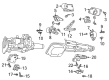
2000 Dodge Durango Front Mount, Passenger Side Part Number: 52022008
Product Specifications- Other Name: Insulator - Engine Mount; Engine Mount, Front Right, Right; Engine Mount Bracket; Motor Mount; Front Insulator; Insulator Engine Mount
- Position: Passenger Side
- Item Weight: 7.60 Pounds
- Condition: New
- Fitment Type: Direct Replacement
- SKU: 52022008
- Warranty: This genuine part is guaranteed by Mopar's factory warranty.
2000 Dodge Durango Front Mount, Driver Side Part Number: 52021009
Product Specifications- Other Name: Insulator - Engine Mount; Engine Mount, Front Left, Left; Engine Mount Bracket; Motor Mount; Front Insulator; Insulator Engine Mount
- Position: Front Driver Side
- Condition: New
- Fitment Type: Direct Replacement
- SKU: 52021009
- Warranty: This genuine part is guaranteed by Mopar's factory warranty.

2000 Dodge Durango Rear Mount Part Number: 52020845AA
Product Specifications- Other Name: Insulator - Transmission Support; Automatic Transmission Mount; Engine Mount Torque Strut; Bracket; Motor Mount; Rear Insulator; Lower Insulator; Bracket And Insulator Transmission Support; Insulator Engine Mount
- Item Weight: 2.60 Pounds
- Condition: New
- Fitment Type: Direct Replacement
- SKU: 52020845AA
- Warranty: This genuine part is guaranteed by Mopar's factory warranty.
 Product Specifications
- Other Name: Bracket - Engine Mount; Engine Mount Bracket, Right; Motor Mount; Bracket Engine Mount; Engine Mount Bracket
- Position: Passenger Side
- Item Weight: 1.70 Pounds
- Condition: New
- Fitment Type: Direct Replacement
- SKU: 52020346AB
- Warranty: This genuine part is guaranteed by Mopar's factory warranty.

2000 Dodge Durango Front Mount, Driver Side Part Number: 52020345AB
Product Specifications- Other Name: Bag - Engine Mount; Engine Mount, Left, Rear Left; Engine Mount Torque Strut; Engine Mount Bracket; Motor Mount; Rear Insulator; Front Insulator; Insulator Engine Mount
- Position: Driver Side
- Item Weight: 8.10 Pounds
- Condition: New
- Fitment Type: Direct Replacement
- SKU: 52020345AB
- Warranty: This genuine part is guaranteed by Mopar's factory warranty.

2000 Dodge Durango Mount Bracket, Driver Side Part Number: 52020257AB
Product Specifications- Other Name: Bracket - Engine Mount; Engine Mount Bracket, Left; Motor Mount; Bracket Engine Mount; Engine Mount Bracket
- Position: Driver Side
- Condition: New
- Fitment Type: Direct Replacement
- SKU: 52020257AB
- Warranty: This genuine part is guaranteed by Mopar's factory warranty.
 Product Specifications
- Other Name: Insulator - Engine Mount; Engine Mount, Left, Rear Left; Engine Mount Torque Strut; Engine Mount Bracket; Motor Mount; Rear Insulator; Front Insulator; Insulator Engine Mount
- Position: Rear Driver Side
- Item Weight: 8.10 Pounds
- Condition: New
- Fitment Type: Direct Replacement
- SKU: 52020243AB
- Warranty: This genuine part is guaranteed by Mopar's factory warranty.

2000 Dodge Durango Rear Mount Part Number: 52019998
Product Specifications- Other Name: Insulator - Transmission Support; Automatic Transmission Mount; Engine Mount Torque Strut; Bracket; Motor Mount; Rear Insulator; Lower Insulator; Insulator; Bracket And Insulator Transmission Support; Isolator Engine Mount
- Item Weight: 2.80 Pounds
- Item Dimensions: 7.6 x 4.0 x 3.0 inches
- Condition: New
- Fitment Type: Direct Replacement
- SKU: 52019998
- Warranty: This genuine part is guaranteed by Mopar's factory warranty.
 Product Specifications
- Other Name: Bracket - Engine Mount; Engine Mount Bracket, Right; Motor Mount; Bracket Engine Mount; Engine Mount Bracket
- Position: Passenger Side
- Condition: New
- Fitment Type: Direct Replacement
- SKU: 52019958AC
- Warranty: This genuine part is guaranteed by Mopar's factory warranty.
2000 Dodge Durango Engine Mount Parts and Q&A
- Q: How to Properly Support and Service Engine Mounts on 2000 Dodge Durango?A: These vehicles are designed so that the engine front support brackets connect the engine block and axle housing firmly together. While doing front support assembly tasks, the engine needs to be supported properly. You should start by taking the black cable off the battery and then hoisting the car. Attach the engine lifting fixture and then take out the front axle assembly. For the left mount insulator, first take off the starter wires and the starter motor assembly and then the insulator to frame through bolt. Lift the engine a bit, remove the upper insulator, then support the install base and through bolt with the bracket stud nut. Detach the support bracket to transmission bell housing bolt(s), as well as the bolts securing the bracket to the engine block, before you can pull out the support bracket. If the bolts for the engine support were removed during installation, mount them to their bolts tightening with 41 Nm (30 ft. lbs.). Similarly, install the bolts onto the transmission bellhousing and tighten those to 88 Nm (65 ft. lbs.). Following that, install the engine mount insulator, securing the insulator to the support bracket with a tightening force of 41 Nm (30 ft. lbs.). Then, tighten the insulator to the support bracket through bolt nut to 102 Nm (75 ft. lbs.) force. Put the engine down and add the insulator by bolt and nut to the frame through hole, with the nut tightened to 95 Nm (70 ft. lbs.). Attach the starter motor and mounting bolts after that and tighten them to 68 Nm (50 ft. lbs.), then link the starter wires. Get rid of the engine lifting fixture, set in place the front axle assembly, have the vehicle lowered and then hook up the ground wire to the battery once more.
Related 2000 Dodge Durango Parts
 2000 Dodge Durango Coolant Filter
 2000 Dodge Durango Crankshaft
 2000 Dodge Durango Crankshaft Pulley
 2000 Dodge Durango Crankshaft Timing Gear
 2000 Dodge Durango Intake Valve
 2000 Dodge Durango Lash Adjuster
 2000 Dodge Durango Oil Filler Cap
 2000 Dodge Durango Oil Pan Gasket
 2000 Dodge Durango Piston
 2000 Dodge Durango Rod Bearing
 2000 Dodge Durango Timing Chain Tensioner
 2000 Dodge Durango Timing Cover Gasket