JeepParts
My Garage
My Account
Cart
OEM 2000 Dodge Neon Piston
Engine Pistons- Select Vehicle by Model
- Select Vehicle by VIN
Select Vehicle by Model
orMake
Model
Year
Select Vehicle by VIN
For the most accurate results, select vehicle by your VIN (Vehicle Identification Number).
1 Piston found

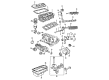
2000 Dodge Neon Piston Part Number: 5103509AA
Product Specifications- Other Name: Piston Pin And Rod; Piston Pin And Rod
- Replaces: 4897642AB
- Item Weight: 2.50 Pounds
- Item Dimensions: 12.4 x 5.7 x 4.5 inches
- Condition: New
- Fitment Type: Direct Replacement
- SKU: 5103509AA
- Warranty: This genuine part is guaranteed by Mopar's factory warranty.
2000 Dodge Neon Piston Parts and Q&A
- Q: How to Remove and Replace a Piston in an Engine on 2000 Dodge Neon?A: First, remove the cylinder head and the oil pan before you try to remove and replace the piston. Apply a genuine ridge reamer to get rid of the top ridge on the bore before taking the piston out, mark each piston with its cylinder number for identification and ensure the tops are protected. Don't use a number punch or marker on connecting rods to keep them safe. Put the cylinder number on the rod and cap with either an engraving pen or permanent marker. Since pistons are stamped, you'll see an L stamp for lighter ones and H for heavier and service pistons marked with S can all be used together. All types of piston assemblies should be the same in weight and the weight designation stamps should be positioned towards the timing belt side on the engine. Attach a cap magnet to the most prominent edge of the crankshaft to locate connecting rod #4, then shift the cap so the crankshaft centerlines with connecting rod #1 and turn it to match connecting rod #2 and #3 as you did with #4. After that, remove all bolts holding the connecting rod caps, install new bolts and reuse the ones you removed for reassembly. Put in Special Tool 8189, connecting rod guides, to block any wear on the crankshaft journal and fractured rod parts and then slowly push each piston and rod out of the cylinder bore, so you do not scratch the rod and cap joint surfaces. After the guides have been removed, fit the bearing cap back on the mating rod. To take out the piston rings, put the identification mark on the piston ring face in line with the piston crown, then expand the upper and intermediate piston rings, move on to the upper oil ring side rail, lower oil ring side rail and oil ring expander, after which, clean all ring rails in the grooves to get rid of carbon. Install the rings, with the manufacturer's identification facing upwards, in this way: oil ring expander, upper oil ring side rail, lower oil ring side rail, No. 2 intermediate piston ring and No. 1 upper piston ring. Arrange the piston and oil ring end gaps so that the oil ring expander gap is 45° from the nearest side rail gap. Assemble the compression rings so that their gaps are staggered and push the oil ring expander holes to the end of each cylinder. First, place both the piston head and the rings in clean engine oil, slide over the ring compressor and check that the rings remain where they should be. The front of the engine's inside should face the L or H stamp. Position the journal in the center of the cylinder bore using the crankshaft, apply clean engine oil to the journal, set the upper bearing half into place and install the connecting rod guides. Place the piston assembly into the bore, guide the connecting rod over the crankshaft and let it fall using a hammer handle as you guide the connecting rod into the cylinder. After removing the connecting rod guides, fit the lower bearing half and cap, tighten down the new bolts to 27 Nm (20 ft. lbs.), then another 1/4 turn and attach the cylinder head and oil pan.
Related 2000 Dodge Neon Parts
 2000 Dodge Neon Oil Filter
 2000 Dodge Neon Oil Pan
 2000 Dodge Neon Timing Belt
 2000 Dodge Neon Cam Gear
 2000 Dodge Neon Crankshaft Thrust Washer Set
 2000 Dodge Neon Crankshaft Timing Gear
 2000 Dodge Neon Cylinder Head Gasket
 2000 Dodge Neon Engine Mount Bracket
 2000 Dodge Neon Exhaust Valve
 2000 Dodge Neon Intake Valve
 2000 Dodge Neon Rod Bearing
 2000 Dodge Neon Valve Stem Seal