JeepParts
My Garage
My Account
Cart
OEM 2000 Dodge Ram 3500 Van A/C Clutch
Air Conditioning Clutch- Select Vehicle by Model
- Select Vehicle by VIN
Select Vehicle by Model
orMake
Model
Year
Select Vehicle by VIN
For the most accurate results, select vehicle by your VIN (Vehicle Identification Number).
1 A/C Clutch found

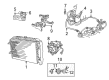
2000 Dodge Ram 3500 Van Clutch Part Number: 5093765AA
Product Specifications- Other Name: Clutch - A/C Compressor; A/C Compressor Clutch; Clutch A/C Compressor
- Item Weight: 4.70 Pounds
- Condition: New
- Fitment Type: Direct Replacement
- SKU: 5093765AA
- Warranty: This genuine part is guaranteed by Mopar's factory warranty.
2000 Dodge Ram 3500 Van A/C Clutch Parts and Q&A
- Q: How can the refrigerant system remain fully charged during replacement of the A/C clutch, pulley, or coil on 2000 Dodge Ram 3500 Van?A: Full refrigerant is preserved throughout the process of changing the compressor clutch, pulley or coil, since these can be replaced in the car. You should start by unhooking and isolating the battery negative cable and after that, remove the serpentine drive belt. Unplug the wire harness connector for the compressor clutch coil. Then, after removing the clutch plate and shims, hammer the plate lightly with a plastic hammer if it's stuck. Don't try to separate the clutch plate from the clutch pulley since it can damage the compressor clutch assembly. After that, take out the snap ring on the compressor clutch pulley with snap ring pliers, then use a 3 jaw puller and a shaft protector # MC-91211 so you don't harm the compressor shaft as you remove the clutch pulley assembly. Pull the screw and retainer off the clutch coil lead wire harness on the compressor front housing and separate the compressor clutch wire harness connectors from the thermal limiter switch. Make sure the direction on the clutch field coil assembly is correct on the compressor and snap off the ring connecting it securely to the front housing, then remove the clutch field coil assembly. Look at the surface where the clutch pulley meets the front plate and change them if there is too much damage. Examine the friction surfaces for oil and inspect around the compressor shaft and nose as well. If you find plenty of oil, the seal is defective and the compressor will have to be replaced. If you find the clutch pulley bearing rough or with too much grease, change it out. Center the back of the clutch field coil against the front housing of the compressor, so the locating pin lines up with the corresponding indentation. With the bevel side facing out, correctly set in the snap ring and then install the clutch field coil. Attach the retaining clip for the lead wire harness to the clutch coil and tighten the screw. After that, plug the compressor clutch wire harness into the thermal limiter switch. Slide the pulley assembly and clutch pulley onto the compressor so the friction surfaces do not get dirt and as you put the clutch pulley snap ring in place, make sure it goes in with the bevel facing outside. Use some 0.07 mm (0.027 inch) shims as a trial stack on the compressor shaft, place the splines of the clutch plate and compressor shaft together and place the clutch plate in position. When installing the front rotor snap ring, be sure the bevel part is facing outwards and make sure it's securely in place. Use a feeler gauge to check that the air gap between the clutch plate and pulley is somewhere between 0.35 to 0.65 mm (0.013 to 0.025 inch), fixing shims to change the air gap if required. Screw in the compressor shaft nut until the torque reaches 17.7 Nm (13 ft. lbs) and once it's tight, analyze the air gap all around to see if it's still correct. Lastly, return the previous steps you took to finish putting together the new heat exchanger. Once you have installed the clutch, turn on the blower, keep the engine speed between 1500 and 2000 rpm, put the system in recirculation mode (Max-A/C) and cycle the clutch for around fifty seconds (by turning the system on for five seconds and then off for another five seconds five times).
Related 2000 Dodge Ram 3500 Van Parts
 2000 Dodge Ram 3500 Van A/C Accumulator
 2000 Dodge Ram 3500 Van A/C Compressor
 2000 Dodge Ram 3500 Van A/C Compressor Cut-Out Switches
 2000 Dodge Ram 3500 Van A/C Condenser
 2000 Dodge Ram 3500 Van A/C Expansion Valve
 2000 Dodge Ram 3500 Van A/C Hose
 2000 Dodge Ram 3500 Van Blend Door Actuator
 2000 Dodge Ram 3500 Van Blower Motor
 2000 Dodge Ram 3500 Van Blower Motor Resistor
 2000 Dodge Ram 3500 Van Evaporator
 2000 Dodge Ram 3500 Van Heater Control Valve
 2000 Dodge Ram 3500 Van HVAC Pressure Switch