JeepParts
My Garage
My Account
Cart
OEM 2001 Chrysler PT Cruiser Crankshaft
Crank Shaft- Select Vehicle by Model
- Select Vehicle by VIN
Select Vehicle by Model
orMake
Model
Year
Select Vehicle by VIN
For the most accurate results, select vehicle by your VIN (Vehicle Identification Number).
1 Crankshaft found

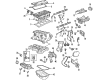
2001 Chrysler PT Cruiser Crankshaft Part Number: 4621917
Product Specifications- Other Name: Crankshft; Crankshaft, Machined
- Item Weight: 50.80 Pounds
- Item Dimensions: 23.3 x 8.8 x 8.4 inches
- Condition: New
- Fitment Type: Direct Replacement
- SKU: 4621917
- Warranty: This genuine part is guaranteed by Mopar's factory warranty.
2001 Chrysler PT Cruiser Crankshaft Parts and Q&A
- Q: How to Remove and Install a Crankshaft in an Engine Assembly on 2001 Chrysler PT Cruiser?A: Stop the engine, take out the engine and break it away from the transaxle to be able to remove the crankshaft. After that, take out the flex plate and crankshaft rear oil seal and finally install the engine onto a repair stand. Also, you need to remove the oil filter, the oil pan, the engine support bracket and the timing belt covers, belt and pump. After the cylinder assembly has been removed, the balance shafts and housing assembly should be removed and all bedplate bolts from the engine block should also be unfastened. Easy tap the bedplate so it comes loose from the engine block dowel pins with a mallet and don't push up from one side or the cylinder block to bedplate alignment will be disturbed, as will the thrust bearing. Care should be taken to remove the bedplate evenly so that the dowel pins, thrust bearing and journal bearings on the crankshaft are not damaged when the housing is lifted off. During installation, the bearing shells should be fitted with their lubrication groove into the cylinder block, so the oil holes line up in both and the bearing tabs fit into the tab slots on the block. You should ensure the oil doesn't touch the bedplate mating surface to help the sealer work properly. Before attaching the crankshaft, you should oil the bearings and journals and use only the specified anaerobic sealer on the bedplate not to harm the engine. The cylinder block's center should receive a 1.5 to 2.0 mm line of Mopar Bedplate Sealant. When adding the main bearing on a side, put it into the main bearing cap/bedplate, with the bearing tabs seated over the bedplate's slots first, before fitting the main bearing/bedplate into the engine block. Oil the bolts carefully with engine oil, then remove the excess and secure your main bearing bedplate bolts 11, 17 and 20 until the bedplate just touches the main bearing surface where you see the notch. Proper thrust bearing alignment should be achieved by turning the crankshaft, positioning number 4 piston at TDC, going to the crankshaft's maximum rear-right travel and then its maximum forward-right travel. Slide a suitable tool behind the rear of the cylinder block and the rear crankshaft counterweight to secure the crankshaft at its most frontward place and then tighten bolts (1-10) to 41 Nm (30 ft. lbs.) after installing them in the right sequence. After taking away the wedge, tighten bolts 1-10 again to 41 Nm (30 ft. lbs.) and add an additional 1/4 turn or more to finish. Secure the base of the main bearing bedplate to the block with bolts (11-20) and tighten each to 28 Nm (20 ft. lbs.) in the correct order. After putting in the bedplate, measure the crankshaft turning torque and confirm that it isn't greater than 5.6 Nm (50 in. lbs.) In the end, set the balance shafts, housing assembly, oil pump and timing belt in place, along with the rear cover for the timing belt and then install the front covers, engine support bracket, oil pan and oil filter. First, apply Mopar Lock & Seal Adhesive to the bolt threads, screw in the crankshaft rear oil seal, flex plate and transaxle to 95 Nm (70 ft. lbs.). After connecting the engine and transaxle, use 101 Nm (75 ft. lbs.) of torque for the bolts and then reinstall the engine.
Related 2001 Chrysler PT Cruiser Parts
 2001 Chrysler PT Cruiser Cam Gear
 2001 Chrysler PT Cruiser Camshaft Seal
 2001 Chrysler PT Cruiser Crankshaft Thrust Washer Set
 2001 Chrysler PT Cruiser Cylinder Head
 2001 Chrysler PT Cruiser Dipstick
 2001 Chrysler PT Cruiser Dipstick Tube
 2001 Chrysler PT Cruiser Oil Filler Cap
 2001 Chrysler PT Cruiser Piston Ring Set
 2001 Chrysler PT Cruiser Rocker Arm
 2001 Chrysler PT Cruiser Rod Bearing
 2001 Chrysler PT Cruiser Timing Cover
 2001 Chrysler PT Cruiser Valve Stem Seal