JeepParts
My Garage
My Account
Cart
OEM 2001 Chrysler Town & Country A/C Clutch
Air Conditioning Clutch- Select Vehicle by Model
- Select Vehicle by VIN
Select Vehicle by Model
orMake
Model
Year
Select Vehicle by VIN
For the most accurate results, select vehicle by your VIN (Vehicle Identification Number).
1 A/C Clutch found


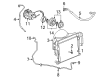
2001 Chrysler Town & Country Clutch Kit Part Number: 5066225AA
Product Specifications- Other Name: Clutch Kit - A/C Compressor; A/C Compressor Clutch; Repair Kit; Hardware Kit; Clutch; Clutch Overhaul Kit A/C Compressor
- Item Weight: 0.50 Pounds
- Item Dimensions: 2.4 x 1.8 x 0.8 inches
- Condition: New
- Fitment Type: Direct Replacement
- SKU: 5066225AA
- Warranty: This genuine part is guaranteed by Mopar's factory warranty.
2001 Chrysler Town & Country A/C Clutch Parts and Q&A
- Q: How to Replace the A/C Clutch on 2001 Chrysler Town & Country?A: Replacing the A/C compressor clutch starts with removing the vehicle's negative battery cable and lifting it off the ground. Remove the drive belt first, then take the engine wire harness connector for the compressor clutch coil off from the clutch coil pigtail wire connector on the compressor. Specific engine models require you to remove the retainer on the engine wire harness and undo the three screws and one nut that attach the compressor to the engine. Press the compressor's front end downward until you can take out the clutch and afterward, raise the compressor by securing the upper left mounting screw. Loose the compressor shaft bolt and, using a band-type oil filter wrench or strap wrench as needed, tap the clutch plate with a plastic hammer while it comes off with any included shim(s). Remove the pulley from the compressor by first removing the snap ring holding it with snap ring pliers (C-4574 or its equal). After that, release the screw that holds the clutch coil pigtail wire connector bracket and ground clip to the compressor housing and then remove the external snap ring on the clutch coil, freeing it from the compressor. Before installing, connect the dowel pin from the back of the clutch coil to the hole on the front of the compressor cover, making sure the pigtail wires are not squeezed. After that, install a new snap ring so the bevel is uppermost. After the snap ring is in place, tighten the screw for the screw which holds the pigtail wire connector bracket. Affix the pulley to the compressor's side, tapping it gently as needed and secure it with a new snap ring, so the bevel side faces outward. Should you be able to reuse the old clutch plate and pulley, just put the old shim(s) back in; but for new parts, fit a group of shims 1.0 mm thin onto the compressor shaft shoulder before putting on the clutch plate. Turn the compressor shaft nut a full turn using a wrench until you reach a force of 17.5 Nm or 155 in. lbs. For those who replace their clutch, confirm that the air space between the plate and pulley is correct. For propellers fitted with fixable engines, attach the compressor to the engine rod with loose screws and a nut and then fix them in the given order to 54 Nm (40 ft. lbs.). Push the retainer on the engine wire harness and build back the engine wire harness on its connector for the compressor clutch coil. Replace the serpentine accessory drive belt, drop the vehicle and bring back the negative cable to the battery. Burnishing is required for any clutch components that you install.
Related 2001 Chrysler Town & Country Parts
 2001 Chrysler Town & Country A/C Accumulator
 2001 Chrysler Town & Country A/C Compressor
 2001 Chrysler Town & Country A/C Condenser
 2001 Chrysler Town & Country A/C Expansion Valve
 2001 Chrysler Town & Country A/C Hose
 2001 Chrysler Town & Country Ambient Temperature Sensor
 2001 Chrysler Town & Country Blend Door Actuator
 2001 Chrysler Town & Country Blower Motor
 2001 Chrysler Town & Country Blower Motor Resistor
 2001 Chrysler Town & Country Evaporator
 2001 Chrysler Town & Country Heater Core
 2001 Chrysler Town & Country HVAC Pressure Switch