JeepParts
My Garage
My Account
Cart
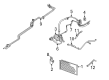
OEM 2001 Chrysler Voyager A/C Accumulator
Accumulator- Select Vehicle by Model
- Select Vehicle by VIN
Select Vehicle by Model
orMake
Model
Year
Select Vehicle by VIN
For the most accurate results, select vehicle by your VIN (Vehicle Identification Number).
2 A/C Accumulators found

2001 Chrysler Voyager Dehydrator Part Number: 5066635AC
$46.40 MSRP: $107.00You Save: $60.60 (57%)Product Specifications- Other Name: Line - Receiver; A/C Receiver Drier; Drier Desiccant Element; A/C Accumulator; Accumulator; Drier
- Replaces: 5066635AB
- Item Weight: 1.50 Pounds
- Item Dimensions: 4.0 x 4.1 x 8.1 inches
- Condition: New
- Fitment Type: Direct Replacement
- SKU: 5066635AC
- Warranty: This genuine part is guaranteed by Mopar's factory warranty.

2001 Chrysler Voyager Dehydrator Part Number: 5066503AB
$99.87 MSRP: $128.00You Save: $28.13 (22%)Ships in 1-2 Business DaysProduct Specifications- Other Name: Drier - Receiver; A/C Receiver Drier; Drier Desiccant Element; A/C Accumulator; Accumulator; Drier; Drier Receiver
- Item Weight: 1.40 Pounds
- Item Dimensions: 8.2 x 3.8 x 4.1 inches
- Condition: New
- Fitment Type: Direct Replacement
- SKU: 5066503AB
- Warranty: This genuine part is guaranteed by Mopar's factory warranty.
2001 Chrysler Voyager A/C Accumulator Parts and Q&A
- Q: How to Service and Repair an A/C Accumulator on 2001 Chrysler Voyager?A: Start by pulling the refrigerant from the refrigerant system when servicing or repairing an A/C accumulator. Open the left door to the housing covering the air cleaner on the right side of the engine compartment and take it out. After that, remove the screw that holds the liquid line front section fitting to the top of the A/C accumulator and unplug the liquid line fitting from the A/C accumulator inlet port, tossing out the seal. You should put a plug into or cover the open end of the liquid line and of the A/C accumulator port with tape. Next, take out the screw holding the liquid line rear section fitting to the top of the A/C accumulator and unhook the liquid line fitting from the A/C accumulator outlet port, throwing away the seal on the fitting. Again, screw in a plug or cover the liquid line fitting with tape and also cover the A/C accumulator outlet port. Unscrew the two nuts keeping the A/C accumulator mounting bracket in place and draw out the A/C accumulator and bracket unit from the front strut tower's weld studs. After you replace the A/C accumulator, put in 30 milliliters (1 fluid ounce) of recommended refrigerant oil. Put the A/C accumulator and mounting bracket unit on the welded studs of the right front strut tower and use a 6 mm wrench to tighten the two nuts to 89 in. lbs. Pull out the tape or plugs from both the side of the A/C accumulator and its outlet. Add oil to a new O-ring seal, set it over the fitting and attach the fitting to the A/C accumulator outlet with the 2-Nm (18-in. lbs.) screw. Take off the tape or plugs from the liquid line front section fitting and the A/C accumulator inlet port, grease another new O-ring with clean refrigerant oil and set it onto the liquid line fitting. Fit the liquid line into the A/C accumulator inlet opening and turn the screw to a tightness of 2 Nm (18 in. lbs.). Set the air cleaner housing in its place on the right side, empty the entire refrigerant system and then charge it.
Related 2001 Chrysler Voyager Parts
 2001 Chrysler Voyager Blower Motor Resistor
 2001 Chrysler Voyager A/C Clutch
 2001 Chrysler Voyager A/C Compressor
 2001 Chrysler Voyager A/C Condenser
 2001 Chrysler Voyager A/C Expansion Valve
 2001 Chrysler Voyager A/C Hose
 2001 Chrysler Voyager A/C Switch
 2001 Chrysler Voyager Blend Door Actuator
 2001 Chrysler Voyager Blower Control Switches
 2001 Chrysler Voyager Blower Motor
 2001 Chrysler Voyager Cabin Air Filter
 2001 Chrysler Voyager Evaporator