JeepParts
My Garage
My Account
Cart
OEM 2001 Chrysler Voyager Timing Belt
Engine Timing Belt- Select Vehicle by Model
- Select Vehicle by VIN
Select Vehicle by Model
orMake
Model
Year
Select Vehicle by VIN
For the most accurate results, select vehicle by your VIN (Vehicle Identification Number).
1 Timing Belt found


2001 Chrysler Voyager Timing Belt Part Number: 4621844
$67.90 MSRP: $102.00You Save: $34.10 (34%)Ships in 1-2 Business DaysProduct Specifications- Other Name: Belt - Timing; Engine Timing Belt; Timing Belt Kit; Belt, Timing; Belt Timing
- Item Weight: 0.80 Pounds
- Item Dimensions: 20.9 x 1.6 x 1.5 inches
- Condition: New
- Fitment Type: Direct Replacement
- SKU: 4621844
- Warranty: This genuine part is guaranteed by Mopar's factory warranty.
2001 Chrysler Voyager Timing Belt Parts and Q&A
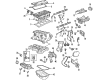
- Q: How to Remove and Install a Timing Belt on 2001 Chrysler Voyager?A: Take away the air cleaner upper cover, housing and clean air tube, then remove the make-up air hose from the cylinder head cover to remove the timing belt. Mount the vehicle on a hoist, get rid of the wheel on the right front and remove the inner splash shield. Then, take the crankshaft vibration damper out, along with the air conditioner/generator belt tensioner and pulley assembly and unbolt the timing belt lower front cover to get it off. Lift the vehicle to the top, undo the bolts connecting the timing belt case cover and remove the right engine mounting and its bracket. Whenever you are placing the timing marks together, move the engine rotating only the crankshaft and do not rotate the camshaft after removing the timing belt. Turn the crankshaft until the mark on the oil pump housing is directly above the mark on the crankshaft sprocket on the trailing edge of the tooth. Slide in a 6 mm Allen wrench, together with a 1/8" Allen wrench, into the belt tensioner and with the former rotated counterclockwise, push down lightly on the latter until it locks. Before removing the crankshaft sprocket, unhook the negative cable on the battery, take out the timing belt and use Special Tools 6793 and C-4685-C2. Don't clean a timing belt if it becomes soiled; replace it if necessary. All the sprockets, however, need to be cleaned with an appropriate solvent. Set the crankshaft sprocket to the correct depth using Special Tool 6792, install the sprocket and belt and follow the timing belt path. At TDC, match the sprocket of the crankshaft and the arrow on the oil pump housing. Next, set the exhaust camshaft timing marks so it is a half notch below the intake, making sure the pointer arrows on each camshaft face up. Put the timing belt around the crankshaft, go through the water pump sprocket, the idler pulley and the camshaft sprockets, then continue to the tensioner. Counterclockwise movement of the exhaust camshaft sprocket brings the marks into alignment and allows for belt slack, so take out the pull pin or Allen wrench from the belt tensioner. Once the timing belt is in and the tensioner has been released, rotate the crankshaft two full time and make sure that the marks from both shafts are aligned. Remember to install the engine mount bracket, timing belt front covers and bolts, air conditioning/generator belt tensioner and pulley, right engine mount, crankshaft vibration damper, accessory drive belts, drive belt splash shield, right front wheel, make-up air hose to the cylinder head cover and air cleaner housing, upper cover and clean air tube.
Related 2001 Chrysler Voyager Parts
 2001 Chrysler Voyager Camshaft
 2001 Chrysler Voyager Camshaft Seal
 2001 Chrysler Voyager Coolant Filter
 2001 Chrysler Voyager Crankshaft
 2001 Chrysler Voyager Cylinder Head
 2001 Chrysler Voyager Dipstick Tube
 2001 Chrysler Voyager Oil Filter
 2001 Chrysler Voyager Rocker Arm
 2001 Chrysler Voyager Rod Bearing
 2001 Chrysler Voyager Timing Chain
 2001 Chrysler Voyager Timing Chain Tensioner
 2001 Chrysler Voyager Valve Stem Seal