JeepParts
My Garage
My Account
Cart
OEM Chrysler Voyager Timing Belt
Engine Timing Belt- Select Vehicle by Model
- Select Vehicle by VIN
Select Vehicle by Model
orMake
Model
Year
Select Vehicle by VIN
For the most accurate results, select vehicle by your VIN (Vehicle Identification Number).
2 Timing Belts found


Chrysler Voyager Timing Belt Part Number: 4621844
$67.90 MSRP: $102.00You Save: $34.10 (34%)Ships in 1-2 Business Days
Chrysler Voyager Timing Belt Part Number: 5096327AB
Chrysler Voyager Timing Belt
Choose OEM Timing Belt that meet Chrysler factory standards. Chrysler designs and tests every component for precision and durability. Each Timing Belt follows strict manufacturing steps to lock in quality and fit. If your Chrysler Voyager matters to you, OEM parts make the smart choice. You'll get the exact look, feel, and performance you expect. Shop genuine Voyager parts at the highly competitive prices online. Enjoy a manufacturer's warranty, a hassle-free return policy, and rapid delivery. No more guesswork with off brands. Get genuine parts with exact fit and true factory performance. Shop with confidence today at JeepPartsDeal.com.
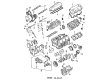
The Chrysler Voyager Timing Belt is one of those parts that are crucial in adding strength to the minivan from a Chrysler stable. Located between the crankshaft and the camshaft, the Timing Belt is responsible for the proper synchronization of engine valves and piston movements as this is crucial for the optimum performance of the car's engine. For example, with reference to the Chrysler Voyager Timing Belt, Chrysler has over the years refined the belt to include some design features such as the curved teeth that enable it to last longer and reduce on noise production. This evolution act as a display of engineering proficiency of Chrysler which in turn makes the Voyager one of the most reliable vehicles both to the families and the individuals. Applicable on the numerous Voyager models, the Timing Belt proves crucial in increasing efficiency as well as preventing a risky engine knock. Although some manufacturers have now recommended that the replacement of these parts should be done at 60,000 miles or more depending on the material that is used, routine checkups on these parts are still very important. At the same time as replacing the Timing Belt it is recommendable to also replace tensioners and idler pulleys in order to maintain smooth running. It is evident of the Chrysler Voyager which has a sales record of over 12 million units in the global automotive market, this vehicle has a high reliability rating and apart from that it as consists of flexible seating system making it comfortable for travel and has a powerful 3.6L Pentastar V6 engine. In conclusion, the Chrysler Voyager Timing Belt is a perfect example of how the company takes time to ensure that only the optimal is offered in the Voyager and this is what has made it a timeless model.
Chrysler Voyager Timing Belt Parts and Q&A
- Q: How to Remove and Install a Timing Belt on Chrysler Voyager?A:Start by removing the air cleaner upper cover, housing and clean air tube and then pull loose the make-up air hose on the cylinder head cover to take out the timing belt. Put the car up on a hoist, take off the right front wheel and its splash shield and remove the accessory Drive Belts. Subsequently, take off the Crankshaft vibration damper and after that remove the air conditioner/generator Belt Tensioner and pulley assembly. Open the timing belt lower front cover, undo its bolts and pull off the cover, after which lower the vehicle and take the upper front cover off by removing its bolts. Separate the right Engine Mount as well as its engine mount bracket. Rotation of the engine from the crankshaft will move the Camshaft and keep its timing correct, so preserve valve components by not rotating the camshaft once you have removed the timing belt. Move the crankshaft until the line for TDC on the oil pump housing lines up with TDC on the crankshaft sprocket, positioned on the sprocket's trailing edge. After inserting a 6 mm Allen wrench into the belt tensioner, turn it counterclockwise and very gently press a 1/8" or 3 mm Allen wrench in until it clicks into place. Take out the timing belt. Disconnect the negative battery cable, remove the timing belt and place Special Tools 6793 as well as C-4685-C2 to take the crankshaft sprocket out. Don't try to clean your timing belt; as soon as it is dirty, you should replace it and the parts called sprockets should be cleaned using an appropriate solvent. Make sure you use Special Tool 6792 to put the crankshaft sprocket to the correct depth on installation, so that timing belt alignment is correct. Insert the crankshaft sprokethrough the pulley fan, then ensure the timing belt is aligned with the arrow on the oil pump housing and that the exhaust camshaft sprocket is a bit lower than the intake camshaft sprocket, so the arrows on both camshafts face up. Start putting on the timing belt by holding it to the crankshaft, running it around the water pump gear, idler pulley and both camshaft sprockets and connect it to the tensioner. Counterclockwise rotation of the exhaust camshaft adjusts the marks and makes the plastic belt slack, after which you can remove the Allen wrench or pull pin. After fitting the timing belt and freeing the tensioner, turn the crankshaft two times and make sure the marks on the camshafts and crankshaft are in line. You should also replace the engine mount bracket, timing belt front covers and bolts, air conditioning/generator belt tensioner and pulley, right engine mount, crankshaft vibration damper, accessory drive belts, drive belt splash shield, right front wheel, make-up air hose to the cylinder head cover and the air cleaner housing, upper cover and clean air tube.

Related Chrysler Voyager Parts
 Chrysler Voyager Coolant Filter
 Chrysler Voyager Crankshaft Pulley
 Chrysler Voyager Crankshaft Seal
 Chrysler Voyager Dipstick Tube
 Chrysler Voyager Engine Mount Bracket
 Chrysler Voyager Motor And Transmission Mount
 Chrysler Voyager Piston Ring Set
 Chrysler Voyager Spool Valve
 Chrysler Voyager Timing Belt Idler Pulley
 Chrysler Voyager Transmission Mount
 Chrysler Voyager Valve Stem Seal
 Chrysler Voyager Variable Timing Solenoid