JeepParts
My Garage
My Account
Cart
OEM 2001 Dodge Neon Control Arm
Suspension Arm- Select Vehicle by Model
- Select Vehicle by VIN
Select Vehicle by Model
orMake
Model
Year
Select Vehicle by VIN
For the most accurate results, select vehicle by your VIN (Vehicle Identification Number).
2 Control Arms found

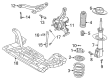
2001 Dodge Neon Control Arm, Front Passenger Side Part Number: 5272236AM
$231.05 MSRP: $421.00You Save: $189.95 (46%)Ships in 1-2 Business DaysProduct Specifications- Other Name: Arm - Control; Front Right Suspension Control Arm and Ball Joint Assembly.; Lower Control Arm
- Position: Front Passenger Side
- Replaces: 5272236AF, 5272236AJ, 5272236AL, 5272236AH, 5272236AK, 5272236AC
- Item Weight: 8.50 Pounds
- Item Dimensions: 21.0 x 10.8 x 3.3 inches
- Condition: New
- Fitment Type: Direct Replacement
- SKU: 5272236AM
- Warranty: This genuine part is guaranteed by Mopar's factory warranty.
2001 Dodge Neon Control Arm, Front Driver Side Part Number: 5272237AM
$214.61 MSRP: $347.00You Save: $132.39 (39%)Ships in 1-2 Business DaysProduct Specifications- Other Name: Arm - Control; Suspension Control Arm, Front Left; Lower Control Arm
- Position: Front Driver Side
- Replaces: 5272237AF, 5272237AC, 5272237AK, 5272237AL, 5272237AJ, 5272237AH
- Item Weight: 8.50 Pounds
- Item Dimensions: 21.6 x 11.1 x 3.3 inches
- Condition: New
- Fitment Type: Direct Replacement
- SKU: 5272237AM
- Warranty: This genuine part is guaranteed by Mopar's factory warranty.
2001 Dodge Neon Control Arm Parts and Q&A
- Q: How to Service and Repair the Front Suspension's Lower Control Arm on 2001 Dodge Neon?A: First, raise your car and take out the front tire and wheel assembly to access the lower control arm. Loosen and remove both stabilizer bar links by first grasping the upper retainer/nut with a wrench as you rotate the bolt, afterward rotating the forward sides of the stabilizer bar downward. Remove just the nut and pinch bolt that keeps the ball joint attached to the steering knuckle, checking the entire process carefully so you do not pull on the knuckle and break the inner C/V joint or the seal on the ball joint. Gently lift the steering knuckle away from the ball joint stud by prying the lower control arm downward against the ball joint boss. Servicing the right lower control arm requires releasing the fasteners on the drive-belt shield and shield, disconnecting the pencil strut from the corner of the crossmember and the body, hydraulic system and removing the bolts near the engine torque strut. Following this, get rid of the front and rear pivot bolts securing the lower control arm to the front suspension crossmember and frame rail and pull out the arm. Set the lower control arm onto the crossmember, insert and partially tighten the rear bolt and finally put in the front bolt. Set the rear bolt in the lower control arm to 203 Nm (150 ft. lbs.) and the front bolt to 163 Nm (120 ft. lbs.). Hold the ball joint stud in place against the steering knuckle so that the bolt hole is lined up with the notch. Once the right lower control arm is serviced, how to replace service manual place the engine torque strut and its mounting bolts, add a washer to the stud's end of the torque strut bolt, adding the pencil strut, then tighten its nuts to 58 Nm (43 ft. lbs.). Finally, place the drive-belt splash shield and secure it with fasteners. Replace the old ball joint stud pinch bolt and the nut and tighten the nut with 95 Nm (70 ft. lbs.). Raise the forward ends of the stabilizer bar and reconnect the two stabilizer bar links by inserting the bolts with bushings from the bottom, through the bar, inner bushings, into the lower control arm and up into the upper retainer/nut and bushings. Drop the car to the ground, after that use a wrench to tighten each stabilizer bar link by rotating the link bolt up to 31 Nm (275 inch lbs.) and if they were loosened, tighten the stabilizer bar cushion retainer bolts up to 28 Nm (250 inch lbs.).
Related 2001 Dodge Neon Parts
 2001 Dodge Neon Wheel Bearing
 2001 Dodge Neon Ball Joint
 2001 Dodge Neon Bump Stop
 2001 Dodge Neon Coil Spring Insulator
 2001 Dodge Neon Coil Springs
 2001 Dodge Neon Lateral Link
 2001 Dodge Neon Shock Absorber
 2001 Dodge Neon Shock And Strut Mount
 2001 Dodge Neon Steering Knuckle
 2001 Dodge Neon Sway Bar Bracket
 2001 Dodge Neon Sway Bar Bushing
 2001 Dodge Neon Sway Bar Link