JeepParts
My Garage
My Account
Cart
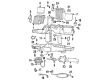
OEM 2002 Dodge Ram 2500 Blend Door Actuator
Air Blend Door Actuator- Select Vehicle by Model
- Select Vehicle by VIN
Select Vehicle by Model
orMake
Model
Year
Select Vehicle by VIN
For the most accurate results, select vehicle by your VIN (Vehicle Identification Number).
5 Blend Door Actuators found


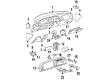
2002 Dodge Ram 2500 Door Actuator Part Number: 5104879AA
$125.78 MSRP: $187.00You Save: $61.22 (33%)Ships in 1-3 Business DaysProduct Specifications- Other Name: Actuator - A/C Temperature Door; HVAC Heater Blend Door Actuator
- Item Weight: 1.00 Pounds
- Item Dimensions: 5.1 x 6.3 x 7.7 inches
- Condition: New
- Fitment Type: Direct Replacement
- SKU: 5104879AA
- Warranty: This genuine part is guaranteed by Mopar's factory warranty.


2002 Dodge Ram 2500 Door Actuator Part Number: 4720279AB
$101.13 MSRP: $151.00You Save: $49.87 (34%)Product Specifications- Other Name: Actuator - Heater; HVAC Air Inlet Door Actuator; HVAC Heater Blend Door Actuator; Actuator; Actuator Heater
- Item Weight: 0.80 Pounds
- Item Dimensions: 2.8 x 2.9 x 6.4 inches
- Condition: New
- Fitment Type: Direct Replacement
- SKU: 4720279AB
- Warranty: This genuine part is guaranteed by Mopar's factory warranty.


2002 Dodge Ram 2500 Door Actuator Part Number: 4886070AA
Product Specifications- Other Name: Door - Fresh Air Door; HVAC Heater Blend Door Actuator; Actuator Fresh Air Door
- Replaced by: 4886070AB
- Item Weight: 1.10 Pounds
- Item Dimensions: 2.9 x 2.9 x 6.3 inches
- Condition: New
- Fitment Type: Direct Replacement
- SKU: 4886070AA
- Warranty: This genuine part is guaranteed by Mopar's factory warranty.


2002 Dodge Ram 2500 Door Part Number: 4886070AB
Product Specifications- Other Name: Door - Fresh Air Door; HVAC Air Adjustment Control Motor; HVAC Heater Blend Door Actuator; Actuator; Actuator Fresh Air Door
- Replaces: 4886070AA
- Item Weight: 1.30 Pounds
- Item Dimensions: 16.9 x 4.5 x 3.8 inches
- Condition: New
- Fitment Type: Direct Replacement
- SKU: 4886070AB
- Warranty: This genuine part is guaranteed by Mopar's factory warranty.


2002 Dodge Ram 2500 Door Actuator Part Number: 4882286
$78.57 MSRP: $118.00You Save: $39.43 (34%)Product Specifications- Other Name: Actuator - Heater Door; HVAC Air Inlet Door Actuator; HVAC Heater Blend Door Actuator; Actuator; Actuator, Door, Floor Duct; Actuator Heater Door
- Item Weight: 1.30 Pounds
- Item Dimensions: 10.1 x 3.9 x 3.8 inches
- Condition: New
- Fitment Type: Direct Replacement
- SKU: 4882286
- Warranty: This genuine part is guaranteed by Mopar's factory warranty.
2002 Dodge Ram 2500 Blend Door Actuator Parts and Q&A
- Q: How to Replace a Blend Door Actuator on 2002 Dodge Ram 2500?A: Before changing the blend door actuator, turn on the ignition, place the temperature control knob at mid-way and then turn the ignition off. Unplug the black cable from the battery first and afterward take out the vehicle's instrument panel and HVAC compartment. Remove one wire harness connector from the blend door actuator and then take out the two screws that hold the actuator to the blower housing. Take off the actuator from the shaft of the blend door; if its black plastic coupler connects it, check it for damage and reinstall it if it's okay. Make certain you can move the blend door freely in both its directions before you install the new actuator. After placing the actuator on the blend door shaft, rotate it to where the mounting bosses on the HVAC housing line up and install and tighten the actuator screws to 2.2 Nm (20 in. lbs.). Connect the wire harness to the blend door actuator, put back the HVAC housing and instrument panel and make sure the Temperature Control Knob is at the mid-point (12 o'clock) until the actuator is properly powered. Then, connect the battery negative cable once again.
Related 2002 Dodge Ram 2500 Parts
 2002 Dodge Ram 2500 Heater Core
 2002 Dodge Ram 2500 Blower Motor Resistor
 2002 Dodge Ram 2500 A/C Accumulator
 2002 Dodge Ram 2500 A/C Clutch
 2002 Dodge Ram 2500 A/C Compressor
 2002 Dodge Ram 2500 A/C Compressor Cut-Out Switches
 2002 Dodge Ram 2500 A/C Hose
 2002 Dodge Ram 2500 A/C Switch
 2002 Dodge Ram 2500 Blower Control Switches
 2002 Dodge Ram 2500 Blower Motor
 2002 Dodge Ram 2500 Evaporator
 2002 Dodge Ram 2500 HVAC Pressure Switch