JeepParts
My Garage
My Account
Cart
OEM 2002 Jeep Liberty Piston
Engine Pistons- Select Vehicle by Model
- Select Vehicle by VIN
Select Vehicle by Model
orMake
Model
Year
Select Vehicle by VIN
For the most accurate results, select vehicle by your VIN (Vehicle Identification Number).
1 Piston found

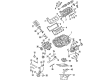
2002 Jeep Liberty Piston Part Number: 5019316AC
Product Specifications- Replaces: 5019316AA, 5019316AB
- Item Weight: 3.30 Pounds
- Item Dimensions: 11.3 x 7.3 x 6.9 inches
- Condition: New
- Fitment Type: Direct Replacement
- SKU: 5019316AC
- Warranty: This genuine part is guaranteed by Mopar's factory warranty.
2002 Jeep Liberty Piston Parts and Q&A
- Q: How to Properly Remove and Install Pistons and Connecting Rods in an Engine on 2002 Jeep Liberty?A: Taking off the cylinder head must be done before you remove the pistons and connecting rods. Insert a ridge reamer into the top of each cylinder hole to remove the ridge, protect the tops of the pistons and note each piston with the matching cylinder number. After that, take out the oil pan and mark the cylinder number on the connecting rod and cap near each end. You'll find that each piston has a small stamp with an arrow, showing you which way up the piston goes. One turns the crankshaft to position the connecting rods in each cylinder so the pistons and connecting rods mounting nut can be removed from the top of the cylinder block. After taking out the Balance Shaft Assembly, remove the bolts from the connecting rod caps and gently push both the piston and rod into the bore, so they exit without damaging the crankshaft journals. Install the bearing cap on the mating rod after you've removed the bearing, as pistons and rods are always removed as a group. When installing, check that the gaps between the compression rings are not aligned and that the ends of the oil ring expander meet up with the right gaps on the rail. Make sure the ring positions are unchanged as you slide the ring compressor over the piston after having the piston and rings bathed in engine oil. Place the directional stamp pointing toward the front when you install the piston. Spin the crankshaft until the center of the connecting rod journal is inside the cylinder bore, slide the piston and rod assembly into place and direct the rod over the journal of the crankshaft. Place a hammer handle in the piston and tap it down into the bore, making sure to guide the connecting rod. Don't use the previous bolts; instead, treat the threads of the new bolts with clean engine oil, install each bolt loosely and then tighten each bolt alternately by hand, without using a torque wrench for the last steps. Finally, fasten the bolts to a torque of 54 Nm (40 ft. lbs.), followed by a 1/4 turn and check the clearance on the connecting rod side with a feeler gauge.
Related 2002 Jeep Liberty Parts
 2002 Jeep Liberty Intake Valve
 2002 Jeep Liberty Oil Pump
 2002 Jeep Liberty Timing Chain
 2002 Jeep Liberty Timing Chain Tensioner
 2002 Jeep Liberty Camshaft Seal
 2002 Jeep Liberty Crankshaft Timing Gear
 2002 Jeep Liberty Cylinder Head Gasket
 2002 Jeep Liberty Dipstick
 2002 Jeep Liberty Engine Mount Bracket
 2002 Jeep Liberty Timing Belt Idler Pulley
 2002 Jeep Liberty Timing Chain Guide
 2002 Jeep Liberty Valve Stem Seal