JeepParts
My Garage
My Account
Cart
OEM 2003 Dodge Durango Piston
Engine Pistons- Select Vehicle by Model
- Select Vehicle by VIN
Select Vehicle by Model
orMake
Model
Year
Select Vehicle by VIN
For the most accurate results, select vehicle by your VIN (Vehicle Identification Number).
3 Pistons found


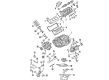
2003 Dodge Durango Piston Part Number: 68233351AA
Product Specifications- Replaces: 5012362AF, 5012362AE, 5012362AC, 5012362AD
- Item Weight: 3.00 Pounds
- Item Dimensions: 10.5 x 6.3 x 6.5 inches
- Condition: New
- Fitment Type: Direct Replacement
- SKU: 68233351AA
- Warranty: This genuine part is guaranteed by Mopar's factory warranty.


2003 Dodge Durango Piston Part Number: 68067510AA
Product Specifications- Replaces: 4778872AD, 4778876AB, 4778876AD, 4778876, 4778874AD, 4778876AC
- Item Weight: 3.60 Pounds
- Condition: New
- Fitment Type: Direct Replacement
- SKU: 68067510AA
- Warranty: This genuine part is guaranteed by Mopar's factory warranty.

2003 Dodge Durango Piston Part Number: 68067509AA
Product Specifications- Replaces: 4778871AC, 4778875AD, 4778875AC, 4778873AB, 4778873AC, 4778871AB, 4778871AD, 4778873AD
- Item Weight: 4.00 Pounds
- Condition: New
- Fitment Type: Direct Replacement
- SKU: 68067509AA
- Warranty: This genuine part is guaranteed by Mopar's factory warranty.
2003 Dodge Durango Piston Parts and Q&A
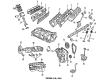
- Q: How to Remove and Replace a Piston in an Engine on 2003 Dodge Durango?A: The first step is to remove the negative battery cable before touching the piston. Following this, take out the oil pan and gasket/windage tray, the cylinder head covers, the timing chain cover and all the cylinder heads. When needed, reclaim the top of the cylinders with a ridge reamer and make sure the reamer doesn't touch the piston crowns. After removing the pistons and connecting rods from the top of the block, rotate the crankshaft to center every connecting rod along the engine bore. It is recommended not to stamp numbers into the arms or caps of a connecting rod, instead mark the position with a scribe or possibly a permanent marker. The guide for Special Tool 8507 should be set into the connecting rod you remove and make sure to lift the piston from the cylinder bore. As soon as the damaged bearing is gone, install the bearing cap on the other connecting rod to stop any harm. Piston rings must be removed, starting from the top ring and going all the way down. For cleaning, put some suitable solvent into warm water and use a nonslip sponge to towel dry the pistons. While removing the piston from the engine should not be necessary during cleaning, take care not to pull out the piston pin directly connected to the connecting rod. Look for more wear than usual on the connecting rod journal, for any signs of twisting or bending in the connecting rod and for taper, elliptical shape, scoring or scraping lines on the skirts of the pistons or cracks or damage in the ring lands. Start by putting in the piston rings before you set the piston and connecting rod into the bore. Put the rings and piston head in clean engine oil, set the ring compressor on top and get it tight so that the rings remain in place. Set the bearing on top of the connecting rod, so the holes in both the bearing and the rod are matched perfectly and spray a thin coat of clean engine oil on the bearing. Hold Special Tool 8507 against the connecting rod in the location of the bolt threads and then install the connecting rod guides. A raised "F" is placed on the piston pin bore to indicate it should face outward on both sides of the engine, with the stack arm or slinger below it pointing forward as well. After coating the bore with engine oil, move the crankshaft until the connecting rod journal is centered in the cylinder bore. Drop both the rod and piston into the bore of the cylinder, carefully locating the connecting rod on the journal rod as you gently press the piston down with a hammer handle. Keep in mind that sections of your engine that use Torque to Yield bolts are never meant to be used again and should be replaced when servicing. Coat the rod bolts and bearing surfaces with engine oil, set the cap and bearing in place and tighten them to a torque of 27 Nm (20 ft. lbs.) plus 90°. After everything is checked, slide on the cylinder head(s), timing chain and cover, cylinder head covers and oil pan and gasket/windage tray, add fresh engine oil to the crankcase to the right level and link the negative charge cable back to the battery.
Related 2003 Dodge Durango Parts
 2003 Dodge Durango Oil Filter
 2003 Dodge Durango Camshaft
 2003 Dodge Durango Oil Pump
 2003 Dodge Durango Cam Gear
 2003 Dodge Durango Crankshaft Pulley
 2003 Dodge Durango Cylinder Head
 2003 Dodge Durango Dipstick
 2003 Dodge Durango Dipstick Tube
 2003 Dodge Durango Lash Adjuster
 2003 Dodge Durango Oil Pan Gasket
 2003 Dodge Durango Rocker Arm
 2003 Dodge Durango Rocker Arm Pivot