JeepParts
My Garage
My Account
Cart
OEM Dodge Durango Piston
Engine Pistons- Select Vehicle by Model
- Select Vehicle by VIN
Select Vehicle by Model
orMake
Model
Year
Select Vehicle by VIN
For the most accurate results, select vehicle by your VIN (Vehicle Identification Number).
25 Pistons found


Dodge Durango Connecting Rod Part Number: 68090672AA
$291.72 MSRP: $439.00You Save: $147.28 (34%)


Dodge Durango Connecting Rod Part Number: 53022257AE
$221.23 MSRP: $328.00You Save: $106.77 (33%)
Dodge Durango Connecting Rod Part Number: 68090673AA
$288.41 MSRP: $435.00You Save: $146.59 (34%)Dodge Durango Connecting Rod Part Number: 53022258AE
$243.53 MSRP: $318.00You Save: $74.47 (24%)Ships in 1-2 Business Days
Dodge Durango Piston Part Number: 4778876AB
$199.41 MSRP: $228.00You Save: $28.59 (13%)Ships in 1-2 Business Days
Dodge Durango Piston Part Number: 68067507AA
$206.24 MSRP: $237.00You Save: $30.76 (13%)Ships in 1-2 Business Days
Dodge Durango Connecting Rod Part Number: 53010928AD
$509.41 MSRP: $769.00You Save: $259.59 (34%)Ships in 1-2 Business DaysDodge Durango Piston Part Number: 4778875AC
$178.11 MSRP: $262.00You Save: $83.89 (33%)Ships in 1-2 Business DaysDodge Durango Piston Part Number: 4778873AB
$178.11 MSRP: $262.00You Save: $83.89 (33%)Ships in 1-2 Business Days


Dodge Durango Piston Part Number: 5086011AB

Dodge Durango Piston Part Number: 5086010AB


Dodge Durango Piston Part Number: 53021539AD


Dodge Durango Piston Part Number: 53021538AD


Dodge Durango Piston Part Number: 68233351AA

Dodge Durango Piston Part Number: 68031605AD
$173.35 MSRP: $255.00You Save: $81.65 (33%)
Dodge Durango Connecting Rod Part Number: 53010927AD
$527.85 MSRP: $769.00You Save: $241.15 (32%)
Dodge Durango Piston Part Number: 5086011AC

Dodge Durango Piston Part Number: 5086010AC

Dodge Durango Piston Part Number: 53022257AC
Dodge Durango Piston Part Number: 53022258AC
| Page 1 of 2 |Next >
1-20 of 25 Results
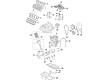
Dodge Durango Piston
Choose OEM Piston that meet Dodge factory standards. Dodge designs and tests every component for precision and durability. Each Piston follows strict manufacturing steps to lock in quality and fit. If your Dodge Durango matters to you, OEM parts make the smart choice. You'll get the exact look, feel, and performance you expect. Shop genuine Durango parts at the highly competitive prices online. Enjoy a manufacturer's warranty, a hassle-free return policy, and rapid delivery. No more guesswork with off brands. Get genuine parts with exact fit and true factory performance. Shop with confidence today at JeepPartsDeal.com.
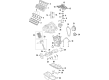
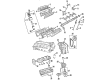
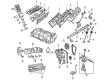
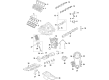
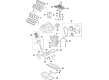
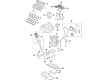
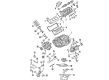
The Piston incorporated in Dodge Durango vehicles is of great importance in transmitting engine combustion power to the energy required in propelling the car. This component is also known as piston and its main job is to translate the pressure of the expanding gases into movement of a crankshaft. Dodge Durango pistons are often made from aluminium alloys having the unique value of weight to power ratio, Some of the high performance ones uses forged or billet type of pistons. There has been the use of different kinds of pistons in different Dodge Durango models over the years, the use of trunk pistons for the petrol and diesel engines has been used as they work to support side forces and contain an oil ring. Also, racing pistons have been engineered to be light so as to be able to cope with the high RPM that is integral in racing. The design of these pistons has been done in such a careful manner to be able to get the premier performance and durability in the Dodge Durango series.
Dodge Durango Piston Parts and Q&A
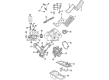
- Q: How to Assemble Piston and Connecting Rod Components on Dodge Durango?A:Before installing the piston and connecting rod, make sure you put on the piston rings and dip the piston and its rings in oil. Adjust the ring compressor above the piston and rings so the rings stay in the right spots. Later, fit the bearing onto the connecting rod, so that the lubrication holes line up, then lubricate that part with clean engine oil. Screw the Connecting Rod Guides 8507 onto the bolts of the connecting rods after placing the bolts into the cylinder head holes. Each piston has an "F" symbol raised on the face of the piston bore and both must be faced toward the engine's front; the connecting rod oil slinger slot also needs to be pointed this way. Carefully clean the cylinder insert and spread clean engine oil on it. Turn the Crankshaft so that the connecting rod journal is exactly centered in the bore, then put the rod and piston into the bore and place the connecting rod guides onto the crankshaft journal. Hold the connecting rod over the rod journal as you tap down the piston with a hammer handle. You should always change the connecting rod bolts when they become loose or need to be taken out. Apply engine oil to the fresh bolts and the connecting Rod Bearings, fit the cap and only the main bolt with a length to 27 Nm plus 90°. Once all other steps are finished, set the cylinder head(s), Timing Chain and cover, cylinder head covers and Oil Pan with gasket/windage tray, add the engine oil up to the correct level in the crankcase and attach the negative cable to the battery.
- Q: How to Properly Install and Remove a Piston in an Engine on Dodge Durango?A:Remove the engine from the vehicle, then get rid of the cylinder head and the Oil Pan before you touch the piston. A ridge reamer is necessary to trim away the excess metal on top of the cylinder bores before you pull the pistons. Match each connecting rod and cap to the number on the cylinder, then pull off the cap and insert the connecting rod bolt guide set onto the bolts. You should take out the pistons and connecting rods from the top of the cylinder block, after positioning the connecting rod in the cylinder bore at bottom dead center while rotating the Crankshaft to avoid damaging the crankshaft journals. Attach the bearing cap on the mating rod after removing the bushing. Installation requires that the compression ring gaps are spaced out, rather than directly on top of the oil ring rail gap. You must make sure the end parts of the oil ring expander are flush and the rail distances are correct before you use the ring compressor. Place the piston into engine oil, insert the piston ring compressor tool C-385 onto the piston and secure it using the special wrench to keep the ring positions intact. Put the long bolt protectors on the bolt heads marked with a number and the rest on the other side. Move the crankshaft so that the center of the connecting rod journal is lined up with the center of the cylinder bore at the matching numbers shown. Moving the rod and piston into the cylinder bore, make sure they are placed on the crank journal and hit the side of the piston with a hammer handle to position the connecting rod. Put the notch on the piston forward in the engine and line up the broad area on the rod bore with the connecting rod journal. Match the numbers on the connecting rod, its cap and the cylinder bore, then set the nuts on the cleaned and oiled rod bolts while tightening to 61 Nm (45 ft. lbs.). After that, install the oil pan, cylinder head and engine into the vehicle.


Related Dodge Durango Parts
 Dodge Durango Oil Pan
 Dodge Durango Oil Pump
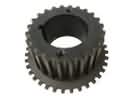 Dodge Durango Crankshaft Gear
 Dodge Durango Engine Mount Bracket
 Dodge Durango Motor And Transmission Mount
 Dodge Durango Rocker Arm
 Dodge Durango Rocker Arm Pivot
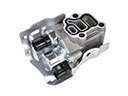 Dodge Durango Spool Valve
 Dodge Durango Timing Chain Tensioner
 Dodge Durango Timing Cover Gasket
 Dodge Durango Valve Cover Gasket
 Dodge Durango Variable Timing Sprocket