JeepParts
My Garage
My Account
Cart
OEM 2003 Jeep Wrangler Axle Shaft
Car Axle Shaft- Select Vehicle by Model
- Select Vehicle by VIN
Select Vehicle by Model
orMake
Model
Year
Select Vehicle by VIN
For the most accurate results, select vehicle by your VIN (Vehicle Identification Number).
12 Axle Shafts found


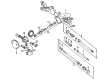
2003 Jeep Wrangler Axle Shafts Part Number: 5083666AA
Product Specifications- Other Name: Shaft - Axle; Axle Shaft; Axle Shaft Assembly; Shaft Axle
- Replaces: 5083666AB, 5083666AC
- Item Weight: 18.90 Pounds
- Item Dimensions: 37.1 x 5.4 x 5.4 inches
- Condition: New
- Fitment Type: Direct Replacement
- SKU: 5083666AA
- Warranty: This genuine part is guaranteed by Mopar's factory warranty.


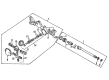
2003 Jeep Wrangler Axle Shafts Part Number: 5083667AA
Product Specifications- Other Name: Shaft - Axle; Axle Shaft; Axle Shaft Assembly; Shaft Axle
- Replaces: 5083667AC, 5083667AB
- Item Weight: 15.20 Pounds
- Item Dimensions: 29.9 x 6.3 x 6.1 inches
- Condition: New
- Fitment Type: Direct Replacement
- SKU: 5083667AA
- Warranty: This genuine part is guaranteed by Mopar's factory warranty.


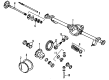 Product Specifications
- Other Name: Shaft - Axle; Drive Axle Shaft, Rear Right; Axle Shafts; Shaft Axle
- Position: Rear Passenger Side
- Item Weight: 21.90 Pounds
- Item Dimensions: 33.2 x 8.2 x 7.9 inches
- Condition: New
- Fitment Type: Direct Replacement
- SKU: 5083676AA
- Warranty: This genuine part is guaranteed by Mopar's factory warranty.

2003 Jeep Wrangler Axle Shafts Part Number: 4874306
Product Specifications- Other Name: Shaft - Axle; Axle Shaft; Axle Shaft Assembly; Axle Assembly; Shaft Axle
- Item Weight: 18.40 Pounds
- Item Dimensions: 40.2 x 6.5 x 6.5 inches
- Condition: New
- Fitment Type: Direct Replacement
- SKU: 4874306
- Warranty: This genuine part is guaranteed by Mopar's factory warranty.

2003 Jeep Wrangler Axle Shaft, Rear Driver Side Part Number: 5086641AA
Product Specifications- Other Name: Shaft - Axle; Drive Axle Shaft, Rear Left; Axle Shafts; Shaft Axle
- Position: Rear Driver Side
- Item Weight: 21.30 Pounds
- Condition: New
- Fitment Type: Direct Replacement
- SKU: 5086641AA
- Warranty: This genuine part is guaranteed by Mopar's factory warranty.
- Product Specifications
- Other Name: Shaft - Axle; Drive Axle Shaft, Rear Right; Axle Shafts; Shaft Axle
- Position: Rear Passenger Side
- Item Weight: 19.40 Pounds
- Condition: New
- Fitment Type: Direct Replacement
- SKU: 5086640AA
- Warranty: This genuine part is guaranteed by Mopar's factory warranty.
2003 Jeep Wrangler Axle Shaft, Rear Driver Side Part Number: 5086633AA
Product Specifications- Other Name: Shaft - Axle; Drive Axle Shaft, Rear Left; Axle Shafts; Shaft Axle
- Position: Rear Driver Side
- Item Weight: 22.40 Pounds
- Item Dimensions: 33.9 x 8.2 x 7.8 inches
- Condition: New
- Fitment Type: Direct Replacement
- SKU: 5086633AA
- Warranty: This genuine part is guaranteed by Mopar's factory warranty.
- Product Specifications
- Other Name: Shaft - Axle; Drive Axle Shaft, Rear Right; Axle Shafts; Shaft Axle
- Position: Rear Passenger Side
- Condition: New
- Fitment Type: Direct Replacement
- SKU: 5086632AA
- Warranty: This genuine part is guaranteed by Mopar's factory warranty.
2003 Jeep Wrangler Axle Shaft, Rear Driver Side Part Number: 5083677AA
Product Specifications- Other Name: Shaft - Axle; Drive Axle Shaft, Rear Left; Axle Shafts; Shaft Axle
- Position: Rear Driver Side
- Item Weight: 21.90 Pounds
- Item Dimensions: 33.9 x 8.9 x 8.0 inches
- Condition: New
- Fitment Type: Direct Replacement
- SKU: 5083677AA
- Warranty: This genuine part is guaranteed by Mopar's factory warranty.
2003 Jeep Wrangler Axle Shafts Part Number: 4874307
Product Specifications- Other Name: Shaft - Axle; Axle Shaft; Axle Shaft Assembly; Axle Assembly; Shaft Assembly, Axle; Shaft Axle
- Item Weight: 12.40 Pounds
- Item Dimensions: 22.4 x 3.2 x 1.6 inches
- Condition: New
- Fitment Type: Direct Replacement
- SKU: 4874307
- Warranty: This genuine part is guaranteed by Mopar's factory warranty.
2003 Jeep Wrangler Axle Shafts Part Number: 4874303
Product Specifications- Other Name: Shaft - Axle; Axle Shaft; Axle Shaft Assembly; Axle Assembly; Shaft Axle
- Item Weight: 11.00 Pounds
- Item Dimensions: 29.3 x 6.0 x 5.9 inches
- Condition: New
- Fitment Type: Direct Replacement
- SKU: 4874303
- Warranty: This genuine part is guaranteed by Mopar's factory warranty.
2003 Jeep Wrangler Axle Shafts Part Number: 4874302
Product Specifications- Other Name: Shaft - Axle; Axle Shaft; Axle Shaft Assembly; Axle Assembly; Shaft Axle
- Item Weight: 17.70 Pounds
- Item Dimensions: 40.5 x 5.3 x 5.3 inches
- Condition: New
- Fitment Type: Direct Replacement
- SKU: 4874302
- Warranty: This genuine part is guaranteed by Mopar's factory warranty.
2003 Jeep Wrangler Axle Shaft Parts and Q&A
- Q: How to Service an Axle Shaft on 2003 Jeep Wrangler?A: Before you service the axle shafts, raise the vehicle and support it and then take off the wheel and tire assembly. After that, remove the brake caliper, rotor and the ABS wheel speed sensor if present. First, unfasten the cotter pin, nut retainer, axle hub nut and washer and screw in the hub bearing bolts to remove the hub bearing from the knuckle. Remove the dust shield from the knuckle and remove the axle shaft without injuring the oil seal found on it. During installation, wipe the axle shaft and add a small amount of Mopar Wheel Bearing Grease to the splines, seal joint and bore of the hub. Insert the axle shaft into the housing and gear side and take care not to damage the seals in your differential. Set the dust shield and hub bearing back into place, then tighten each bolt on the hub bearing to 102 Nm. attach the axle washer and nut, tighten the nut to 237 Nm (175 ft. lbs.), slide the assembly into the following cotter pin hole and add the nut retainer and a new cotter pin. Finally, set the wheel and tire on, then put the wheel and tire assembly back on, remove the support and lower the entire vehicle.
Related 2003 Jeep Wrangler Parts
 2003 Jeep Wrangler Differential
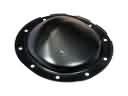 2003 Jeep Wrangler Differential Cover
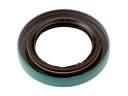 2003 Jeep Wrangler Transfer Case Seal
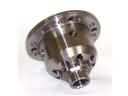
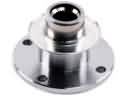 2003 Jeep Wrangler CV Joint Companion Flange
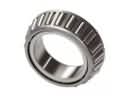 2003 Jeep Wrangler Differential Bearing
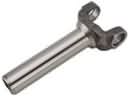 2003 Jeep Wrangler Driveshaft Yokes
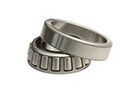 2003 Jeep Wrangler Pinion Bearing
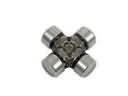 2003 Jeep Wrangler Universal Joint