JeepParts
My Garage
My Account
Cart
OEM 2004 Chrysler Pacifica Coil Springs
Strut Spring- Select Vehicle by Model
- Select Vehicle by VIN
Select Vehicle by Model
orMake
Model
Year
Select Vehicle by VIN
For the most accurate results, select vehicle by your VIN (Vehicle Identification Number).
20 Coil Springs found

2004 Chrysler Pacifica Coil Spring, Rear Part Number: 4743465AB
$93.26Ships in 1-2 Business DaysProduct Specifications- Other Name: Spring - Rear Coil; Coil Spring, Rear; Coil Spring Kit Rear; Coil Spring Set; Coil Springs; Spring; Spring Rear Coil
- Position: Rear
- Item Weight: 6.50 Pounds
- Condition: New
- Fitment Type: Direct Replacement
- SKU: 4743465AB
- Warranty: This genuine part is guaranteed by Mopar's factory warranty.
2004 Chrysler Pacifica Coil Spring, Rear Part Number: 4766886AB
$78.57 MSRP: $90.15You Save: $11.58 (13%)Ships in 1-2 Business DaysProduct Specifications- Other Name: Spring - Rear Coil; Coil Spring, Rear; Coil Spring Set; Coil Springs; Spring; Spring Rear Coil
- Position: Rear
- Item Weight: 7.70 Pounds
- Condition: New
- Fitment Type: Direct Replacement
- SKU: 4766886AB
- Warranty: This genuine part is guaranteed by Mopar's factory warranty.
2004 Chrysler Pacifica Spring, Rear Part Number: 4766885AB
$78.57 MSRP: $90.15You Save: $11.58 (13%)Ships in 1-2 Business DaysProduct Specifications- Other Name: Spring - Rear Coil; Coil Spring, Rear; Coil Springs; Spring Rear Coil
- Position: Rear
- Replaces: 4766885AA
- Item Weight: 6.70 Pounds
- Condition: New
- Fitment Type: Direct Replacement
- SKU: 4766885AB
- Warranty: This genuine part is guaranteed by Mopar's factory warranty.
2004 Chrysler Pacifica Spring, Rear Part Number: 4766884AB
$12.01 MSRP: $68.85You Save: $56.84 (83%)Ships in 1-2 Business DaysProduct Specifications- Other Name: Spring - Rear Coil; Coil Spring, Rear; Coil Spring Kit Rear; Coil Spring Set; Coil Springs; Spring Rear Coil
- Position: Rear
- Item Weight: 6.90 Pounds
- Condition: New
- Fitment Type: Direct Replacement
- SKU: 4766884AB
- Warranty: This genuine part is guaranteed by Mopar's factory warranty.
2004 Chrysler Pacifica Coil Spring, Rear Part Number: 4743463AB
$12.87 MSRP: $63.65You Save: $50.78 (80%)Ships in 1-2 Business DaysProduct Specifications- Other Name: Spring - Rear Coil; Coil Spring, Rear; Coil Spring Kit Rear; Coil Spring Set; Coil Springs; Spring; Spring Rear Coil
- Position: Rear
- Item Weight: 5.90 Pounds
- Condition: New
- Fitment Type: Direct Replacement
- SKU: 4743463AB
- Warranty: This genuine part is guaranteed by Mopar's factory warranty.

2004 Chrysler Pacifica Coil Spring, Front Part Number: 4862002AB
Product Specifications- Other Name: Spring - Front Coil; Coil Spring, Front; Coil Springs; Spring; Spring Front Coil
- Position: Front
- Replaces: 4862002AA
- Item Weight: 7.30 Pounds
- Condition: New
- Fitment Type: Direct Replacement
- SKU: 4862002AB
- Warranty: This genuine part is guaranteed by Mopar's factory warranty.
2004 Chrysler Pacifica Coil Spring, Front Part Number: 4862006AB
Product Specifications- Other Name: Spring - Front Coil; Coil Spring, Front; Coil Spring Kit Front; Coil Spring Set; Coil Springs; Spring; Spring Front Coil
- Position: Front
- Replaces: 4862006AA
- Item Weight: 7.70 Pounds
- Item Dimensions: 17.0 x 7.7 x 7.8 inches
- Condition: New
- Fitment Type: Direct Replacement
- SKU: 4862006AB
- Warranty: This genuine part is guaranteed by Mopar's factory warranty.

2004 Chrysler Pacifica Coil Spring, Front Part Number: 4862005AB
Product Specifications- Other Name: Spring - Front Coil; Coil Spring, Front; Coil Spring Set; Coil Springs; Spring; Spring Front Coil
- Position: Front
- Replaces: 4862005AA
- Item Weight: 8.40 Pounds
- Item Dimensions: 17.2 x 7.7 x 7.8 inches
- Condition: New
- Fitment Type: Direct Replacement
- SKU: 4862005AB
- Warranty: This genuine part is guaranteed by Mopar's factory warranty.
2004 Chrysler Pacifica Coil Spring, Front Part Number: 4862004AB
Product Specifications- Other Name: Spring - Front Coil; Coil Spring, Front; Coil Spring Set; Coil Springs; Spring; Spring Front Coil
- Position: Front
- Replaces: 4862004AA
- Item Weight: 7.90 Pounds
- Item Dimensions: 17.0 x 7.9 x 7.6 inches
- Condition: New
- Fitment Type: Direct Replacement
- SKU: 4862004AB
- Warranty: This genuine part is guaranteed by Mopar's factory warranty.
2004 Chrysler Pacifica Coil Spring, Rear Part Number: 4743464AB
Product Specifications- Other Name: Spring - Rear Coil; Coil Spring, Rear; Coil Spring Kit Rear; Coil Spring Set; Coil Springs; Spring; Spring Rear Coil
- Position: Rear
- Item Weight: 6.90 Pounds
- Item Dimensions: 13.3 x 4.4 x 4.3 inches
- Condition: New
- Fitment Type: Direct Replacement
- SKU: 4743464AB
- Warranty: This genuine part is guaranteed by Mopar's factory warranty.
2004 Chrysler Pacifica Spring, Front Part Number: 4862007AB
Product Specifications- Other Name: Spring - Front Coil; Coil Spring, Front; Coil Spring Set; Coil Springs; Spring Front Coil
- Position: Front
- Replaces: 4862007AA
- Item Weight: 8.30 Pounds
- Condition: New
- Fitment Type: Direct Replacement
- SKU: 4862007AB
- Warranty: This genuine part is guaranteed by Mopar's factory warranty.
2004 Chrysler Pacifica Coil Spring, Front Part Number: 4862003AB
Product Specifications- Other Name: Spring - Front Coil; Coil Spring, Front; Coil Spring Set; Coil Springs; Spring; Spring Front Coil
- Position: Front
- Replaces: 4862003AA
- Item Weight: 7.10 Pounds
- Condition: New
- Fitment Type: Direct Replacement
- SKU: 4862003AB
- Warranty: This genuine part is guaranteed by Mopar's factory warranty.
2004 Chrysler Pacifica Spring, Rear Part Number: 4743467AB
Product Specifications- Other Name: Spring - Rear Coil; Coil Spring, Rear; Coil Springs; Spring Rear Coil
- Position: Rear
- Item Weight: 7.60 Pounds
- Condition: New
- Fitment Type: Direct Replacement
- SKU: 4743467AB
- Warranty: This genuine part is guaranteed by Mopar's factory warranty.
2004 Chrysler Pacifica Coil Spring, Rear Part Number: 4743466AB
Product Specifications- Other Name: Spring - Rear Coil; Coil Spring, Rear; Coil Spring Set; Coil Springs; Spring; Spring Rear Coil
- Position: Rear
- Item Weight: 7.10 Pounds
- Condition: New
- Fitment Type: Direct Replacement
- SKU: 4743466AB
- Warranty: This genuine part is guaranteed by Mopar's factory warranty.
2004 Chrysler Pacifica Coil Spring, Rear Part Number: 4766887AB
Product Specifications- Other Name: Spring - Rear Coil; Coil Spring, Rear; Coil Springs; Spring; Spring Rear Coil
- Position: Rear
- Item Weight: 6.40 Pounds
- Item Dimensions: 12.6 x 4.0 x 4.1 inches
- Condition: New
- Fitment Type: Direct Replacement
- SKU: 4766887AB
- Warranty: This genuine part is guaranteed by Mopar's factory warranty.
2004 Chrysler Pacifica Spring, Rear Part Number: 4766888AB
Product Specifications- Other Name: Spring - Rear Coil; Coil Spring, Rear; Coil Springs; Spring Rear Coil
- Position: Rear
- Item Weight: 6.60 Pounds
- Item Dimensions: 12.5 x 4.1 x 4.1 inches
- Condition: New
- Fitment Type: Direct Replacement
- SKU: 4766888AB
- Warranty: This genuine part is guaranteed by Mopar's factory warranty.
2004 Chrysler Pacifica Spring, Rear Part Number: 4766883AB
Product Specifications- Other Name: Spring - Rear Coil; Coil Spring, Rear; Coil Springs; Spring Rear Coil
- Position: Rear
- Item Weight: 6.40 Pounds
- Item Dimensions: 11.8 x 4.1 x 4.0 inches
- Condition: New
- Fitment Type: Direct Replacement
- SKU: 4766883AB
- Warranty: This genuine part is guaranteed by Mopar's factory warranty.
2004 Chrysler Pacifica Coil Spring, Rear Part Number: 4743462AB
Product Specifications- Other Name: Spring - Rear Coil; Coil Spring, Rear; Coil Springs; Spring; Spring Rear Coil
- Position: Rear
- Item Weight: 6.70 Pounds
- Condition: New
- Fitment Type: Direct Replacement
- SKU: 4743462AB
- Warranty: This genuine part is guaranteed by Mopar's factory warranty.
2004 Chrysler Pacifica Coil Spring, Rear Part Number: 4743468AB
Product Specifications- Other Name: Spring - Rear Coil; Coil Spring, Rear; Coil Springs; Spring; Spring Rear Coil
- Position: Rear
- Item Weight: 7.50 Pounds
- Item Dimensions: 13.2 x 4.1 x 4.1 inches
- Condition: New
- Fitment Type: Direct Replacement
- SKU: 4743468AB
- Warranty: This genuine part is guaranteed by Mopar's factory warranty.
2004 Chrysler Pacifica Coil Spring, Rear Part Number: 4581212AC
Product Specifications- Other Name: Spring Rear Coil; Coil Spring, Rear; Coil Springs; Spring
- Position: Rear
- Item Weight: 5.20 Pounds
- Condition: New
- Fitment Type: Direct Replacement
- SKU: 4581212AC
- Warranty: This genuine part is guaranteed by Mopar's factory warranty.
2004 Chrysler Pacifica Coil Springs Parts and Q&A
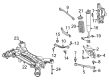
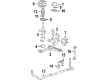
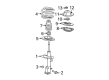
- Q: How Are Coil Springs Serviced and Repaired on 2004 Chrysler Pacifica?A: Open the vehicle's hood and raise the back of the car, then remove the wheel and tire assembly. Put a second pair of jack stands under the engine cradle at its front for stability when working on the rear suspension. Lift the vehicle with either an 8,500 lb under-hoist utility jack or transmission jack positioned below the center of the rear suspension crossmember (without AWD) or rear driveline module (with AWD) so that it touches the part firmly. Loosen and remove the upper shock absorber bolts and then lose and take out the lower lower shock absorber nut and bolt. You should not remove or loosen the crossmember mounting bolts on that side, since realignment of the rear wheels is required after installation. Loosen both the front and rear mounts for the crossmember, attempting to keep the crossmember just above its ordinary position to avoid harming other things. Only move the jack down gradually, so the damaged crossmember section drops enough for the shock absorber to clear the flange. Tilt the top of the shock toward the outside and raise the lower shock end where it meets the spring link. Then, without shaking the mountings, lift the isolator and coil spring lower end, letting all these items drop out of the pocket. Ensure the abutment in the spring link matches the lower end of the coil spring isolator as you install it on top of the spring. Place the drum inside the link's pocket and move it until the collar on top rests in line with the holes where you will secure it. Install the upper mounting bolts, but don't tighten them just yet. Slowly bring up the jack, moving the coil spring and bottom of the shock, until the lower mounting hole becomes aligned with the spring link. Screw in the lower shock mounting bolt just until it hand-tightens. Lift the crossmember with the jack securely in place until the two crossmember bolts can be fitted and torqued to 163 Nm (120 ft. lbs.). After applying 61 Nm (45 ft. lbs.) on the top of the shock absorber mounting bolts, lower the car from the jack and remove it. Mount the wheel and tire onto the hub, tightening the five wheel nuts in the correct order to 135 Nm (100 ft. lbs.) torque and settle down the vehicle. Elevate the vehicle on an alignment rack or drive-on hoist so that you can see the mounting bolt. Tighten the shock absorber lower mounting bolt to 102 Nm (75 ft. lbs.) torque.
Related 2004 Chrysler Pacifica Parts
 2004 Chrysler Pacifica Shock Absorber
 2004 Chrysler Pacifica Axle Beam Mount
 2004 Chrysler Pacifica Bump Stop
 2004 Chrysler Pacifica Coil Spring Insulator
 2004 Chrysler Pacifica Control Arm
 2004 Chrysler Pacifica Control Arm Bolt
 2004 Chrysler Pacifica Lateral Link
 2004 Chrysler Pacifica Steering Knuckle
 2004 Chrysler Pacifica Sway Bar Bracket
 2004 Chrysler Pacifica Sway Bar Bushing
 2004 Chrysler Pacifica Sway Bar Kit
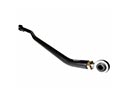 2004 Chrysler Pacifica Track Bar