JeepParts
My Garage
My Account
Cart
OEM 2004 Chrysler Pacifica Shock Absorber
Suspension Shock Absorber- Select Vehicle by Model
- Select Vehicle by VIN
Select Vehicle by Model
orMake
Model
Year
Select Vehicle by VIN
For the most accurate results, select vehicle by your VIN (Vehicle Identification Number).
4 Shock Absorbers found

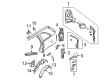
2004 Chrysler Pacifica Shock Reinforcement, Driver Side Part Number: 5054625AD
$16.87 MSRP: $96.75You Save: $79.88 (83%)Ships in 1-2 Business DaysProduct Specifications- Other Name: Reinforcement - Shock Absorber; Shock Absorber Bracket, Left; Reinforcement Shock Absorber
- Position: Driver Side
- Replaces: 5054625AB
- Item Weight: 6.80 Pounds
- Condition: New
- Fitment Type: Direct Replacement
- SKU: 5054625AD
- Warranty: This genuine part is guaranteed by Mopar's factory warranty.

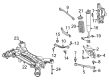
2004 Chrysler Pacifica Shock Absorber, Rear Part Number: 4725865AD
$629.95 MSRP: $736.00You Save: $106.05 (15%)Ships in 1-2 Business DaysProduct Specifications- Other Name: Absorber - Suspension; Shock Absorber, Rear;Strut/Coil Kit;ABS;Complete Strut; Shock; Shock Absorber Suspension
- Position: Rear
- Replaces: 4725865AC, 4725865AB
- Item Weight: 11.50 Pounds
- Item Dimensions: 34.0 x 7.7 x 3.0 inches
- Condition: New
- Fitment Type: Direct Replacement
- SKU: 4725865AD
- Warranty: This genuine part is guaranteed by Mopar's factory warranty.
2004 Chrysler Pacifica Shock Absorber, Rear Part Number: 4766854AD
Product Specifications- Other Name: Absorber - Suspension; Shock Absorber, Rear;Strut/Coil Kit;ABS;Complete Strut; Shock; Shock Absorber Suspension
- Position: Rear
- Replaces: 4766854AC
- Item Weight: 11.70 Pounds
- Item Dimensions: 29.0 x 7.2 x 6.4 inches
- Condition: New
- Fitment Type: Direct Replacement
- SKU: 4766854AD
- Warranty: This genuine part is guaranteed by Mopar's factory warranty.
- Product Specifications
- Other Name: Reinforcement - Shock Absorber; Shock Absorber Bracket, Right; Reinforcement Shock Absorber
- Position: Passenger Side
- Replaces: 5054624AB
- Item Weight: 6.20 Pounds
- Item Dimensions: 18.0 x 9.0 x 4.7 inches
- Condition: New
- Fitment Type: Direct Replacement
- SKU: 5054624AD
- Warranty: This genuine part is guaranteed by Mopar's factory warranty.
2004 Chrysler Pacifica Shock Absorber Parts and Q&A
- Q: How to Effectively Remove and Install a Shock Absorber on 2004 Chrysler Pacifica?A: Raise the vehicle, support it securely, take off the wheel and tire and then disconnect the shock absorber. Put two jack stands under the engine cradle near the front to support the car during rear suspension work. Without AWD, support the weight of the rear suspension by placing the jack head beneath the suspension crossmember's center, while for AWD cars, place it at the same point on the driveline module and tighten the jack. Start by removing the two plugs on the top, then the lower bolt and its nut. Always keep the crossmember bolts on the opposite side nicely tight or you will have to align the rear wheels once everything is back in place. Carefully take out all the bolts from the front and rear crossmember, trying not to lower the whole assembly until the bolt is removed. Pause as you lower the jack, so that the other side of the crossmember moves down just enough to let the shock absorber top clear the body flange and then lift and pull the shock out of the top of the lower spring support. Begin with the bottom piece going into the spring link's pocket and after that tilt the top end inward until it sits right above the holes in the mounting area. Install the upper mounting bolts so they are secured but continue loosely. Affix the isolator and verify that the spring lower end coil is situated against the fitting in the spring link. Slowly lift the jack, making sure the coil spring and lower end of the shock absorber move into place and keep going until the lower mounting hole matches the spring link hole. Put in the lower shock bolt, but do not tighten it yet. Raise the crossmember with the jack until the bolts are accessible and so that all bolts reach 163 Nm (120 ft. lbs.) torque when installed. Secure the top bolts of the shock absorber to a torque of 61 Nm or 45 ft. lbs. and then raise and remove the jack. Place the tire and wheel on the hub, screw on the nuts in the correct sequence until they reach 135 Nm (100 ft. lbs.) torque and move the vehicle down from the jack. Locate the car on an alignment rack or drive-on hoist, raising it as needed to get to the mounting bolt and then tighten the lower mounting bolt of the shock absorber to a final torque of 102 Nm (75 ft. lbs.).
Related 2004 Chrysler Pacifica Parts
 2004 Chrysler Pacifica Wheel Bearing
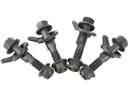 2004 Chrysler Pacifica Alignment Bolt
 2004 Chrysler Pacifica Bump Stop
 2004 Chrysler Pacifica Coil Spring Insulator
 2004 Chrysler Pacifica Coil Springs
 2004 Chrysler Pacifica Control Arm Bushing
 2004 Chrysler Pacifica Crossmember Bushing
 2004 Chrysler Pacifica Lateral Link
 2004 Chrysler Pacifica Shock And Strut Mount
 2004 Chrysler Pacifica Steering Knuckle
 2004 Chrysler Pacifica Sway Bar Link
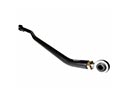 2004 Chrysler Pacifica Track Bar