JeepParts
My Garage
My Account
Cart
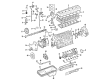
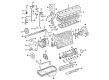
OEM 2004 Dodge Ram 2500 Crankshaft Seal
- Select Vehicle by Model
- Select Vehicle by VIN
Select Vehicle by Model
orMake
Model
Year
Select Vehicle by VIN
For the most accurate results, select vehicle by your VIN (Vehicle Identification Number).
5 Crankshaft Seals found


2004 Dodge Ram 2500 Rear Main Seal Retainer Part Number: 5086755AC
$167.33 MSRP: $252.00You Save: $84.67 (34%)Ships in 1-2 Business DaysProduct Specifications- Other Name: Retainer - Crankshaft Rear Oil Seal; Retainer Crankshaft Rear Oil Seal; serviced individually.
- Position: Rear
- Replaces: 5086755AB
- Item Weight: 1.90 Pounds
- Item Dimensions: 2.7 x 11.9 x 12.1 inches
- Condition: New
- Fitment Type: Direct Replacement
- SKU: 5086755AC
- Warranty: This genuine part is guaranteed by Mopar's factory warranty.


2004 Dodge Ram 2500 Oil Seal, Front Part Number: 68426385AA
$43.93 MSRP: $65.00You Save: $21.07 (33%)Ships in 1-2 Business DaysProduct Specifications- Other Name: Seal - Crankshaft Oil; Engine Crankshaft Seal, Front; Front Crank Seal; Outer Timing Cover Seal; Seal Crankshaft Oil Front; Crankshaft Seal
- Position: Front
- Item Weight: 0.50 Pounds
- Item Dimensions: 3.4 x 3.5 x 0.7 inches
- Condition: New
- Fitment Type: Direct Replacement
- SKU: 68426385AA
- Warranty: This genuine part is guaranteed by Mopar's factory warranty.


2004 Dodge Ram 2500 Rear Main Seal Part Number: 53021335AE
$97.59 MSRP: $142.00You Save: $44.41 (32%)Product Specifications- Other Name: Retainer - Crankshaft Rear Oil Seal; Engine Crankshaft Seal, Rear; Rear Main Seal Retainer; Crankshaft Rear Oil Seal not included with Long Block Engine Install Kit.
- Position: Rear
- Replaces: 53021335AD, 53021338AB, 68017721AA, 53021335BA, 53021335AC, 68060342AA, 5140028AA
- Item Weight: 3.10 Pounds
- Item Dimensions: 1.3 x 10.2 x 14.9 inches
- Condition: New
- Fitment Type: Direct Replacement
- SKU: 53021335AE
- Warranty: This genuine part is guaranteed by Mopar's factory warranty.


2004 Dodge Ram 2500 Oil Seal, Front Part Number: 53021585AD
$24.97 MSRP: $36.70You Save: $11.73 (32%)Product Specifications- Other Name: Seal - Crankshaft Oil; Front Engine Crankshaft Seal; Timing Cover Seal; Gasket; Crankshaft Seal; Front Seal included with Long Block Engine Install Kit.
- Position: Front
- Replaces: 53021585AB
- Item Weight: 0.50 Pounds
- Item Dimensions: 1.1 x 3.3 x 3.3 inches
- Condition: New
- Fitment Type: Direct Replacement
- SKU: 53021585AD
- Warranty: This genuine part is guaranteed by Mopar's factory warranty.

2004 Dodge Ram 2500 Rear Main Seal Part Number: 68444256AA
$134.26 MSRP: $197.00You Save: $62.74 (32%)Ships in 1-2 Business DaysProduct Specifications- Other Name: Seal Kit - Crankshaft Oil; Engine Crankshaft Seal, Rear; Seal Crankshaft Oil Rear; Engine Crankshaft Seal; Crankshaft Seal
- Position: Rear
- Replaces: 5114027AA, 68086401AA, 68142421AA, 5015705AA
- Item Weight: 1.10 Pounds
- Item Dimensions: 8.0 x 7.8 x 1.6 inches
- Condition: New
- Fitment Type: Direct Replacement
- SKU: 68444256AA
- Warranty: This genuine part is guaranteed by Mopar's factory warranty.
2004 Dodge Ram 2500 Crankshaft Seal Parts and Q&A
- Q: How to Service and Repair a Front Crankshaft Seal on 2004 Dodge Ram 2500?A: You should begin service and repair of the front crankshaft seal by disconnecting the negative battery cables and placing the vehicle on a hoist. Partially transfer the engine coolant into a container to save it and once that's ready, lower the car. Pull the upper hose off the radiator, separate the bottle from the radiator and lift it out of the way on the fan shroud. Loosen and isolate the supply hose and electrical wires at the pump and remove all bolts holding the fan shroud to the radiator plus the fan assembly. Take away the cooling fan shroud and the fan assembly and then remove the accessory drive belt. Get rid of the cooling fan support/hub from the front, then elevate the vehicle once more. Remove the crankshaft damper, speed indicator ring, hydraulic pump and the accessory drive belt tensioner. Lift the gear cover carefully away from the housing, take out the bolts that attach the cover to the housing and then remove the crank seal dust shield as you lift the cover. With wooden blocks set under the cover to hold it in place, carefully hammer the old seal out of the back onto the front with a suitable punch and hammer. Use a suitable scraper to gently clean the mating surfaces of the cover and housing gasket, making certain not to harm the gear housing and clean the bore of the oil seal of any old sealer. Wipe the front seal area of the crankshaft well, making sure the oil does not build up there. Examine the gear housing and cover carefully for cracks and if found, replace the part and straighten the metal door cover. Join a bead of Mopar Stud & Bearing Mount along the outside circumference of the new seal, but do not lubricate the inside diameter. Stick the seal into the rear of the cover with Special Tool 8281 using the C-4171 driver handle, tapping the driver handle until the tool ends its travel. Fit the plastic seal pilot from the seal kit into the crankshaft seal and then add a small degree of sealant around the gear housing cover sealing point with Mopar Silicone Rubber Adhesive Sealant. Install the cover over the gear housing, place the seal pilot at the crankshaft's nose and tighten all the bolts to 30 Nm (22 ft. lbs.) before you take away the pilot tool. After the nose dust shield, add the crankshaft damper and speed indicator ring in that sequence, fastening the bolts with 40 Nm (30 ft. lbs.) of torque, then rotate it another 60°. Prevent the engine from rotating by fitting the engine bar ring tool to your platform. Mount the fan support/hub assembly and tighten its bolts to 32 Nm (24 ft. lbs.), then set the hydraulic pump and accessory belt tensioner assembly on, tightening its bolt to 43 Nm (32 ft. lbs.). Attach the fan and belt, replace all the coolant, reattach the negative battery terminals and drive the car to check for oil drips.
Related 2004 Dodge Ram 2500 Parts
 2004 Dodge Ram 2500 Oil Filter
 2004 Dodge Ram 2500 Transmission Mount
 2004 Dodge Ram 2500 Crankshaft
 2004 Dodge Ram 2500 Dipstick Tube
 2004 Dodge Ram 2500 Oil Pan
 2004 Dodge Ram 2500 Oil Pan Gasket
 2004 Dodge Ram 2500 Oil Pump
 2004 Dodge Ram 2500 Piston
 2004 Dodge Ram 2500 Pushrod
 2004 Dodge Ram 2500 Rocker Arm
 2004 Dodge Ram 2500 Timing Cover Gasket
 2004 Dodge Ram 2500 Valve Cover Gasket