JeepParts
My Garage
My Account
Cart
OEM Dodge Ram 2500 Crankshaft Seal
- Select Vehicle by Model
- Select Vehicle by VIN
Select Vehicle by Model
orMake
Model
Year
Select Vehicle by VIN
For the most accurate results, select vehicle by your VIN (Vehicle Identification Number).
12 Crankshaft Seals found


Dodge Ram 2500 Rear Main Seal Part Number: 53021335AE
$97.59 MSRP: $147.00You Save: $49.41 (34%)


Dodge Ram 2500 Rear Main Seal Retainer Part Number: 5086755AC
$167.33 MSRP: $252.00You Save: $84.67 (34%)Ships in 1-2 Business Days

Dodge Ram 2500 Oil Seal, Front Part Number: 68426385AA
$45.51 MSRP: $65.00You Save: $19.49 (30%)Ships in 1-2 Business Days


Dodge Ram 2500 Oil Seal, Front Part Number: 53021585AD
$27.24 MSRP: $40.00You Save: $12.76 (32%)


Dodge Ram 2500 Front Seal Part Number: 53021585AC
$20.22 MSRP: $25.64You Save: $5.42 (22%)Ships in 1-2 Business Days
Dodge Ram 2500 Rear Main Seal Part Number: 68444256AA
$134.26 MSRP: $197.00You Save: $62.74 (32%)Ships in 1-2 Business Days
Dodge Ram 2500 Rear Main Seal Part Number: 53005837
$46.95 MSRP: $59.51You Save: $12.56 (22%)Ships in 1-2 Business Days

Dodge Ram 2500 Rear Main Seal Part Number: 4778228

Dodge Ram 2500 Rear Main Seal Gasket Part Number: 53021075

Dodge Ram 2500 Rear Main Seal Part Number: 4798216AC

Dodge Ram 2500 Front Crank Seal Part Number: 4429353

Dodge Ram 2500 Rear Main Seal Retainer Part Number: 53005843AC
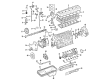
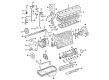
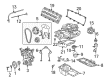
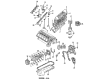
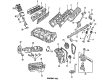
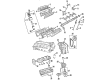
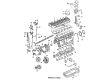
Dodge Ram 2500 Crankshaft Seal
Choose OEM Crankshaft Seal that meet Dodge factory standards. Dodge designs and tests every component for precision and durability. Each Crankshaft Seal follows strict manufacturing steps to lock in quality and fit. If your Dodge Ram 2500 matters to you, OEM parts make the smart choice. You'll get the exact look, feel, and performance you expect. Shop genuine Ram 2500 parts at the highly competitive prices online. Enjoy a manufacturer's warranty, a hassle-free return policy, and rapid delivery. No more guesswork with off brands. Get genuine parts with exact fit and true factory performance. Shop with confidence today at JeepPartsDeal.com.
Dodge Ram 2500 Crankshaft Seal Parts and Q&A
- Q: How to Remove a Crankshaft Seal on Dodge Ram 2500?A:First, if you are removing the seal while the vehicle is together, take out the transmission and then the flexplate. You must buy a new crankshaft oil seal each time you remove it. Put Special Tool 8506 into the oil seal and continue to tighten the removal tool until it will not turn. It is very important to put the tool in place securely right away, because if it fails, the tool will pull free before taking the seal out of the engine. Remove the crankshaft rear oil seal using Special Tool 8506.
- Q: How to Install a Crankshaft Seal on Dodge Ram 2500?A:The lower seal half of the viton seal involves taking out the rear main bearing cap, but the upper seal half can be installed with or without the Crankshaft in place. After pulling the crankshaft, get rid of the old upper seal, clean the cylinder rear cap mating surface and remove any rubbish caught in the groove for the new seal. Don't overdo lubricating but ensure to coat and fit the new upper rear bearing oil seal properly behind the studs (with the white on the inside). Insert the crankshaft into the block and then moisten and fit in the white side of the new lower rear bearing oil seal. Use about 5 mm (0.20 in.) of Mopar Gasket Maker on each side of the rear main bearing cap so that it doesn't touch the rubber seal, then immediately fix the bearing cap to the cylinder block. Square the bearing cap using the cap slot, an alignment dowel and cap bolts and try not to remove too much material after assembly; go easy on rear cap strikes, with no more than two being necessary. Before installation, grease all cap bolts and once all main bearing caps are set in place, alternate to tighten with 115 Nm (85 ft. lbs.), giving them 115 Nm (85 ft. lbs. each. Place the oil pump and dot Mopar Silicone Rubber Adhesive Sealant around the bearing cap at the blocking joint to seal the area properly, making sure there is just enough on the sealant that some squeezes into view, but clean any that remains on the Oil Pan rim with a shop towel and set the oil pan on right after. Remove the old lower oil seal and the upper oil seal first and afterward dispose of the old oil pan and oil pump, both when the crankshaft is in place. Clear the cylinder block surfaces where it meets the cylinder head, add a little oil to the upper seal lips and turn two main bearing caps around the front of the rear bearing cap before laying in the cylinder head. Hold up the upper seal and insert it into the cylinder block until the white paint sits at the rear of the engine and install the lower rear bearing oil seal into the bearing cap with the white color facing towards the rear as well. Place a 5 mm (0.20 inch) drop of Mopar Gasket Maker on both the upper and lower faces of the rear main bearing cap, reassemble the components immediately and place them back in position as we did before. Use appropriately cleaned and lubricated cap bolts to mount the main bearing cap, alternating between clockwise turns to 115 Nm (85 ft. lbs.) torque. After that, set in the oil pump, use Mopar Silicone Rubber Adhesive Sealant on the bearing cap and place the oil pan immediately afterward. Take out the oil pan and pump, then off comes the rear main bearing cap, followed by discarding the front lower seal. Clean both the bearing cap mating surfaces, put a new upper seal in place as you did earlier, lightly oil the new lower seal surface you see and fit the new lower seal onto the cap with the white mark pointing towards the rear. Coat each edge of the rear main bearing cap with 5 mm (0.20 in.) of Mopar Gasket Maker, assemble the cap, align it, screw it into place with cleaned and oiled cap bolts, alternate the tightening to 115 Nm (85 ft. lbs.), add Mopar Silicone Rubber Adhesive Sealant to the bearing cap to seal up the bearing joint, then mount the oil pump and install the oil pan.


Related Dodge Ram 2500 Parts
 Dodge Ram 2500 Oil Filter
 Dodge Ram 2500 Rod Bearing
 Dodge Ram 2500 Cam Gear
 Dodge Ram 2500 Coolant Filter
 Dodge Ram 2500 Intake Valve
 Dodge Ram 2500 Motor And Transmission Mount
 Dodge Ram 2500 Oil Drain Plug
 Dodge Ram 2500 Oil Pan Gasket
 Dodge Ram 2500 Piston Ring Set
 Dodge Ram 2500 Rocker Arm Pivot
 Dodge Ram 2500 Rocker Shaft Spring Kit
 Dodge Ram 2500 Timing Chain Tensioner