JeepParts
My Garage
My Account
Cart
OEM 2005 Chrysler Pacifica Steering Knuckle
Front Steering Knuckle- Select Vehicle by Model
- Select Vehicle by VIN
Select Vehicle by Model
orMake
Model
Year
Select Vehicle by VIN
For the most accurate results, select vehicle by your VIN (Vehicle Identification Number).
2 Steering Knuckles found

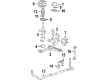
2005 Chrysler Pacifica Knuckle, Front Passenger Side Part Number: 4743144AB
$334.34 MSRP: $414.00You Save: $79.66 (20%)Ships in 1-2 Business DaysProduct Specifications- Other Name: Knuckle - Front; Steering Knuckle, Front Right; Knuckle Front
- Position: Front Passenger Side
- Item Weight: 7.00 Pounds
- Item Dimensions: 13.4 x 10.2 x 4.3 inches
- Condition: New
- Fitment Type: Direct Replacement
- SKU: 4743144AB
- Warranty: This genuine part is guaranteed by Mopar's factory warranty.
- Product Specifications
- Other Name: Knuckle - Front; Steering Knuckle, Front Left; Knuckle Front
- Position: Front Driver Side
- Item Weight: 7.10 Pounds
- Item Dimensions: 13.4 x 10.4 x 4.3 inches
- Condition: New
- Fitment Type: Direct Replacement
- SKU: 4743145AB
- Warranty: This genuine part is guaranteed by Mopar's factory warranty.
2005 Chrysler Pacifica Steering Knuckle Parts and Q&A
- Q: How to Service and Repair a Rear Suspension Steering Knuckle on 2005 Chrysler Pacifica?A: Lock the automatic adjuster in the parking brake lever, then lift the car so it is safe to work on it. Upgrade the cable bolt at the knuckle and then take out the rear hub and bearing from the wheel. First, draw off the parking brake shoe return spring and the shoe actuator from where they are on the cable. After that, pull the support and shoes away from the knuckle. Then, get rid of the bolts that secure the brake caliper adapter mount and then pull out the adapter. Put an under-hoist jack or jack stand under the spring link and raise it just to touch the spring link at the shock mount. Unscrew the spring link-to-knuckle nut and bolt, keeping Guide, Special Tool 905OA-2, close by to carefully tap the sleeve so that Tap, Special Tool 905OA-1, does not get bent during manipulation. Attach Guide 905OA-2 to the knuckle, push Tap 905OA-1 through the Guide into the sleeve and as you cut around halfway through the bushing, occasionally turn Tap 905OA-1 back out to clean it, making sure to keep it oiled. Before fitting Remover, Special Tool 9050A, oil the bolt threads for a smoother process. Always have the hardened side of the thrust bearing facing the nut when putting together Remover 9050A. Thread the Remover through the assembled knuckle sleeve by hand, then rotate the nut until it stops. After that, angle the knuckle's top so it matches Sleeve 905OA-5, turning it down and removing the old knuckle sleeve as you go. Loosen and take away the bolts and nuts holding the compression, toe, stabilizer and tension links to the knuckle, then remove the knuckle and the bolts connecting the hub to it. When mounting, put four hub bolts from the inner side through the knuckle so that their ends stick out from the opposite end. With the rear mounting hole facing down, insert the parking brake cable, then lift the knuckle over the outer links so they slide into the knuckle. Attach the bolt and nut to fasten the camber link to the knuckle and then move on to the other links: tension, stabilizer, toe and compression, all left loose. Before installing Special Tool 9050A, lubricate the threads on the bolt one more time. Sit the new knuckle sleeve into Special Tool 9050-4 and march it up on Installer Bolt as far as it can go. Thread Installer Bolt 905OA-4 (with new sleeve) from the front of the knuckle toward the spring link, then install the ball bearing and nut on the end of the bolt with the hardened side of the bearing facing the nut. As the bolt head is kept in place, twist the nut to install the sleeve as much as you can, without trying to tighten it any further. First, remove the tool, then slide the spring link-to-knuckle bolt and nut in place and tighten the nut to 129 Nm (95 ft. lbs.) torque. Disconnect the under-hoist jack or stand, put in the brake caliper adapter, fasten it with bolts to 85 ft. lbs. and tighten all the way to 115 Nm (85 ft. lbs.). Secure the shoe support with parking brake shoes onto the knuckle by threading the bolts into the hub mounting holes and link the actuator to one end of the parking brake cable at the space between the parking brake shoes so that its marker points outward. Match the shoes with the actuator and add the parking brake shoe return spring and then attach the cable securely to the knuckle using a bolt tightened to 28 Nm (21 ft. lbs. Put the hub and bearing onto the wheel speed sensor, with all the needed parts, lower the vehicle, open the automatic parking brake adjustment and then adjust the shoes as you should. Up to the suspension away from the ground and adjust the bolts at the knuckle with the correct torque: Camber Link to 95 Nm (70 ft. lbs.), Compression Link to 81 Nm (60 ft. lbs.), Stabilizer Link to 61 Nm (45 ft. lbs.), Tension Link to 119 Nm (88 ft. lbs.) and Toe Link to 108 Nm (80 ft. lbs.). In the end, check and adjust the wheel alignment.
Related 2005 Chrysler Pacifica Parts
 2005 Chrysler Pacifica Wheel Bearing
 2005 Chrysler Pacifica Axle Beam Mount
 2005 Chrysler Pacifica Coil Springs
 2005 Chrysler Pacifica Control Arm
 2005 Chrysler Pacifica Control Arm Bolt
 2005 Chrysler Pacifica Control Arm Bushing
 2005 Chrysler Pacifica Crossmember Bushing
 2005 Chrysler Pacifica Lateral Link
 2005 Chrysler Pacifica Shock And Strut Mount
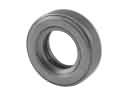 2005 Chrysler Pacifica Strut Bearing
 2005 Chrysler Pacifica Sway Bar Bushing
 2005 Chrysler Pacifica Sway Bar Link