JeepParts
My Garage
My Account
Cart
OEM 2005 Chrysler Town & Country Crankshaft Seal
- Select Vehicle by Model
- Select Vehicle by VIN
Select Vehicle by Model
orMake
Model
Year
Select Vehicle by VIN
For the most accurate results, select vehicle by your VIN (Vehicle Identification Number).
3 Crankshaft Seals found


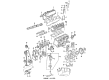
2005 Chrysler Town & Country Oil Seal, Front Part Number: 4792317AB
$18.16 MSRP: $26.70You Save: $8.54 (32%)Ships in 1-2 Business DaysProduct Specifications- Other Name: Seal - Crankshaft Oil; Engine Crankshaft Seal, Front; Timing Cover Gasket; Timing Cover Seal; Crankshaft Seal; Front Crank Seal; Timing Cover Assy; Front Main Crankshaft Seal.
- Position: Front
- Replaces: 4792317, 4273275
- Item Weight: 0.50 Pounds
- Item Dimensions: 0.6 x 1.9 x 1.9 inches
- Condition: New
- Fitment Type: Direct Replacement
- SKU: 4792317AB
- Warranty: This genuine part is guaranteed by Mopar's factory warranty.


2005 Chrysler Town & Country Rear Main Seal Part Number: 4621939AB
$27.24 MSRP: $40.20You Save: $12.96 (33%)Ships in 1-2 Business DaysProduct Specifications- Other Name: Seal - Rear Main Crankshaft; Engine Crankshaft Seal, Rear; Rear Seal; Seal Rear Main Crankshaft Serviced With Retainer [04663625]; Crankshaft Seal
- Position: Rear
- Item Weight: 0.50 Pounds
- Item Dimensions: 0.7 x 4.6 x 4.8 inches
- Condition: New
- Fitment Type: Direct Replacement
- SKU: 4621939AB
- Warranty: This genuine part is guaranteed by Mopar's factory warranty.


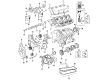
2005 Chrysler Town & Country Rear Main Seal Part Number: 4654389AB
$30.97Ships in 1-2 Business DaysProduct Specifications- Other Name: Retainer - Crankshaft Rear Oil Seal; Rear Main Seal Retainer; Includes Rear Seal and Crankshaft Rear Oil Seal.
- Position: Rear
- Item Weight: 0.80 Pounds
- Item Dimensions: 10.3 x 6.4 x 5.3 inches
- Condition: New
- Fitment Type: Direct Replacement
- SKU: 4654389AB
- Warranty: This genuine part is guaranteed by Mopar's factory warranty.
2005 Chrysler Town & Country Crankshaft Seal Parts and Q&A
- Q: How to Service and Repair a Front Crankshaft Seal on 2005 Chrysler Town & Country?A: To fix the front crankshaft seal, disconnect the battery, raise the vehicle and remove the right wheel and splash shield. Use Special Tools to remove and install the new seal taking care to align properly. Reconnect the parts and attach the battery again to finish the procedure.
Related 2005 Chrysler Town & Country Parts
 2005 Chrysler Town & Country Camshaft
 2005 Chrysler Town & Country Crankshaft
 2005 Chrysler Town & Country Crankshaft Pulley
 2005 Chrysler Town & Country Cylinder Head
 2005 Chrysler Town & Country Intake Valve
 2005 Chrysler Town & Country Oil Filter
 2005 Chrysler Town & Country Oil Pan
 2005 Chrysler Town & Country Oil Pan Gasket
 2005 Chrysler Town & Country Piston
 2005 Chrysler Town & Country Piston Ring Set
 2005 Chrysler Town & Country Pushrod
 2005 Chrysler Town & Country Valve Stem Seal