JeepParts
My Garage
My Account
Cart
OEM 2005 Dodge Magnum Coil Springs
Strut Spring- Select Vehicle by Model
- Select Vehicle by VIN
Select Vehicle by Model
orMake
Model
Year
Select Vehicle by VIN
For the most accurate results, select vehicle by your VIN (Vehicle Identification Number).
31 Coil Springs found


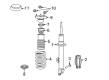
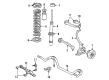
2005 Dodge Magnum Spring, Front Part Number: 4895646AD
Product Specifications- Other Name: Spring - Front Coil; Coil Spring, Front; Coil Spring Kit Front; Coil Spring Set; Coil Springs; Spring Front Coil
- Position: Front
- Replaces: 4895646AC
- Item Weight: 8.60 Pounds
- Item Dimensions: 16.9 x 5.6 x 5.7 inches
- Condition: New
- Fitment Type: Direct Replacement
- SKU: 4895646AD
- Warranty: This genuine part is guaranteed by Mopar's factory warranty.

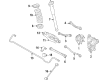
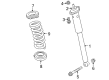
2005 Dodge Magnum Coil Spring, Rear Part Number: 4895312AA
Product Specifications- Other Name: Spring - Rear Coil; Coil Springs; Spring
- Position: Rear
- Item Weight: 7.10 Pounds
- Condition: New
- Fitment Type: Direct Replacement
- SKU: 4895312AA
- Warranty: This genuine part is guaranteed by Mopar's factory warranty.


2005 Dodge Magnum Spring, Rear Part Number: 4895315AA
Product Specifications- Other Name: Spring - Rear Coil; Coil Springs
- Position: Rear
- Item Weight: 7.10 Pounds
- Condition: New
- Fitment Type: Direct Replacement
- SKU: 4895315AA
- Warranty: This genuine part is guaranteed by Mopar's factory warranty.
2005 Dodge Magnum Spring, Rear Part Number: 4895333AB
Product Specifications- Other Name: Spring - Rear Coil; Coil Springs
- Position: Rear
- Item Weight: 9.30 Pounds
- Condition: New
- Fitment Type: Direct Replacement
- SKU: 4895333AB
- Warranty: This genuine part is guaranteed by Mopar's factory warranty.
2005 Dodge Magnum Spring, Rear Part Number: 4895532AA
Product Specifications- Other Name: Spring - Rear Coil; Coil Springs
- Position: Rear
- Item Weight: 6.70 Pounds
- Condition: New
- Fitment Type: Direct Replacement
- SKU: 4895532AA
- Warranty: This genuine part is guaranteed by Mopar's factory warranty.
2005 Dodge Magnum Spring, Rear Part Number: 4895533AA
Product Specifications- Other Name: Spring - Rear Coil; Coil Springs
- Position: Rear
- Item Weight: 6.90 Pounds
- Condition: New
- Fitment Type: Direct Replacement
- SKU: 4895533AA
- Warranty: This genuine part is guaranteed by Mopar's factory warranty.
2005 Dodge Magnum Spring, Rear Part Number: 4895535AA
Product Specifications- Other Name: Spring - Rear Coil; Coil Springs
- Position: Rear
- Item Weight: 6.80 Pounds
- Condition: New
- Fitment Type: Direct Replacement
- SKU: 4895535AA
- Warranty: This genuine part is guaranteed by Mopar's factory warranty.


2005 Dodge Magnum Spring, Front Part Number: 4895635AB
Product Specifications- Other Name: Spring - Front Coil; Coil Spring, Front; Coil Springs
- Position: Front
- Item Weight: 6.50 Pounds
- Condition: New
- Fitment Type: Direct Replacement
- SKU: 4895635AB
- Warranty: This genuine part is guaranteed by Mopar's factory warranty.
2005 Dodge Magnum Spring, Rear Part Number: 4895332AB
Product Specifications- Other Name: Spring - Rear Coil; Coil Springs
- Position: Rear
- Item Weight: 8.60 Pounds
- Condition: New
- Fitment Type: Direct Replacement
- SKU: 4895332AB
- Warranty: This genuine part is guaranteed by Mopar's factory warranty.
2005 Dodge Magnum Spring, Rear Part Number: 4895322AB
Product Specifications- Other Name: Spring - Rear Coil; Coil Springs
- Position: Rear
- Item Weight: 8.60 Pounds
- Item Dimensions: 14.3 x 4.7 x 4.8 inches
- Condition: New
- Fitment Type: Direct Replacement
- SKU: 4895322AB
- Warranty: This genuine part is guaranteed by Mopar's factory warranty.
2005 Dodge Magnum Spring, Rear Part Number: 4895334AB
Product Specifications- Other Name: Spring - Rear Coil; Coil Springs
- Position: Rear
- Item Weight: 9.00 Pounds
- Condition: New
- Fitment Type: Direct Replacement
- SKU: 4895334AB
- Warranty: This genuine part is guaranteed by Mopar's factory warranty.
2005 Dodge Magnum Spring, Rear Part Number: 4895321AB
Product Specifications- Other Name: Spring - Rear Coil; Coil Springs
- Position: Rear
- Item Weight: 7.80 Pounds
- Condition: New
- Fitment Type: Direct Replacement
- SKU: 4895321AB
- Warranty: This genuine part is guaranteed by Mopar's factory warranty.
2005 Dodge Magnum Spring, Rear Part Number: 4895325AB
Product Specifications- Other Name: Spring - Rear Coil; Coil Springs
- Position: Rear
- Item Weight: 8.10 Pounds
- Condition: New
- Fitment Type: Direct Replacement
- SKU: 4895325AB
- Warranty: This genuine part is guaranteed by Mopar's factory warranty.
2005 Dodge Magnum Spring, Rear Part Number: 4895323AB
Product Specifications- Other Name: Spring - Rear Coil; Coil Springs
- Position: Rear
- Item Weight: 8.70 Pounds
- Condition: New
- Fitment Type: Direct Replacement
- SKU: 4895323AB
- Warranty: This genuine part is guaranteed by Mopar's factory warranty.
2005 Dodge Magnum Spring, Rear Part Number: 4895324AB
Product Specifications- Other Name: Spring - Rear Coil; Coil Springs
- Position: Rear
- Item Weight: 8.60 Pounds
- Condition: New
- Fitment Type: Direct Replacement
- SKU: 4895324AB
- Warranty: This genuine part is guaranteed by Mopar's factory warranty.
2005 Dodge Magnum Spring, Rear Part Number: 4895534AB
Product Specifications- Other Name: Spring - Rear Coil; Coil Springs
- Position: Rear
- Item Weight: 6.90 Pounds
- Condition: New
- Fitment Type: Direct Replacement
- SKU: 4895534AB
- Warranty: This genuine part is guaranteed by Mopar's factory warranty.

2005 Dodge Magnum Coil Spring, Front Part Number: 4895622AB
Product Specifications- Other Name: Spring - Front Coil; Coil Springs
- Position: Front
- Item Weight: 6.50 Pounds
- Condition: New
- Fitment Type: Direct Replacement
- SKU: 4895622AB
- Warranty: This genuine part is guaranteed by Mopar's factory warranty.
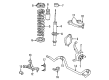
2005 Dodge Magnum Coil Spring, Front Part Number: 4895642AC
Product Specifications- Other Name: Spring - Front Coil; Coil Spring, Front; Coil Springs; Spring; Spring Front Coil
- Position: Front
- Replaces: 4895642AD, 4895642AB
- Item Weight: 6.60 Pounds
- Item Dimensions: 16.2 x 6.3 x 6.1 inches
- Condition: New
- Fitment Type: Direct Replacement
- SKU: 4895642AC
- Warranty: This genuine part is guaranteed by Mopar's factory warranty.

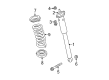
2005 Dodge Magnum Spring, Rear Part Number: 4895537AA
Product Specifications- Other Name: Spring - Rear Coil; Coil Spring, Rear; Coil Springs; Spring Rear Coil
- Position: Rear
- Item Weight: 8.20 Pounds
- Item Dimensions: 13.8 x 4.5 x 4.7 inches
- Condition: New
- Fitment Type: Direct Replacement
- SKU: 4895537AA
- Warranty: This genuine part is guaranteed by Mopar's factory warranty.
2005 Dodge Magnum Spring, Rear Part Number: 4895343AC
Product Specifications- Other Name: Spring - Rear Coil; Coil Spring, Rear; Coil Spring Kit Rear; Coil Spring Set; Coil Springs; Spring Rear Coil
- Position: Rear
- Replaces: 4895343AB
- Item Weight: 10.20 Pounds
- Item Dimensions: 13.8 x 4.6 x 4.6 inches
- Condition: New
- Fitment Type: Direct Replacement
- SKU: 4895343AC
- Warranty: This genuine part is guaranteed by Mopar's factory warranty.
| Page 1 of 2 |Next >
1-20 of 31 Results
2005 Dodge Magnum Coil Springs Parts and Q&A
- Q: How to Maintain and Fix Coil Springs on 2005 Dodge Magnum?A: First lift and support the vehicle, taking care of the rear wheel assembly and remove the wheel mounting nuts before working on the coil spring. During servicing of the left shock absorber, first remove the fuel filler tube. Extras jacks supports should be added to the front of the engine cradle while working on the rear suspension below and above the car. If the vehicle has two exhaust outlets or you're servicing the side on a vehicle with one, place a stand or jack beneath the outlet at the muffler, release the connectors and drop the pipe onto the jack or stand. Position the jack below the center of the rear axle differential, raise it to reach the differential and stabilize the jack until you can add the stabilizer bar. Unscrew the upper mounting screws and remove the shock absorber's lower bolt and nut. Don't remove spacers from between the crossmember mounts and the body or loosen the other mounting bolts when you change the bolts on just one side, as this may affect rear wheel alignment. Lower the front and rear crossmember mounting bolts on the lifting side and lower the car with the jack just enough to let the crossmember go past the top of the shock absorber. To remove the shock absorber, tip the top of the front over and lift up the lower end from its spring link pocket. Release the brake hose from the brake at the bracket and then slowly lower the jack so the crossmember is useful enough to allow for the removal of the spring and isolators. First, set both isolators on the coil spring and then install them as completely as possible, only adding the coil spring after the isolators are positioned. Place the spring link pocket around the essential part at the bottom of the shock and fit the top onto the upper attachment holes. Replace the lower shock bolt and nut, but do not tighten and if it is an AWD, correct the location of the spacers above the top crossmember mount bushings. Lift the jack as you guide the coil spring and shock absorber towards the top and install the nuts at the top with a torque wrench set to 52 Nm. Secure the crossmember bracket bolts lightly, then measure the distance from the tension link to the body weld flange to be sure it is no less than 12 mm for proper suspension performance. Make sure the rear crossmember is correctly aligned at this distance, then tighten all the mounting bolts on it to 180 Nm. Take away the jack from the rear axle differential, move the exhaust back up into its original place and attach the isolators. Attach the tire, fuel filler tube and wheel assembly again, while tightening the wheel nuts to 150 Nm. After placing the vehicle on an alignment rack, tighten the shock absorber lower mounting bolt nut to 72 Nm torque, lowering the vehicle first.
Related 2005 Dodge Magnum Parts
 2005 Dodge Magnum Control Arm
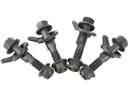 2005 Dodge Magnum Alignment Bolt
 2005 Dodge Magnum Axle Pivot Bushing
 2005 Dodge Magnum Bump Stop
 2005 Dodge Magnum Coil Spring Insulator
 2005 Dodge Magnum Lateral Link
 2005 Dodge Magnum Shock Absorber
 2005 Dodge Magnum Shock And Strut Mount
 2005 Dodge Magnum Steering Knuckle
 2005 Dodge Magnum Wheel Bearing
 2005 Dodge Magnum Wheel Cover
 2005 Dodge Magnum Wheel Hub