JeepParts
My Garage
My Account
Cart
OEM Dodge Magnum Coil Springs
Strut Spring- Select Vehicle by Model
- Select Vehicle by VIN
Select Vehicle by Model
orMake
Model
Year
Select Vehicle by VIN
For the most accurate results, select vehicle by your VIN (Vehicle Identification Number).
51 Coil Springs found

Dodge Magnum Spring, Rear Part Number: 4895474AB
$45.17 MSRP: $86.35You Save: $41.18 (48%)Ships in 1-2 Business Days

Dodge Magnum Coil Spring, Rear Part Number: 4895583AA


Dodge Magnum Spring, Rear Part Number: 4895314AB

Dodge Magnum Spring, Rear Part Number: 4895313AB

Dodge Magnum Coil Spring, Rear Part Number: 4895342AC


Dodge Magnum Spring, Front Part Number: 4895646AD

Dodge Magnum Coil Spring, Front Part Number: 4895624AB

Dodge Magnum Spring, Rear Part Number: 4895325AC

Dodge Magnum Spring, Rear Part Number: 4895475AB


Dodge Magnum Spring, Rear Part Number: 4895324AC
Dodge Magnum Spring, Rear Part Number: 5290477AA


Dodge Magnum Spring, Front Part Number: 4895635AB
Dodge Magnum Spring, Rear Part Number: 4895594AA
Dodge Magnum Spring, Rear Part Number: 4895538AA
Dodge Magnum Spring, Rear Part Number: 4895535AA
Dodge Magnum Spring, Rear Part Number: 4895533AA
Dodge Magnum Spring, Rear Part Number: 4895532AA
Dodge Magnum Spring, Rear Part Number: 4895333AB
Dodge Magnum Spring, Rear Part Number: 4895322AC
Dodge Magnum Spring, Rear Part Number: 4895315AA
| Page 1 of 3 |Next >
1-20 of 51 Results
Dodge Magnum Coil Springs
Choose OEM Coil Springs that meet Dodge factory standards. Dodge designs and tests every component for precision and durability. Each Coil Springs follows strict manufacturing steps to lock in quality and fit. If your Dodge Magnum matters to you, OEM parts make the smart choice. You'll get the exact look, feel, and performance you expect. Shop genuine Magnum parts at the highly competitive prices online. Enjoy a manufacturer's warranty, a hassle-free return policy, and rapid delivery. No more guesswork with off brands. Get genuine parts with exact fit and true factory performance. Shop with confidence today at JeepPartsDeal.com.
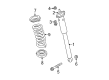
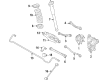
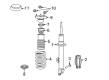
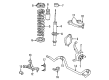
Coil Springs are essential assemblies which tend to hold or support the weight of the car and absorb any shocks on the surface of the road, avoiding I sagging and loss of standard height of the car body as illustrated by the Dodge Magnum. There are several types of springs which consist of linear rate that offers high spring rate from trunk to crown, progressive springs benefitting the handling and providing a longer stroke than the linear rate suspension and dual rate springs which offers lower spring rate on the first part of the stroke and the higher one on the second half of the stoke. Coil springs are essential for correct positioning of wheels and to avoid uneven wearing of tires, therefore are a component of vehicle suspension. Moreover, it can also be noted that adjustable coilovers and height adjustable springs can also be useful as they also allow for further adjustments of the lowering height of the vehicle without the need to change the complete lowering kit. Dodge Magnum Coil Springs is vital and wide spread sprung suspension parts that contributes to the comfort and balance while driving.
Dodge Magnum Coil Springs Parts and Q&A
- Q: How to install Rear Coil Springs on Dodge Magnum?A:To begin, lay the rear coil springs on their side and skilled the isolators at both ends so they are completely fixed. After that, slide the spring into the spring link's spring pocket, making sure to fit the under isolator to the pocket and guiding the upper end of the spring so it lines up with the body mount at the bottom. Put the Shock Absorber's lower ball into the spring link pocket and turn its top inward to match the upper holes. Do not tighten the lower shock mounting nuts or bolts yet; instead, attach them together loosely. If you have an AWD vehicle, carefully place the spacers on top of the crossmember mount bushings as they should be. Lift the jack slowly, steering the coil spring and top section of the shock absorber into its right spot and then attach the upper screws and tighten them to 52 Nm (38 ft. lbs.). Since the bolts for the rear crossmember are longer than those for the front, make sure not to mix them. Set the crossmember mounting screws, but don't tighten them completely just yet. Take the measurement from the tension link to the body weld flange; it should be at least 12 mm for good suspension movement; if it is less, move the rear crossmember backward until the measurement is sufficient and then tighten the loose nuts on the whole assembly. Dotron all of the crossmember bolts to 180 Nm (133 ft. lbs.), remove the jack from lifting the rear axle and if the rear exhaust was lowered in the process, raise it and link up the exhaust isolators. After that, attach the fuel filler tube and then the tires and wheels, safe-tightening their nuts at 150 Nm if it's a civilian car and 190 Nm for the police vehicles. Lower the car and put it up on a lift using an alignment rack, increase lift height until the lower bolt is clear and finally, tighten the nut on that bolt to 72 Nm.
- Q: How to Effectively Service and Repair Coil Springs on Dodge Magnum?A:To start, raise and support the car, remove the nuts and take out the wheel and tire assembly at the rear. When you service the left side Shock Absorber, also remove the fuel filler tube. Put an additional jack stand below the front area of the engine cradle to support the car during the removal and installation of the rear axle and suspension. Position an under-hoist utility jack or stand below the exhaust at the Muffler if dual exhaust is not installed or is serviced on the right side, then remove the isolators from the muffler and resonator hangers and bring the exhaust down onto the jack or stand. Later, put a jack at the center of the rear axle differential and lift it until it touches the differential, but don't secure the stabilizer bar. Start with the upper screws of the shock absorber, then remove the bolt and nut under it. For vehicles fitted with AWD, watch out not to lose spacers as you remove the bolts holding the crossmember to the body. Don't take out or loosen the bolts on the other side of the car, as this will require a rear wheel alignment after putting things back. Prise out both front and Rear Crossmember bracket bolts from the damaged side, but keep the crossmember almost near the vehicle to not disturb any other components. Draw the jack slowly down while holding the repair side of the crossmember to let the shock absorber top clear the body flange, then tilt the top out and lift the shock absorber out of the spring link on the bottom. Disconnect the brake hose from the bracket attached to the body to be sure it won't overextend and suffer damage during the following step. Set the jack level so the crossmember is almost touching the ground, but not all the way down-then take out the coil spring and isolators.


Related Dodge Magnum Parts
 Dodge Magnum Bump Stop
 Dodge Magnum Lateral Link
 Dodge Magnum Leaf Spring Bushing
 Dodge Magnum Radius Arm Bushing
 Dodge Magnum Strut Housing
 Dodge Magnum Suspension Strut Rod
 Dodge Magnum Sway Bar Bracket
 Dodge Magnum Sway Bar Bushing
 Dodge Magnum Sway Bar Link Bushing
 Dodge Magnum Wheel Bearing
 Dodge Magnum Wheel Cover
 Dodge Magnum Wheel Hub
Browse Dodge Magnum Coil Springs by Years
2008
2007
2006
2005