JeepParts
My Garage
My Account
Cart
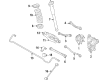
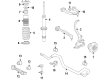
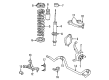
OEM 2005 Dodge Magnum Steering Knuckle
Front Steering Knuckle- Select Vehicle by Model
- Select Vehicle by VIN
Select Vehicle by Model
orMake
Model
Year
Select Vehicle by VIN
For the most accurate results, select vehicle by your VIN (Vehicle Identification Number).
8 Steering Knuckles found


2005 Dodge Magnum Knuckle, Rear Driver Side Part Number: 4782587AF
$700.94 MSRP: $943.00You Save: $242.06 (26%)Ships in 1-2 Business DaysProduct Specifications- Other Name: Knuckle - Rear; Suspension Knuckle, Rear Left
- Position: Rear Driver Side
- Replaces: 4782587AD, 4782587AC
- Item Weight: 5.90 Pounds
- Item Dimensions: 13.4 x 9.6 x 4.3 inches
- Condition: New
- Fitment Type: Direct Replacement
- SKU: 4782587AF
- Warranty: This genuine part is guaranteed by Mopar's factory warranty.
2005 Dodge Magnum Knuckle, Rear Passenger Side Part Number: 4782586AF
$609.96 MSRP: $924.00You Save: $314.04 (34%)Ships in 1-2 Business DaysProduct Specifications- Other Name: Knuckle - Rear; Suspension Knuckle, Rear Right
- Position: Rear Passenger Side
- Replaces: 4782586AD, 4782586AC
- Item Weight: 5.00 Pounds
- Item Dimensions: 13.4 x 9.8 x 4.4 inches
- Condition: New
- Fitment Type: Direct Replacement
- SKU: 4782586AF
- Warranty: This genuine part is guaranteed by Mopar's factory warranty.


2005 Dodge Magnum Knuckle, Front Driver Side Part Number: 4782741AD
Product Specifications- Other Name: Knuckle - Front; Steering Knuckle, Front Left
- Position: Front Driver Side
- Replaces: 4782741AC, 4782741AB
- Item Weight: 16.70 Pounds
- Item Dimensions: 8.0 x 9.2 x 21.9 inches
- Condition: New
- Fitment Type: Direct Replacement
- SKU: 4782741AD
- Warranty: This genuine part is guaranteed by Mopar's factory warranty.
2005 Dodge Magnum Knuckle, Front Passenger Side Part Number: 4782740AD
Product Specifications- Other Name: Knuckle - Front; Steering Knuckle, Front Right
- Position: Front Passenger Side
- Replaces: 4782740AB, 4782740AC, 4782740AA
- Item Weight: 18.10 Pounds
- Item Dimensions: 20.9 x 8.9 x 8.0 inches
- Condition: New
- Fitment Type: Direct Replacement
- SKU: 4782740AD
- Warranty: This genuine part is guaranteed by Mopar's factory warranty.

2005 Dodge Magnum Knuckle, Rear Driver Side Part Number: 4782929AF
Product Specifications- Other Name: Knuckle - Rear; Suspension Knuckle, Rear Left
- Position: Rear Driver Side
- Replaces: 4782929AD, 4782929AC
- Item Weight: 6.40 Pounds
- Item Dimensions: 14.5 x 10.8 x 7.5 inches
- Condition: New
- Fitment Type: Direct Replacement
- SKU: 4782929AF
- Warranty: This genuine part is guaranteed by Mopar's factory warranty.
2005 Dodge Magnum Knuckle, Rear Passenger Side Part Number: 4782928AF
Product Specifications- Other Name: Knuckle - Rear; Suspension Knuckle, Rear Right
- Position: Rear Passenger Side
- Replaces: 4782928AC, 4782928AD, 68258460AA
- Item Weight: 6.10 Pounds
- Item Dimensions: 14.1 x 10.9 x 7.5 inches
- Condition: New
- Fitment Type: Direct Replacement
- SKU: 4782928AF
- Warranty: This genuine part is guaranteed by Mopar's factory warranty.

2005 Dodge Magnum Knuckle, Front Driver Side Part Number: 4895711AB
Product Specifications- Other Name: Knuckle - Front; Steering Knuckle, Front Left; Knuckle Front
- Position: Front Driver Side
- Replaces: 4895711AA
- Item Weight: 20.70 Pounds
- Item Dimensions: 24.7 x 9.7 x 4.1 inches
- Condition: New
- Fitment Type: Direct Replacement
- SKU: 4895711AB
- Warranty: This genuine part is guaranteed by Mopar's factory warranty.

2005 Dodge Magnum Knuckle, Front Passenger Side Part Number: 4895710AB
Product Specifications- Other Name: Knuckle - Front; Steering Knuckle, Front Right; Knuckle Front
- Position: Front Passenger Side
- Replaces: 4895710AA
- Item Weight: 20.70 Pounds
- Item Dimensions: 24.9 x 9.7 x 3.9 inches
- Condition: New
- Fitment Type: Direct Replacement
- SKU: 4895710AB
- Warranty: This genuine part is guaranteed by Mopar's factory warranty.
2005 Dodge Magnum Steering Knuckle Parts and Q&A
- Q: How to Maintain a Steering Knuckle on 2005 Dodge Magnum?A: Before working on the AWD steering knuckle, first lift and support the car, take out the wheel mounting nuts and take off the tire and wheel assembly. Since the brake is applied to the hub, you can safely take out the hub nut from the axle half shaft. Take off the clip, attach the wheel speed sensor on the knuckle with a screw and pull out the sensor head afterwards. Bring out the front brake rotor first, then get rid of the outer tie rod end stud nut. Put Puller, Special Tool 9360, on the tie rod stud to pull it away from the knuckle. Screw off just enough of the nut on the ball joint of the lower control arm until it's flush with the stud, to avoid distortion. Slide the Puller securely past the seal boot around the ball joint, unhook the stud from the knuckle and take out the Puller. Do the same thing for the upper ball joint stud, making certain the nut is flush with the end of the stud. Separate the upper ball joint stud, then remove the tool and Hex nut at the end. Slide the knuckle away from the half shaft and take it out of the truck. Should the hub, bearing and dust shield all require removal, slide out the four connecting bolts and take the hub, bearing and shield from the knuckle together. To install, slide the shield over the back of the hub and bearing, insert both into the knuckle and secure them with four bolts tightened to 68 Nm. Both the hub and the bearing can be fitted on the axle half shaft after verifying and confirming the presence and good state of the isolation washer. Put the knuckle over the ball joint stud and push the hub and bearing onto the axle half shaft, starting a new nut on the lower ball joint stud but do not tighten it. Fit the upper ball joint stud into the knuckle, put the nut in place and tighten to 47 Nm with an additional 90° extra tightening. Apply 68 Nm plus a 90° turn of force to the lower ball joint nut. The outer tie rod stud should be passed through the knuckle and tightened till 85 Nm. Begin by installing the brake rotor and then put the caliper and adapter back on as well. Apply brakes while screwing that nut onto the axle half shaft until you reach 213 Nm torque. Position the wheel speed sensor head into its place in the knuckle, fasten it using the screw and then tighten it to 11 Nm and finally attach the cable routing clip as seen in the following diagram. Afterward, put the tire and wheel back on, tighten the mounting nuts on the wheels to 150 Nm, lower the car, pump the brake several times, review the brake fluid and do a wheel alignment if needed.
Related 2005 Dodge Magnum Parts
 2005 Dodge Magnum Control Arm
 2005 Dodge Magnum Control Arm Bushing
 2005 Dodge Magnum Alignment Bolt
 2005 Dodge Magnum Axle Beam Mount
 2005 Dodge Magnum Axle Pivot Bushing
 2005 Dodge Magnum Axle Support Bushings
 2005 Dodge Magnum Coil Spring Insulator
 2005 Dodge Magnum Coil Springs
 2005 Dodge Magnum Leaf Spring Bushing
 2005 Dodge Magnum Sway Bar Bushing
 2005 Dodge Magnum Sway Bar Link
 2005 Dodge Magnum Wheel Hub