JeepParts
My Garage
My Account
Cart
OEM 2005 Dodge Neon Ball Joint
Control Arm Joint- Select Vehicle by Model
- Select Vehicle by VIN
Select Vehicle by Model
orMake
Model
Year
Select Vehicle by VIN
For the most accurate results, select vehicle by your VIN (Vehicle Identification Number).
1 Ball Joint found

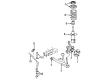
2005 Dodge Neon Ball Joint, Front Lower Part Number: 4656010AE
$70.36 MSRP: $157.00You Save: $86.64 (56%)Ships in 1-2 Business DaysProduct Specifications- Other Name: Ball Join - Lower Control Arm; Suspension Ball Joint, Front; Lower Ball Joint; Ball Joint Kit Lower Control Arm; Ball Joint Lower Control Arm; Suspension Ball Joint
- Position: Front Lower
- Replaces: 4656010AB, 4656010AD, 4656010AC
- Item Weight: 1.20 Pounds
- Item Dimensions: 4.1 x 3.0 x 2.1 inches
- Condition: New
- Fitment Type: Direct Replacement
- SKU: 4656010AE
- Warranty: This genuine part is guaranteed by Mopar's factory warranty.
2005 Dodge Neon Ball Joint Parts and Q&A
- Q: How to Service and Repair a Ball Joint Seal Boot on 2005 Dodge Neon?A: To repair or service the seal boot under the lower ball joint, you need to take out the steering knuckle first. Gently use a screwdriver or a similar tool to lift the seal boot away from the ball joint. Remove any grease that has been spread around the ball joint stem. During installation, make sure the upside border on the seal boot is standing out from the control arm so it can block heat from reaching the sealing boot. After you have the boot in your hand, place its up-pointing side over the ball joint stem. Hold the ball joint in place and carefully start the boot up its sides. Stand Position Installer, Special Tool 6758, at the base of the sealing boot and use the top of the tool to tighten the seal boot until it is directly on the control arm's top surface and then release the tool. Install a standard zirc-type grease tip in the ball joint's hole and save the other headless fitting for another time. Put some grease on the ball joint so that air from the venting seal does not get blocked as the seal fills once you reinstall the knuckle. Fill the seal boot with Mopar Multi-Mileage Lube or similar by operating the hand grease gun, ensuring grease develops at the ball joint stem and afterwards excess should be wiped away. After that, remove the standard zirc-type grease fitting and fit the headless grease fitting into the ball joint to avoid further lubrication problems, then connect the steering knuckle.
Related 2005 Dodge Neon Parts
 2005 Dodge Neon Wheel Hub
 2005 Dodge Neon Axle Beam Mount
 2005 Dodge Neon Axle Pivot Bushing
 2005 Dodge Neon Axle Support Bushings
 2005 Dodge Neon Bump Stop
 2005 Dodge Neon Coil Spring Insulator
 2005 Dodge Neon Coil Springs
 2005 Dodge Neon Control Arm Bushing
 2005 Dodge Neon Shock And Strut Mount
 2005 Dodge Neon Steering Knuckle
 2005 Dodge Neon Sway Bar Kit
 2005 Dodge Neon Sway Bar Link