JeepParts
My Garage
My Account
Cart
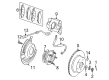
OEM 2005 Jeep Wrangler Brake Caliper
Caliper- Select Vehicle by Model
- Select Vehicle by VIN
Select Vehicle by Model
orMake
Model
Year
Select Vehicle by VIN
For the most accurate results, select vehicle by your VIN (Vehicle Identification Number).
4 Brake Calipers found


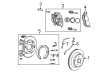
2005 Jeep Wrangler Caliper, Rear Passenger Side Part Number: 5191824AA
Product Specifications- Other Name: Caliper - Disc Brake; Disc Brake Caliper, Rear Right; Caliper Disc Brake; Brake Caliper
- Position: Rear Passenger Side
- Replaces: 5093542AA
- Item Weight: 5.20 Pounds
- Condition: New
- Fitment Type: Direct Replacement
- SKU: 5191824AA
- Warranty: This genuine part is guaranteed by Mopar's factory warranty.


 Product Specifications
- Other Name: Caliper - Disc Brake; Disc Brake Caliper, Front Left; Caliper, Brake, 2WD 1991-92-1/2, Right; Front Brake Caliper, Right
- Position: Front Driver Side
- Item Weight: 7.90 Pounds
- Item Dimensions: 8.6 x 6.4 x 5.4 inches
- Condition: New
- Fitment Type: Direct Replacement
- SKU: 5252985
- Warranty: This genuine part is guaranteed by Mopar's factory warranty.
2005 Jeep Wrangler Caliper, Rear Driver Side Part Number: 5191825AA
Product Specifications- Other Name: Caliper - Disc Brake; Disc Brake Caliper, Rear Left; Caliper Disc Brake; Brake Caliper
- Position: Rear Driver Side
- Replaces: 5093543AA
- Item Weight: 5.10 Pounds
- Condition: New
- Fitment Type: Direct Replacement
- SKU: 5191825AA
- Warranty: This genuine part is guaranteed by Mopar's factory warranty.
- Product Specifications
- Other Name: Caliper - Disc Brake; Disc Brake Caliper, Front Right; Caliper, Brake, 2WD 1991-92-1/2, Right; Front Brake Caliper, Right
- Position: Front Passenger Side
- Item Weight: 7.80 Pounds
- Item Dimensions: 8.8 x 6.9 x 5.7 inches
- Condition: New
- Fitment Type: Direct Replacement
- SKU: 5252984
- Warranty: This genuine part is guaranteed by Mopar's factory warranty.
2005 Jeep Wrangler Brake Caliper Parts and Q&A
- Q: How to Service and Repair a Rear Disc Brake Caliper on 2005 Jeep Wrangler?A: Start by putting a prop rod on the brake pedal and then raise and support the vehicle before you start working on the rear disc brake caliper. After removing the wheel and tire assembly, take off the caliper's brake hose banjo bolt when the caliper is being replaced. Then, using a socket, unscrew the mounting slide pin bolts and take out the caliper. Take out the brake shoes and drain all the brake fluid from the caliper. Before removing the caliper piston, stuff a piece of wood between the piston and the bore, blanket its surface with one-inch thick shop rags and fire some short, low-pressure bursts of compressed air carefully through the fluid inlet port to gently free the piston from the bore without damaging the housing. Remove the boot from the caliper piston with a special pry tool and the piston seal with something wood or plastic to protect the bore. After taking out the caliper mounting bolt bushings and boots, give all parts a clean with clean brake fluid or brake clean. Check that the piston is smooth; if it is cracked or scored, a new piston of the same type is required since phenolic resin and steel pistons are not alternates. For small marks in the barrel, lightly hone it with a brake hone, but if it is seriously rusted or makes the bore diameter larger than 0.025 mm, you need to get a new caliper. Be sure to clean and dry the area for assembly, grease the caliper piston, new piston seal and piston with good brake fluid and use silicone grease to lubricate the caliper bushings and bushing boot interior. After installing the bushing boots, put in the special bushings and finish with the new seal in the groove. Fix the new dust boot around the caliper piston, use a type of motion to guide the piston in and anchor the dust boot with Installation Tool C-4842 and Tool Handle C-4171. When the caliper bleed screw is not there, it must be replaced. When installing, put the brake pads in place if they were removed, grease the anti-rattle clips for the disc brake pads and secure the caliper to the adapter. Apply silicone grease to the caliper mounting pin bolts, set them in place and tighten each to 15 Nm (11 ft. lbs.). Attach the brake hose banjo bolt if you removed it, join each end to the caliper with new washers and tighten the bolt to 31 Nm (23 ft. lbs.) so the brake hose is not twisted or kinked. Remove the prop rod, carry out brake bleeding for the wheel, put the wheel and tires back on, lower the vehicle and make sure the pedal feels solid before you move it.
Related 2005 Jeep Wrangler Parts
 2005 Jeep Wrangler Speed Sensor
 2005 Jeep Wrangler ABS Control Module
 2005 Jeep Wrangler Brake Booster
 2005 Jeep Wrangler Brake Dust Shield
 2005 Jeep Wrangler Wheel Cylinder
 2005 Jeep Wrangler Wheel Stud
 2005 Jeep Wrangler Brake Caliper Bolt
 2005 Jeep Wrangler Brake Caliper Piston
 2005 Jeep Wrangler Brake Disc
 2005 Jeep Wrangler Brake Pad
 2005 Jeep Wrangler Brake Proportioning Valve
 2005 Jeep Wrangler Hydraulic Hose