JeepParts
My Garage
My Account
Cart
OEM 2006 Chrysler Crossfire Drive Shaft
Axle Shaft- Select Vehicle by Model
- Select Vehicle by VIN
Select Vehicle by Model
orMake
Model
Year
Select Vehicle by VIN
For the most accurate results, select vehicle by your VIN (Vehicle Identification Number).
4 Drive Shafts found

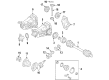
2006 Chrysler Crossfire Joint Part Number: 5127495AA
$306.09 MSRP: $467.00You Save: $160.91 (35%)Ships in 1-2 Business DaysProduct Specifications- Other Name: Shaft - Driveshaft; Joint Kit Driveshaft
- Item Weight: 2.80 Pounds
- Item Dimensions: 7.8 x 6.2 x 2.5 inches
- Condition: New
- Fitment Type: Direct Replacement
- SKU: 5127495AA
- Warranty: This genuine part is guaranteed by Mopar's factory warranty.

2006 Chrysler Crossfire Drive Shaft Part Number: 5135420AA
Product Specifications- Other Name: Shaft - Drive; Driveshaft; Shaft Drive 2 Piece
- Item Weight: 19.90 Pounds
- Item Dimensions: 52.1 x 5.8 x 5.8 inches
- Condition: New
- Fitment Type: Direct Replacement
- SKU: 5135420AA
- Warranty: This genuine part is guaranteed by Mopar's factory warranty.
2006 Chrysler Crossfire Drive Shaft Part Number: 5102636AA
Product Specifications- Other Name: Shaft - Drive; Driveshaft; Shaft Drive 2 Piece
- Item Weight: 22.40 Pounds
- Item Dimensions: 53.6 x 6.0 x 5.7 inches
- Condition: New
- Fitment Type: Direct Replacement
- SKU: 5102636AA
- Warranty: This genuine part is guaranteed by Mopar's factory warranty.
2006 Chrysler Crossfire Drive Shaft Part Number: 5099384AA
Product Specifications- Other Name: Shaft - Drive; Driveshaft; Shaft Drive 2 Piece
- Item Weight: 18.50 Pounds
- Item Dimensions: 61.2 x 7.8 x 6.8 inches
- Condition: New
- Fitment Type: Direct Replacement
- SKU: 5099384AA
- Warranty: This genuine part is guaranteed by Mopar's factory warranty.
2006 Chrysler Crossfire Drive Shaft Parts and Q&A
- Q: How to Service and Repair a Drive Shaft on 2006 Chrysler Crossfire?A: You should start by raising and supporting the vehicle and following this by removing the exhaust system. At this stage, come off the middle exhaust heat shield by removing the screws and the heat shield and take out the rear transmission tunnel support bracket by removing all its bolts. Proposition the transmission with a jack stand and unbolt the transmission mount from the transmission and the transmission crossmember from the vehicle before you move the crossmember. Measure and mark the proper positions of the front and rear propeller shaft flanges relative to the output flange of the transmission as well as the rear axle pinion and be sure to mark the position of every bolt so you know where to replace them. Remove the bolt holding the rear propeller shaft at the axle pinion, then pull out the rear propeller shaft. After that, do the same for the front propeller shaft at the transmission's output flange. Eliminate the center bearing bracket bolts and gradually pull out the whole propeller shaft. Put the propeller shaft in the car again, rest it on a jack stand, make sure the center bearing bracket is properly placed and install and tighten all necessary bolts to 30 Nm (22 ft. lbs.). Screw the rear propeller shaft onto the rear axle pinion flange, holding the car at its usual ride height, then tighten all the rear propeller shaft bolts to 60 Nm (44 ft. lbs.). After that, fasten the front propeller shaft to the transmission output flange, confirming the vehicle is at its normal ride height and tighten the three bolts to 60 Nm (44 ft. lbs.). Place the transmission tunnel support bracket and the bolts back into position, tightening them until you reach 20 Nm (15 ft. lbs.) and tighten the crossmember bolts to 45 Nm (33 ft. lbs.). After that, place the rear exhaust heat shield and nuts back in, secure them with 10 Nm (89 in. lbs.) of torque, remove the jack stand for the transmission, secure everything and lower your vehicle.
Related 2006 Chrysler Crossfire Parts
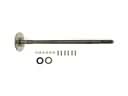 2006 Chrysler Crossfire Axle Shaft
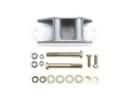 2006 Chrysler Crossfire Carrier Bearing Spacer
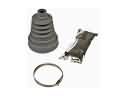 2006 Chrysler Crossfire CV Boot
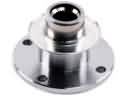 2006 Chrysler Crossfire CV Joint Companion Flange
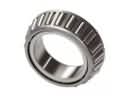 2006 Chrysler Crossfire Differential Bearing
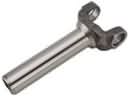 2006 Chrysler Crossfire Driveshaft Yokes
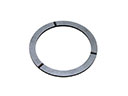 2006 Chrysler Crossfire Mainshaft Washer
 2006 Chrysler Crossfire Pinion Bearing
 2006 Chrysler Crossfire Pinion Washer