JeepParts
My Garage
My Account
Cart
OEM 2006 Chrysler Sebring A/C Clutch
Air Conditioning Clutch- Select Vehicle by Model
- Select Vehicle by VIN
Select Vehicle by Model
orMake
Model
Year
Select Vehicle by VIN
For the most accurate results, select vehicle by your VIN (Vehicle Identification Number).
1 A/C Clutch found

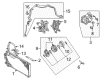
2006 Chrysler Sebring Clutch Assembly Part Number: 5018772AA
Product Specifications- Other Name: Clutch - A/C Compressor; Clutch Overhaul Kit A/C Compressor
- Item Weight: 4.60 Pounds
- Condition: New
- Fitment Type: Direct Replacement
- SKU: 5018772AA
- Warranty: This genuine part is guaranteed by Mopar's factory warranty.
2006 Chrysler Sebring A/C Clutch Parts and Q&A
- Q: How to Maintain the A/C Clutch on 2006 Chrysler Sebring?A: The first part of servicing the A/C compressor clutch is to disconnect the ground cable, take off the accessory belt and lift the vehicle. Separate the wire harness connector between the clutch field coil and the A/C compressor and then remove the bolts connecting the compressor to its bracket. Support the compressor and withdraw it slowly when taking it out. Removing the clutch bolt with the Special Tool 9351 is safe, provided that the clutch plate is held in place with the fixture from Kit 9349. You can either take off the clutch plate using your hands or remove it with an 8 x 1.25 mm bolt when necessary. Remove the clutch shims from the compressor shaft and then take out the snap ring securing the pulley and bearing assembly with snap ring pliers. When the pulley and bearing assembly cannot be pulled out with ordinary methods, a two jaw puller can help. You should then unscrew the wire harness connector bracket and extract the clutch field coil using the compressor field coil remover (Special Tool 9354 from Kit 9349) and a two jaw puller. Line up the A/C clutch field coil on the front hub of the compressor case, making certain the positioning tab and connectors are right. Install the clutch field coil by using Special Tool 9352 found in Kit 9349, Special Tool 9353 found in Kit 9349 and a two jaw puller. Screw the clutch coil wire harness connector until you reach a force of 2 N.m (17 in. lbs.). Place the assembly of the pulley and bearing onto the front of the compressor with the clutch pulley installer (Special Tool 9355 in Kit 9349), tapping as you go until it makes contact with the housing. The beveled side of the snap ring should face on the outside of the engine and it must be secured in its groove to avoid clutch problems. Confirm that there is enough spacing between the clutch field coil wire and the clutch pulley and secure the proper shim supplier's chart. Place the clutch on the plate holding fixture (Special Tool 9351 in Kit 9349) and tighten the clutch bolt to 13 N.m (115 in. lbs.). Test the clutch by placing a feeler gauge between the hood and outer casing, using shims to reach the requirement of between 0.35 and 0.75 millimeter (0.014 and 0.030 inch). Put the A/C compressor into place and hold it with the mounting bracket using bolts tightened to 28 N.m (20 ft. lbs.) and then plug the wire harness back into the clutch field coil connector. Put the vehicle on the ground, wrap the accessory drive belt, link the negative battery cable again and break in the clutch.
Related 2006 Chrysler Sebring Parts
 2006 Chrysler Sebring Blower Motor Resistor
 2006 Chrysler Sebring A/C Compressor
 2006 Chrysler Sebring A/C Condenser
 2006 Chrysler Sebring A/C Expansion Valve
 2006 Chrysler Sebring A/C Hose
 2006 Chrysler Sebring A/C Service Cap
 2006 Chrysler Sebring Blend Door Actuator
 2006 Chrysler Sebring Blower Control Switches
 2006 Chrysler Sebring Blower Motor
 2006 Chrysler Sebring Evaporator
 2006 Chrysler Sebring Heater Core
 2006 Chrysler Sebring HVAC Pressure Switch