JeepParts
My Garage
My Account
Cart
OEM Chrysler Sebring A/C Clutch
Air Conditioning Clutch- Select Vehicle by Model
- Select Vehicle by VIN
Select Vehicle by Model
orMake
Model
Year
Select Vehicle by VIN
For the most accurate results, select vehicle by your VIN (Vehicle Identification Number).
10 A/C Clutches found

Chrysler Sebring Clutch Part Number: MR500339
$74.98 MSRP: $95.05You Save: $20.07 (22%)Ships in 1-2 Business Days
Chrysler Sebring Clutch Part Number: 4762849
$102.04 MSRP: $129.36You Save: $27.32 (22%)Ships in 1-2 Business Days
Chrysler Sebring Clutch & Pulley Part Number: MR360244
Chrysler Sebring Clutch Part Number: MR500254

Chrysler Sebring Pulley Part Number: MR500233
Chrysler Sebring Pulley Part Number: MR460108

Chrysler Sebring Clutch & Pulley Part Number: MR360178

Chrysler Sebring Repair Kit Part Number: MR315936
Chrysler Sebring Clutch Assembly Part Number: 5018772AA
Chrysler Sebring Clutch Assembly Part Number: 5018771AA
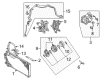
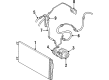
Chrysler Sebring A/C Clutch
Choose OEM A/C Clutch that meet Chrysler factory standards. Chrysler designs and tests every component for precision and durability. Each A/C Clutch follows strict manufacturing steps to lock in quality and fit. If your Chrysler Sebring matters to you, OEM parts make the smart choice. You'll get the exact look, feel, and performance you expect. Shop genuine Sebring parts at the highly competitive prices online. Enjoy a manufacturer's warranty, a hassle-free return policy, and rapid delivery. No more guesswork with off brands. Get genuine parts with exact fit and true factory performance. Shop with confidence today at JeepPartsDeal.com.
The Chrysler Sebring A/C Clutch is an important part of the car air conditioning system widely praised for its quality and efficiency across most of the Sebring models. This A/C Clutch effectively translates the engine's power to drive the A/C compressor and connects when the air conditioning system is turned on. The Chrysler Sebring A/C Clutch works through the lock-up system where a drum on the interior of the belt pulley is magnetized and as a result the belt drive becomes locked in place, this helps in achieving the aimed efficiency without overworking the engine when it is off. It makes remarkable changes the vehicle's movement and adds to fuel economy and safe driving. The Chrysler Sebring vehicles have come in many models since they were first introduced in 1995 coupes, Convertible, Sedan and all of them have been enhanced with A/C Clutch engineering. Since the inception of the Chrysler A/C Clutch, they have been fashionable in redesigning the Sebring A/C Clutch with aim of resolving some of the indefinable values for disadvantageous impacts such as sticking or slippage of the A/C thus increasing fuel rate. The Chrysler Sebring A/C Clutch is much more than just a normal part; it works to regulate the climate inside the car and as such contributes to the comfort of the driver and passengers. The Chrysler Sebring A/C Clutch can be viewed as a champion of the automotive market due to its strong design and effective functionality, thus allowing the drivers to fully count on their Sebring.
Chrysler Sebring A/C Clutch Parts and Q&A
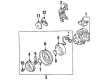
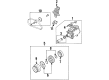
- Q: How to Properly Burnish a New A/C Clutch on Chrysler Sebring?A:Cycle the compressor clutch following installation of the A/C compressor clutch. Turn it on for five seconds and off for five seconds twenty times. Choose A/C Recirculation Mode, select the highest speed for the Blower Motor and make sure the engine runs at 1500 to 2000 rpm. Burnishing will lock in the components by pressing them against each other and boost the clutch torque of the compressor.
- Q: How to Service and Repair an A/C Clutch on Chrysler Sebring?A:Before servicing or repairing the compressor clutch, first remove the negative Battery Cable and remove the serpentine belt. Compressor cannot be removed until you have removed the height adjuster wire harness plug and all the bolts that secure it to the car. Carefully remove the compressor from the bracket by holding it under the support. To start, hold the clutch in place with a Spanner Wrench (kit # 6460 or similar), then unscrew the nut. Use a Puller (6461 or related) to take out the clutch plate and the compressor clutch shims will come off as well. After that, use snap ring pliers to take out the front housing snap ring. Lip the Rotor Puller inside the groove of the external snap ring and put the Shaft Protector into the mix at the same time. Attachment of the Secure Puller Bolts (6461 or similar) into both sides of the puller flange into the jaws of the rotor puller, tightening them and then rotate the puller center bolt until the rotor pulley is released. After removing the screw and retainer from the harness, let go of the snap ring on the compressor hub and remove the clutch field coil. After installation, snap in the clutch field coil and snap ring, then hook the clutch coil wire harness retaining clip and tighten the screw. Square up the rotor on the front compressor housing hub and, using a tool such as the Installer (6871), mount the pulley bearing assembly by turning the nut clockwise until it is fully seated. Align the bevel side of the external snap ring to the outside, ensure it is seated properly, so the clutch or compressor doesn't get damaged. After putting new clutch shims on the compressor shaft, fit the clutch plate with a Driver (6463 or doubly used vehicle-like) and tighten the shaft nut to 14.4Nm (10.5 ft lbs). Adjust the shims using a feeler gauge, so that the greatest clutch air gap is within the range of 0.41 to 0.79 mm (0.016 to 0.031 in.). After you form the arch, tap or lift the feet lightly if needed to ensure all space is the same distance apart. For a compressor that didn't originally have a clutch, add the included shims with thicknesses of 1.0, 0.50 and 0.13 mm (0.040, 0.020 and 0.005 in.). Lay the compressor on the mount, bolt it down securely at 41 Nm (30 ft. lbs.), attach the clutch wire harness, fasten the Drive Belt back in and restore the negative battery cable. First, run the engine at 1500-2000 rpm with the AC in use, the blower on high and let the clutch cycle for 20 times (three seconds on, three seconds off) just for the first clutch in use.

Related Chrysler Sebring Parts
 Chrysler Sebring A/C Accumulator
 Chrysler Sebring A/C Compressor
 Chrysler Sebring A/C Compressor Cut-Out Switches
 Chrysler Sebring A/C Expansion Valve
 Chrysler Sebring A/C Hose
 Chrysler Sebring A/C Service Cap
 Chrysler Sebring A/C System Valve Core
 Chrysler Sebring Blend Door Actuator
 Chrysler Sebring Blower Control Switches
 Chrysler Sebring Blower Motor
 Chrysler Sebring Evaporator
 Chrysler Sebring Heater Core