JeepParts
My Garage
My Account
Cart
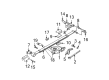
OEM 2006 Dodge Caravan Shock Absorber
Suspension Shock Absorber- Select Vehicle by Model
- Select Vehicle by VIN
Select Vehicle by Model
orMake
Model
Year
Select Vehicle by VIN
For the most accurate results, select vehicle by your VIN (Vehicle Identification Number).
10 Shock Absorbers found

2006 Dodge Caravan Shock Absorber, Rear Part Number: 4743224AA
$73.12 MSRP: $96.65You Save: $23.53 (25%)Ships in 1-2 Business DaysProduct Specifications- Other Name: Absorber - Suspension; Shock Absorber, Rear;Strut/Coil Kit;ABS;Complete Strut; Shock; Shock Absorber Suspension
- Position: Rear
- Item Weight: 3.60 Pounds
- Item Dimensions: 26.8 x 4.4 x 3.4 inches
- Condition: New
- Fitment Type: Direct Replacement
- SKU: 4743224AA
- Warranty: This genuine part is guaranteed by Mopar's factory warranty.
2006 Dodge Caravan Shock, Rear Part Number: 4766452AA
$372.39 MSRP: $567.00You Save: $194.61 (35%)Ships in 1-2 Business DaysProduct Specifications- Other Name: Absorber - Suspension; Rear Shock Absorber; Strut and Coil Spring Assembly; Shock Absorber Kit; Complete Strut.; Shock Absorber Suspension; Shock Absorber
- Position: Rear
- Item Weight: 9.00 Pounds
- Item Dimensions: 22.1 x 6.2 x 4.6 inches
- Condition: New
- Fitment Type: Direct Replacement
- SKU: 4766452AA
- Warranty: This genuine part is guaranteed by Mopar's factory warranty.
2006 Dodge Caravan Shock Absorber, Rear Part Number: 4743229AA
$495.04 MSRP: $751.00You Save: $255.96 (35%)Ships in 1-2 Business DaysProduct Specifications- Other Name: Absorber - Suspension; Shock Absorber, Rear;Strut/Coil Kit;ABS;Complete Strut; Shock; Shock Absorber Suspension
- Position: Rear
- Item Weight: 9.10 Pounds
- Item Dimensions: 15.8 x 6.2 x 4.5 inches
- Condition: New
- Fitment Type: Direct Replacement
- SKU: 4743229AA
- Warranty: This genuine part is guaranteed by Mopar's factory warranty.
2006 Dodge Caravan Shock, Rear Part Number: 4721340AA
$239.04 MSRP: $536.00You Save: $296.96 (56%)Ships in 1-2 Business DaysProduct Specifications- Other Name: Absorber - Suspension; Shock Absorber, Rear;Strut/Coil Kit;ABS;Complete Strut; Shock Absorber Suspension; Shock Absorber
- Position: Rear
- Item Weight: 4.00 Pounds
- Item Dimensions: 24.6 x 6.4 x 2.4 inches
- Condition: New
- Fitment Type: Direct Replacement
- SKU: 4721340AA
- Warranty: This genuine part is guaranteed by Mopar's factory warranty.
2006 Dodge Caravan Shock Absorber, Rear Part Number: 4743226AA
$224.10 MSRP: $505.00You Save: $280.90 (56%)Ships in 1-2 Business DaysProduct Specifications- Other Name: Absorber - Suspension; Shock Absorber, Rear;Strut/Coil Kit;ABS;Complete Strut; Shock; Shock Absorber Suspension
- Position: Rear
- Item Weight: 3.60 Pounds
- Item Dimensions: 26.6 x 5.0 x 4.1 inches
- Condition: New
- Fitment Type: Direct Replacement
- SKU: 4743226AA
- Warranty: This genuine part is guaranteed by Mopar's factory warranty.

2006 Dodge Caravan Shock, Rear Part Number: 4743225AA
Product Specifications- Other Name: Absorber - Suspension; Shock Absorber, Rear;Strut/Coil Kit;ABS;Complete Strut; Shock Absorber Suspension; Shock Absorber
- Position: Rear
- Item Weight: 3.70 Pounds
- Item Dimensions: 18.9 x 3.9 x 2.8 inches
- Condition: New
- Fitment Type: Direct Replacement
- SKU: 4743225AA
- Warranty: This genuine part is guaranteed by Mopar's factory warranty.
2006 Dodge Caravan Shock Absorber, Rear Part Number: 4743230AA
Product Specifications- Other Name: Absorber - Suspension; Shock Absorber, Rear;Strut/Coil Kit;ABS;Complete Strut; Shock; Shock Absorber Suspension
- Position: Rear
- Item Weight: 9.40 Pounds
- Item Dimensions: 21.9 x 6.2 x 4.6 inches
- Condition: New
- Fitment Type: Direct Replacement
- SKU: 4743230AA
- Warranty: This genuine part is guaranteed by Mopar's factory warranty.
2006 Dodge Caravan Shock, Rear Part Number: 4743233AA
Product Specifications- Other Name: Absorber - Suspension; Shock Absorber, Rear;Strut/Coil Kit;ABS;Complete Strut; Shock Absorber Suspension; Shock Absorber
- Position: Rear
- Item Weight: 9.00 Pounds
- Condition: New
- Fitment Type: Direct Replacement
- SKU: 4743233AA
- Warranty: This genuine part is guaranteed by Mopar's factory warranty.
2006 Dodge Caravan Shock Absorber, Rear Part Number: 4743232AA
Product Specifications- Other Name: Absorber - Suspension; Shock Absorber, Rear;Strut/Coil Kit;ABS;Complete Strut; Shock; Shock Absorber Suspension
- Position: Rear
- Item Weight: 9.10 Pounds
- Condition: New
- Fitment Type: Direct Replacement
- SKU: 4743232AA
- Warranty: This genuine part is guaranteed by Mopar's factory warranty.
2006 Dodge Caravan Shock, Rear Part Number: 4743227AA
Product Specifications- Other Name: Absorber - Suspension; Shock Absorber, Rear;Strut/Coil Kit;ABS;Complete Strut; Shock Absorber Suspension; Shock Absorber
- Position: Rear
- Item Weight: 4.00 Pounds
- Item Dimensions: 26.1 x 4.7 x 3.5 inches
- Condition: New
- Fitment Type: Direct Replacement
- SKU: 4743227AA
- Warranty: This genuine part is guaranteed by Mopar's factory warranty.
2006 Dodge Caravan Shock Absorber Parts and Q&A
- Q: How to Safely Remove and Install a Shock Absorber Strut Assembly on 2006 Dodge Caravan?A: When working on the suspension strut assembly, first prop up the vehicle, take out the wheel and tire assembly from the front at the location where the strut will come out and then start with the repair. Remember to tag the right and left assemblies when you remove both of them. Separate the hydraulic brake hose bracket and speed sensor cable bracket from the strut damper brackets. Before you pull the nut out of the link stud, keep the stud still by holding it with an open-end wrench and remove the stabilizer bar link from the bracket on the strut assembly. Steering knuckle to strut assembly bolts have serrated heads and must not move during the nut's removal. Unbolt the clevis bracket from the steering knuckles, remove the nuts attaching the strut assembly upper mount and remove the whole strut assembly assembly from the car. To disassemble, insert a Strut Spring Compressor or a PSE tool W-7200 (or its equivalent) into the strut to push on the spring, compressed first. Place the strut assembly in the compressor and make sure the lower hooks are properly in position, then compress the coil spring so all tension comes out of the upper mount. Use Special Tool 6864, also called Strut Nut Socket, to release the retaining nut on the strut as you hold the strut shaft in place. Remove the upper mount and, if the coil spring needs it, take out the upper seat pivot bearing. Take out the tension from the coil spring, then take off the dust shield and jounce bumper as an assembled piece on the strut shaft. Thoroughly check all parts of the strut assembly for harm and replace anything damaged as the job calls for. When assembling, ensure the coil spring is correctly placed in the compressor, fit the upper seat and isolator and compress the coil spring enough so you can fit the strut. After removing the pivot bearing, install the rest in order: spring isolator, jounce bumper and dust shield. Push the strut through the center of the coil spring, align the clevis bracket and put the clamp in place. Put the strut mount on the strut shaft as well as the pivot bearing and upper seat and only tighten the retaining nut slightly. Screw the strut shaft retaining nut until the torque reaches 100 Nm (75 ft. lbs.), while making certain that the upper spring seat, coil spring and strut clevis bracket are in line. Gently release the pressure in the coil spring, take off the clamp and remove the strut assembly from the compressor. Line up the three studs from the strut assembly with the shock tower holes, set them into the strut tower and use the three upper strut mounting nuts to tighten them by 28 Nm (250 inch lbs.). Lay the strut assembly across the steering knuckles, fit both mating bolts into the strut assembly and fasten them until their torque reaches 81 Nm (60 ft. lbs.) and add one quarter twist. Attach the stud to the assembly bracket in the strut, hand thread and fix the nut and tighten to 88 Nm (65 ft. lbs.) without moving the stud. Connect the hydraulic brake hose and speed sensor cable routing brackets, tightening their bolts to 13 Nm (10 ft. lbs.). After that, fix the wheel/tire assembly and tighten the stud nuts on the wheel to 135 Nm (100 ft. lbs.). After jacking down the vehicle, do a wheel alignment when required.
Related 2006 Dodge Caravan Parts
 2006 Dodge Caravan Wheel Bearing
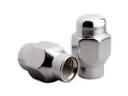 2006 Dodge Caravan Lug Nuts
 2006 Dodge Caravan Leaf Spring Bushing
 2006 Dodge Caravan Axle Beam Mount
 2006 Dodge Caravan Coil Spring Insulator
 2006 Dodge Caravan Coil Springs
 2006 Dodge Caravan Crossmember Bushing
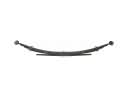 2006 Dodge Caravan Leaf Spring
 2006 Dodge Caravan Steering Knuckle
 2006 Dodge Caravan Sway Bar Bracket
 2006 Dodge Caravan Sway Bar Bushing
 2006 Dodge Caravan Sway Bar Link